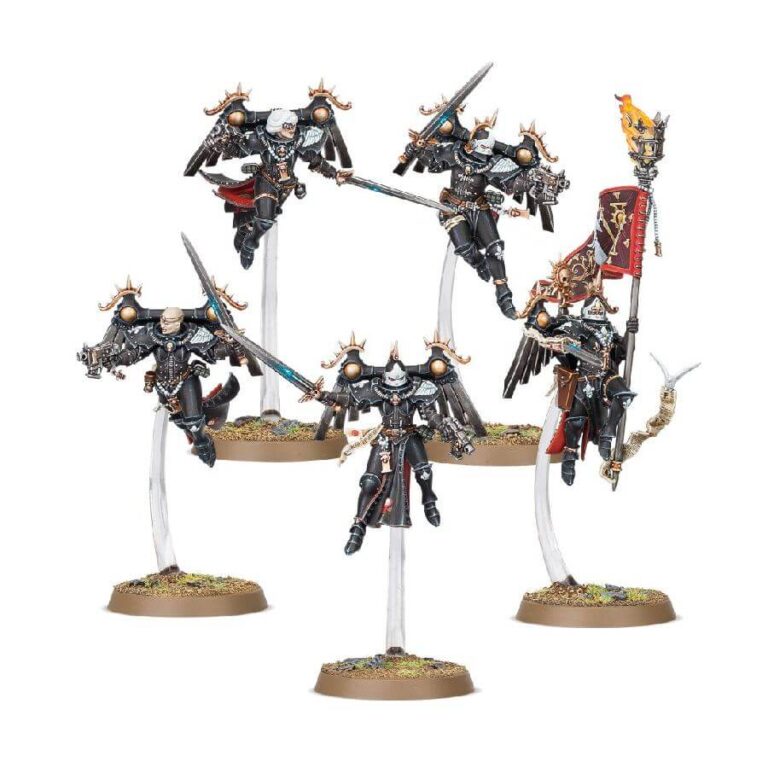
The Zephyrim, divine warriors of unwavering zeal, strike fear into the hearts of their enemies as they soar through the skies with righteous fury. This kit allows you to assemble five Zephyrim, armed with a combination of pistols and power swords. Alternatively, two of them can wield hand flamers, while two others can carry inferno pistols. Among them, a Zephyrim Superior can be built, wielding a plasma pistol or proudly displaying a fluttering Zephyrim pennant. Prepare to witness the destructive prowess of these celestial avengers as they sing hymns of victory and unleash their wrath upon the forces of darkness, leaving naught but vaporized remnants in their wake.
What’s in the Zephyrim Squad box
- x107 plastic components: This kit provides a wide range of plastic components necessary to assemble the Zephyrim miniatures.
- x5 Citadel 32mm Round Bases: Each Zephyrim model can be securely placed on these round bases, providing stability and compatibility with the game’s rules.
- x2 Citadel 45mm Groove Stem Sets: These groove stem sets allow you to attach the Zephyrim models to flying stands, giving them an elevated and dynamic appearance on the tabletop.
- x1 Adepta Sororitas Transfer Sheet: Included in the kit is a transfer sheet featuring various decals and symbols associated with the Adepta Sororitas, allowing you to add intricate details and personalization to your Zephyrim miniatures.
How to paint the Zephyrim Squad set
- Step 1: Basecoat the miniatures
Apply a basecoat of a suitable color, such as a vibrant red like Mephiston Red, using a brush or airbrush. Ensure an even coverage over all the areas. - Step 2: Paint the armor
Using a brush, carefully paint the armor plates with a metallic paint like Leadbelcher. Apply thin layers to achieve a smooth and consistent finish. - Step 3: Highlight the armor
Using a lighter metallic paint, such as Ironbreaker, gently drybrush the raised areas of the armor plates to create highlights and add depth. - Step 4: Paint the details
Using appropriate colors, paint the details on the miniatures. For example, use a bone color like Screaming Skull for the wings, a dark red like Khorne Red for the power swords, and a gold like Retributor Armor for the trim and decorative elements. - Step 5: Add shading and depth
Apply washes or shades, such as Agrax Earthshade or Nuln Oil, to the recessed areas of the miniatures to create shadows and enhance the depth of the colors. Be careful not to let the washes pool in unwanted areas. - Step 6: Highlight the details
Using lighter shades or drybrushing techniques, highlight the raised areas and edges of the details. For example, use a light bone color like Ushabti Bone to highlight the wings, a bright red like Evil Sunz Scarlet for the power sword edges, and a light gold like Liberator Gold for the trim. - Step 7: Paint the faces and hair
Using flesh tones like Cadian Fleshtone, carefully paint the faces of the miniatures, adding depth with washes and highlights with lighter flesh tones. For the hair, choose appropriate colors and add highlights and shading as desired. - Step 8: Paint the bases
Paint the bases in a suitable color or texture, such as a dark brown or a rocky texture paint. Add additional details like grass tufts or small rocks for extra realism. - Step 9: Apply decals and transfers
Use the Adepta Sororitas Transfer Sheet to apply decals and transfers to the miniatures. Wet the decal, slide it off the sheet onto the desired area, and carefully smooth it out. Apply a decal-setting solution for a better adherence and a seamless appearance. - Step 10: Varnish and protect
Once the paint is completely dry, apply a suitable varnish, such as a matte or satin varnish, to protect the miniatures and give them a finished look. Ensure even coverage and follow the instructions on the varnish bottle.

