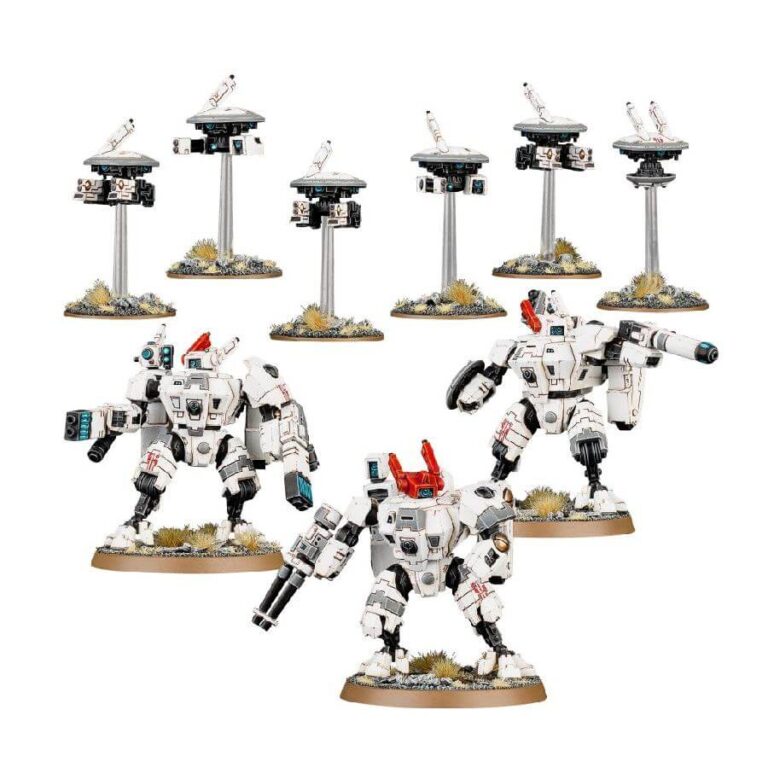
Prepare to be awestruck by the iconic XV8 Crisis Battlesuit, a testament to the T’au Empire’s progress and ingenuity on the battlefield. This formidable war machine strikes fear into its enemies while offering a joyous spectacle for those witnessing its might from afar. Skimming effortlessly on repulsor engines, the Crisis Battlesuit swiftly closes in on its targets, delivering a devastating barrage of weaponry before leaping away in the blink of an eye. Piloting such a marvel is an honor reserved for only the most skilled T’au warriors, who spend years proving their worth on the front lines before earning the right to command these imposing suits.
This multi-part plastic kit opens up a world of customization, allowing you to construct three XV8 Crisis Battlesuits, each accompanied by six drones. The level of posability is unparalleled, thanks to the clever use of ball fittings. One of the miniatures can be assembled as a Shas’vre, complete with a unique head and chest plate design. The box is packed with a plethora of advanced T’au weaponry, including four plasma rifles, three flamers, four fusion blasters, four burst cannons, three missile pods, and three shield generators. The accompanying drones offer various options, allowing you to choose between gun, shield, or marker variants. You can build a total of six drones, with the flexibility to include up to three of any single type. To add even more depth, the kit provides an array of battlesuit electronics systems.
Furthermore, amidst this fantastic variety, one model can be assembled as the cutting-edge Iridium-class XV8-02 Crisis Battlesuit. This experimental variant boasts thicker armor and a strikingly aggressive appearance, setting it apart from its counterparts.
What’s in the XV8 Crisis Battlesuit Team box
- x152 plastic components that make this kit.
- x3 Citadel 50mm Round bases.
- x3 Citadel 32mm small Flying bases.
How to paint the XV8 Crisis Battlesuit Team set
- Step 1: Prime the Models
Begin by priming your XV8 Crisis Battlesuit Team with a white spray-on primer. This will serve as a base for the white armor you’ll be painting. - Step 2: Base Coat the Armor
Paint the armor plates of the Battlesuits with a white color like Celestra Grey or White Scar. Apply thin and even coats to achieve a smooth white surface. - Step 3: Add Weathering Colors
For weathering effects, use colors like Rhinox Hide, Steel Legion Drab, and Skrag Brown to create areas of chipping, rust, and dirt on the white armor. Apply these colors to edges, corners, and areas where wear and tear would naturally occur. - Step 4: Shade and Weather the Armor
To enhance the weathering effects, use a dark brown or black wash, such as Agrax Earthshade or Nuln Oil, on the weathered areas. This will add depth and make the weathering effects look more realistic. - Step 5: Add Red and Black Details
Use red and black paints to add details to the Battlesuits. For example, you can paint some armor plates or markings in red using colors like Khorne Red or Mephiston Red. Additionally, use black paint like Abaddon Black to add small details, such as symbols or lines. - Step 6: Paint Blue Weapon Details
For the weapon details, use a bright blue color like Baharroth Blue or Alaitoc Blue. Apply this color to the weapon barrels, targeting systems, and any other blue details on the Battlesuits. - Step 7: Add Chipping and Weathering Effects to Weapons
Apply chipping and weathering effects to the weapons using the same weathering colors used on the armor. This will make the weapons look battle-worn and rugged. - Step 8: Highlight the White Armor
Using a slightly lighter color than the base white, like Ulthuan Grey or Pallid Wych Flesh, carefully highlight the edges and raised areas of the armor plates to add dimension and make them pop. - Step 9: Final Touches and Basing
Add any additional details you desire, such as lenses, cabling, or other small markings, using appropriate colors. For the base, you can use materials like sand, rocks, or tufts of grass, and paint them to match the theme of your army. - Step 10: Varnish for Protection
To protect your painted models and weathering effects, apply a layer of varnish. Matte varnish will give a more natural finish, while gloss varnish will make certain areas, like the blue weapon details, appear shiny.

