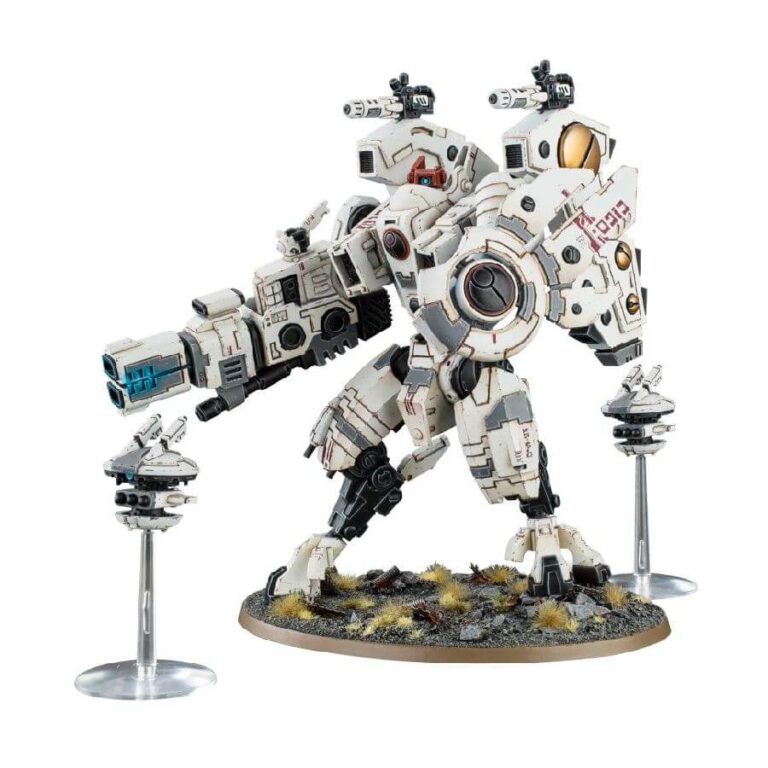
The XV104 Riptide represents a whole new level of evolution for T’au battlesuits. Towering over all other T’au units, including battlesuits and tanks, its sleek and elegant armor panels, adorned with bolts and grills, create an awe-inspiring sight. Despite its enormous size, the Riptide remains highly maneuverable, thanks to its ball and socket joints, allowing you to pose its arms and legs in various dynamic ways. Stand it tall and imposing or even have it kneel down in preparation for action, making it a unique centrepiece for your T’au army.
Not only does the XV104 Riptide boast striking aesthetics, but it also offers a range of formidable weaponry options. Armed with a heavy burst cannon, twin-linked smart missile systems, fusion blaster, and Riptide shield generator, this versatile battlesuit is prepared to dominate the battlefield. As if that weren’t enough, the kit even includes two Shielded Missile Drones to further enhance its firepower.
Whether you’re a seasoned T’au commander or a newcomer to the world of Warhammer 40,000, the XV104 Riptide is sure to captivate your imagination. Its imposing presence and unmatched firepower make it a force to be reckoned with on any tabletop. Unleash the potential of the Earth caste’s pinnacle battlesuit and witness the rise of T’au supremacy in the face of adversity. So, assemble your XV104 Riptide, pose it proudly, and lead your T’au forces to victory! Happy gaming <3
What’s in the XV104 Riptide Battlesuit box
- x108 plastic components with which to make a XV104 Riptide Battlesuit and two Shielded Missile Drones.
- x1 Citadel 120mm Oval Base.
- x2 Citadel Small Flying Bases.
- x1 T’au transfer sheet
How to paint the XV104 Riptide Battlesuit set
- Step 1: Prime the Model
Start by priming your XV104 Riptide Battlesuit with a white spray-on primer. This will provide a solid base for the white color you’ll be using. - Step 2: Base Coat the Armor
Paint the armor of the Battlesuit with a white color like Celestra Grey or White Scar. Apply thin and even coats to achieve a smooth and solid white base. - Step 3: Add Grey and Black Details
Use grey and black paints to add details to the Battlesuit. For example, you can paint some armor plates or markings in grey using colors like Mechanicus Standard Grey. Additionally, use black paint like Abaddon Black to add small details, such as symbols or lines. - Step 4: Shade the Armor
To add depth and dimension to the Battlesuit, apply a shade paint to the recesses and corners. For example, use a dark grey wash like Nuln Oil on the grey and black areas. - Step 5: Layer the Armor
Using a slightly lighter color than the base, like Ulthuan Grey or Pallid Wych Flesh, layer the raised areas of the armor to create highlights and make the details pop. - Step 6: Add Red Details
Use a bright red color like Mephiston Red to paint additional details on the Battlesuit. For instance, you can highlight some edges or add markings in red to create visual interest. - Step 7: Shade the Red Details
Apply a shade paint that complements the red color, such as Carroburg Crimson, to the red details. This will add depth and make the red areas look more vibrant. - Step 8: Final Touches and Weathering
Add any final details you desire, such as lenses, cabling, or other small markings using appropriate colors. Additionally, you can create weathering effects using brown or black paints to make the Battlesuit appear battle-worn and rugged. - Step 9: Varnish for Protection
To protect your painted model and ensure longevity, apply a layer of varnish. Matte varnish will give a natural finish, while gloss varnish will add shine to certain areas, like the red details.

