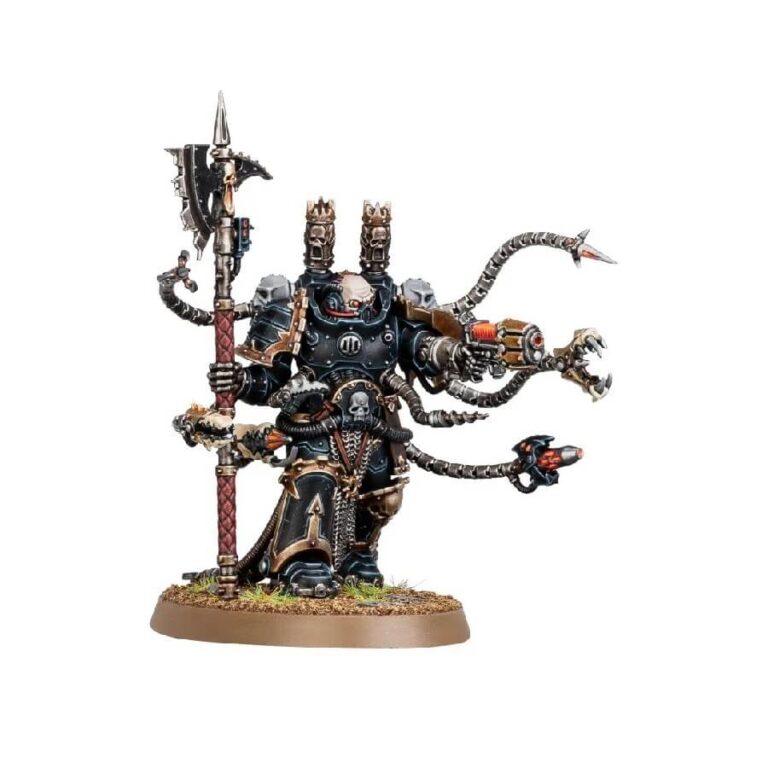
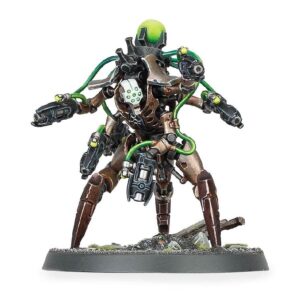
Introducing the Warpsmith, the enigmatic and formidable engineer of the Chaos Space Marines who possesses forbidden knowledge of the inner workings of machines. With their mastery over corrupted code, these Warpsmiths play a crucial role in maintaining their warband’s armored vehicles, infusing their engines with dark power. They go beyond mere utilization of technology; their ultimate aim is complete subjugation.
Crafted with precision, the multipart plastic kit of the Warpsmith captures the essence of this diabolical character. As you assemble this model, you’ll be enthralled by the intricate details and options for customization. The Warpsmith is adorned with a writhing mass of semi-sentient mechatendrils, each of which can be individually posed. These appendages bristle with menacing spikes, drills, and snapping jaws, creating a visually striking and malevolent appearance.
Furthermore, the Warpsmith is armed with a formidable array of ranged weapons, including a melta gun and a flamer, alongside a plasma pistol wielded by the Warpsmith itself. The model features additional industrial details such as smokestacks and bionics, immersing you in the grim aesthetics of the Warhammer 40,000 universe. The kit also provides a choice of three distinct corrupted cog-teeth-rimmed shoulder pads – one blank, one with iron banding, and one adorned with a skull-and-cog icon – allowing you to further personalize your Warpsmith.
What’s in the Warpsmith box
- x25 plastic components that make 1 Warpsmith
- x1 Citadel 60mm x 35.5mm Oval Base
How to paint the Warpsmith set
- Step 1: Gather your materials
Before you begin, make sure you have all the necessary materials at hand. You’ll need brushes of different sizes, a palette or a wet palette, water for rinsing brushes, a primer suitable for plastic models, and a selection of acrylic paints. For this guide, we’ll use paints such as Abaddon Black, Leadbelcher, Retributor Armor, and Mephiston Red. - Step 2: Prime your model
Start by applying a thin, even coat of primer(sprays work the best for this) to your Warpsmith model. This helps the paint adhere better to the miniature and provides a smooth surface for painting. Allow the primer to fully dry before moving on to the next step. - Step 3: Basecoat the model
Begin by applying the base color to each part of the model. For example, you can use Abaddon Black for the armor, Leadbelcher for metallic areas, and Retributor Armor for golden details. Apply the paint evenly, covering the entire area, and let it dry before proceeding. - Step 4: Apply washes for shading
Using a wash, such as Nuln Oil or Agrax Earthshade, apply it to the recesses and crevices of the model. This will create shadows and add depth to your miniature. For instance, you can use Nuln Oil on the black armor and Agrax Earthshade on the golden details. Allow the wash to dry completely. - Step 5: Highlight the model
Using a lighter shade of the base color, apply highlights to the raised areas of the model to make them pop. For example, you can use a lighter gray or silver(such as Administratum Grey or Stormhost Silver) to highlight the edges of the metallic areas, or a lighter shade of gold to highlight the golden details. Apply the highlights sparingly, focusing on the most prominent areas. - Step 6: Add details and accents
Now it’s time to add additional details and accents to enhance the overall look of your Warpsmith. You can use different colors for smaller details like cables, lenses, or symbols. For instance, you can use Mephiston Red for the glowing eyes or other small details on the model. - Step 7: Seal the model
To protect your hard work and make the paintjob more durable, apply a layer of varnish or a protective spray over the entire model. This will help prevent the paint from chipping or rubbing off during gameplay.

