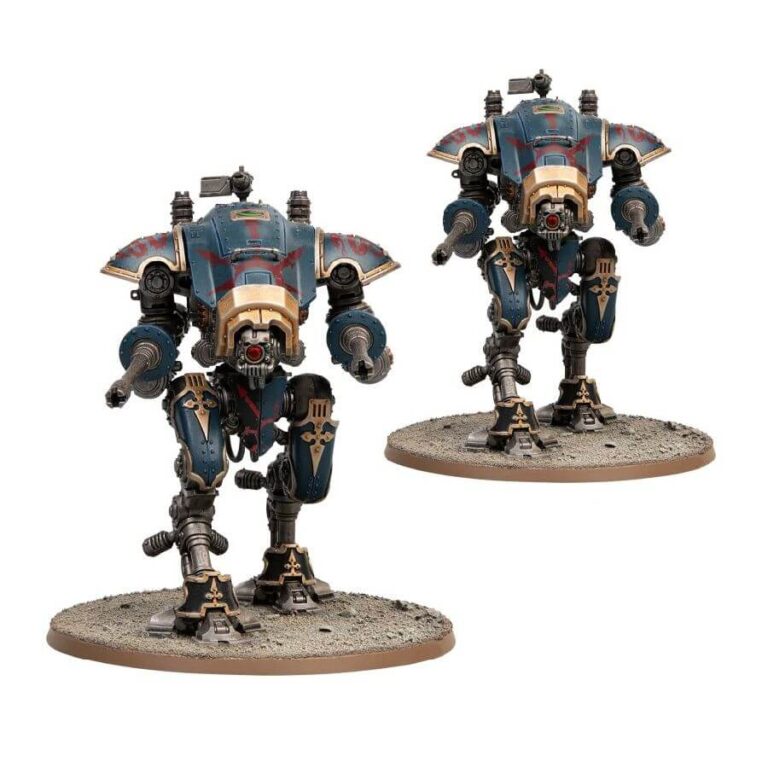
The War Dog-class Knights, nimble and responsive combat walkers, are the perfect hunting packs for the Dread Household, guarding flanks and devastating enemy scouts to protect their colossal masters from being surrounded. In this kit, you can build two War Dogs – either the long-ranged War Dog Executioners or the War Dog Huntsmen. The War Dog Executioners, a formidable Lords of War choice, excel at providing vital fire support to your Chaos Knights army or can join other Imperium forces as a wandering Dreadblade pack. With their long-barrelled autocannons and a choice of a carapace-mounted diabolus heavy stubber or daemonbreath meltagun, these War Dogs can be further customized with various poses, armor plating, and six unique faceplates. Their large carapaces offer a perfect canvas for your painting project. Prepare for ruthless battles and unleash the wrath of the Ruinous Powers with these fierce War Dogs!
What’s in the War Dog Executioners box
- x148 plastic components that make 2 War Dog Executioners. Additionally, this versatile kit can also be assembled as a pair of Armiger Warglaives or Armiger Helverins, expanding the options for your Imperial Knights armies.
- x2 Citadel 100mm Round Bases. Also included is an Armiger transfer sheet featuring heraldry for Imperial Knights, ripe for corruption.
How to paint the War Dog Executioners set
- Step 1: Prime the Model
Apply a thin, even coat of Chaos Black primer to the War Dog Executioners. This provides a solid base for the paint to adhere to. - Step 2: Basecoat the Armor
Using a brush, apply a base coat of dark blue paint, such as Macragge Blue, to the armor plates. Ensure complete coverage and let it dry. - Step 3: Highlight the Armor
With a lighter blue, like Lothern Blue, carefully apply highlights to the edges and raised areas of the armor to add depth and definition. - Step 4: Paint the Details
Select appropriate colors to paint the various details on the model. For example, you can use Mephiston Red for the cables, Abaddon Black for the weapons, Yriel Yellow for the eye lenses and Leadbelcher for metallic parts, like the legs. Take your time and paint each detail with precision. - Step 5: Apply Wash
Using a wash, like Nuln Oil, apply it over the entire model to enhance the shadows and add depth to the recessed areas. Make sure the wash settles in the crevices and details. - Step 6: Drybrush
Lightly drybrush a lighter metallic paint, such as Dawnstone, over the raised areas of the armor to further highlight the edges and add a worn metallic texture. - Step 7: Paint the Base
Paint the base with appropriate colors to match your desired theme. You can use a combination of brown, grey, and green for a battlefield or urban setting. Add texture paint, like Astrogranite Debris, and drybrush it with a lighter shade for added realism. - Step 8: Finishing Touches
Add any additional details, such as weathering effects, decals, or transfers, to further personalize your War Dog Executioners. Use a fine brush and steady hand for precise application. Here are some ideas:
Apply a drybrush of Runefang Steel to the edges of the weapons and armor plates to create a worn metal look.
You can use Blood for the Blood God to add realistic blood splatters and gore to the weapons and claws of the War Dogs.
With Typhus Corrosion you can add rust effects. Pair this with the blood splatters for an amazing weathered look! - Step 9: Varnish
Once the paint is completely dry, apply a layer of Stormshield to protect the model and give it a consistent finish.

