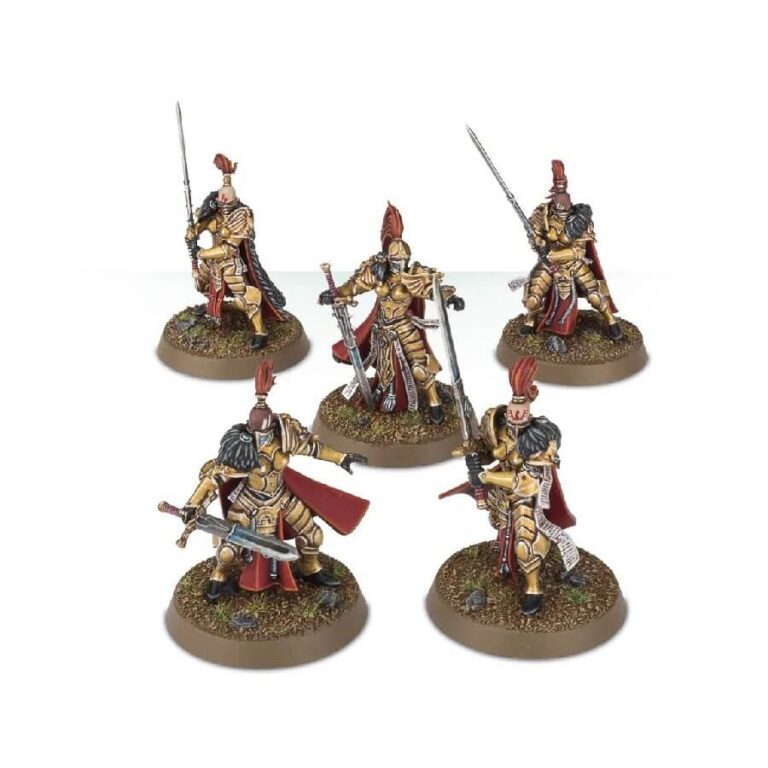
The Vigilator Squads of the Silent Sisterhood are renowned for their exceptional skill and mastery of the two-handed blades unique to their order. These highly-trained warriors have inherited an ancient sword-form, passed down through generations since the earliest Sisters pledged their loyalty to the Emperor. With their executioner greatblades, cherished heirloom weapons meticulously maintained and enhanced with powerful disruptive power fields crafted by the skilled Tech-Priests of Mars, the Vigilators effortlessly slice through even the toughest armor.
This multipart plastic kit offers everything needed to assemble a formidable 5-model Vigilator Squad, a specialized unit proficient in close-quarters combat wielding executioner greatblades. Among the models, one can be built as a Sister Superior, distinguished by a specially-posed greatblade, loincloth, shoulder pad, seal, and a choice of 2 heads, showcasing her leadership within the squad.
Furthermore, this versatile kit allows optional assembly as Prosecutors, offering increased flexibility and equipping them with bolters for engagements at longer ranges. Alternatively, you can assemble them as Witchseekers, arming them with flamers capable of unleashing devastating multi-target assaults. The kit includes an impressive assortment of 6 executioner greatswords, 5 Umbra-pattern boltguns, and 5 flamers, providing various customization options for your Vigilator Squad.
What’s in the Vigilator Squad box
- x67 components: all the necessary parts to assemble your Vigilator Squad.
- x5 Citadel 32mm Round bases: You will receive 5 round bases of the Citadel 32mm size, which serve as the sturdy foundations for your Vigilator models.
- x1 Burning of Prospero transfer sheet: As an added bonus, the kit includes a transfer sheet featuring designs from the Burning of Prospero, allowing you to customize your models with additional details and markings. These transfers include a variety of symbols, insignias, and other decorative elements that add character to your Vigilator Squad.
How to paint the Vigilator Squad set
- Step 1: Prime the Models
Apply a base coat of primer to all the models in the Vigilator Squad. This helps the paint adhere better to the miniature and provides a smooth surface for painting. Use a grey or black primer for a traditional look. - Step 2: Base Colors
Start by painting the main colors of the models. For the armor, use a metallic silver paint, such as Leadbelcher, to give it a reflective appearance. Paint the loincloth and other fabric areas with a color of your choice, like a dark red or blue. - Step 3: Wash
Apply a wash, such as Nuln Oil, to the entire model. This will flow into the recesses and crevices, adding depth and shading to the miniature. Allow the wash to dry completely before proceeding. - Step 4: Highlights
Using a lighter shade of the base color, carefully apply highlights to the raised areas of the armor and other details. This will create contrast and make the details stand out. For example, use Runefang Steel to highlight the silver armor. - Step 5: Details
Paint the smaller details of the models, such as the seals, shoulder pads, and any decorative elements. Use appropriate colors, like Liberator Gold for the seals or a contrasting color for the shoulder pads. - Step 6: Blades
The Vigilators wield impressive executioner greatblades. Paint the blades with a Stormhost Silver and then add a wash, like Agrax Earthshade, to give them a darker, weathered look. Highlight the edges of the blades with a lighter silver or steel color for added definition. - Step 7: Bases
Finish off the models by painting the bases. Use earth tones for a realistic look, or experiment with different colors to match your preferred theme. Add texture to the bases using materials like sand or small rocks for added realism. - Step 8: Varnish
To protect your painted models and give them a professional finish, apply a coat of varnish. Use a matte varnish to reduce shine and glare, or a gloss varnish for a shiny, polished look.

