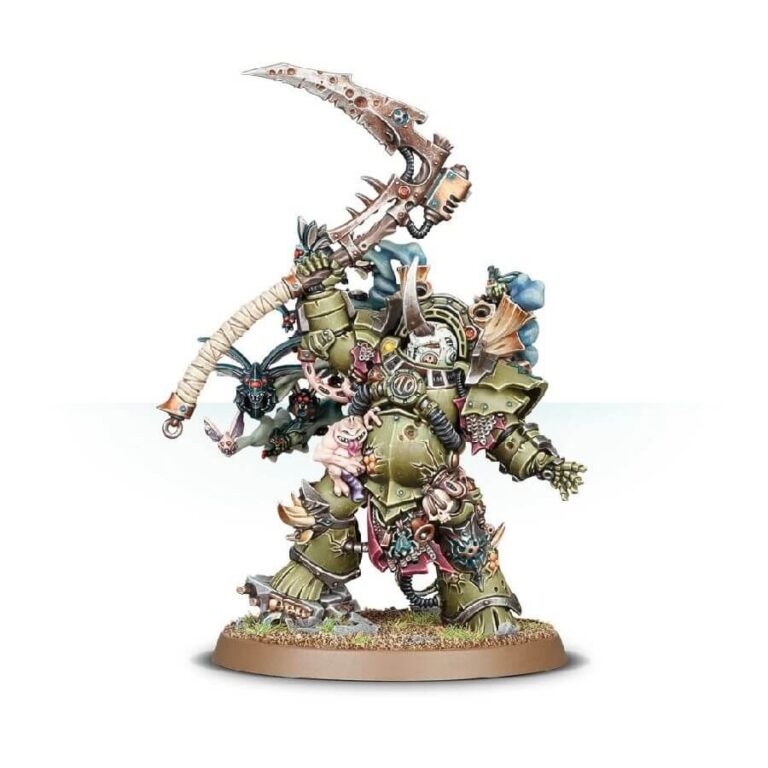
Typhus, the dreaded commander of Mortarion‘s First Plague Company and leader of the Destroyer Hive, instills fear in the hearts of all who face him. From his ancient vessel, the Terminus Est, Typhus spreads contagion and despair throughout the galaxy. Undeniably blessed by Nurgle, he has spent the last ten thousand years ravaging Imperial worlds with his fleet, leaving in his wake a devastating plague that turns victims into plague zombies, perpetuating the cycle of death and undeath.
This impressive multi-part plastic kit enables you to assemble Typhus, the Herald of Nurgle and Host of the Destroyer Hive. Towering over his enemies, Typhus is adorned with rot-infested Cataphractii armor, adorned with skulls, Nurgle icons, and spikes. Even a mischievous Nurgling finds a place clinging to his waist, adding an extra touch of macabre detail. Typhus brandishes a master-crafted manreaper, a colossal weapon that bears the unmistakable signs of corruption and battle scars. On his back, a repulsive swarm of flies and insects burst forth from a noxious chimney, their size rivaling that of a Nurgling. Completing the scene, Typhus confidently rests his foot on toppled Imperial masonry, a symbol of his defiance against the crumbling forces of order.
With Typhus leading your forces, you’ll immerse yourself in the dark and chaotic world of Nurgle’s Death Guard. Whether you’re a skilled painter seeking intricate details or a tactical mastermind plotting battles on the tabletop, Typhus offers boundless opportunities for creativity and strategic dominance. Prepare to unleash the ultimate embodiment of pestilence and decay upon your enemies!
What’s in the Typhus, Herald of the Plague God box
- x15 plastic components that make 1 Typhus, Lord of Mortarion’s First Plague Company and Host of the Destroyer Hive, the most feared of all Plague Fleet commanders.
- x1 Citadel 50mm Round base
How to paint the Typhus, Herald of the Plague God set
- Step 1: Prime the model
Before starting to paint, apply a thin layer of primer to the Typhus miniature. This will help the paint adhere better to the model and provide a smooth surface to work on. Death Guard Green Spray is a good option obviously, but you can’t go wrong with Chaos Black either. - Step 2: Basecoat the armor
Using a dark green paint, such as Caliban Green (or Death Guard Green if you didn’t used it in the previous step) apply an even basecoat to Typhus armor. Ensure that the paint covers all the surfaces and reaches into the recesses. - Step 3: Paint the metallic parts
Using a metallic paint like Leadbelcher, carefully paint the various metallic areas on Typhus, such as the chains, weapons, and spikes. Take your time to get clean, even coverage. - Step 4: Detail the rotten flesh
Using Nurgles Rot paint the areas of Typhus exposed flesh. Apply thin layers to build up the color gradually, adding more depth to the recesses and highlights to the raised areas. - Step 5: Add washes for depth
Apply a wash, like Agrax Earthshade, over the metallic parts to add depth and make the details pop. Apply another wash, such as Biel-Tan Green, over the rotten flesh to bring out the textures and add a grimy appearance. - Step 6: Highlight the armor
Using a lighter green, like Warpstone Glow, carefully apply highlights to the edges and raised areas of Typhus armor. This will create depth and enhance the details. - Step 7: Paint the details
Use various colors to paint the details on Typhus, such as the skulls, Nurgle icons, and spikes. Experiment with different shades to add variety and make them stand out. A good example would be his helmet. We suggest you paint it with a different color, such as White Scar, then paint the eyes a vibrant red, like Mephiston Red or Flesh Tearers Red. This is going to give Typhus a truly menacing look. - Step 8: Finish the base
Paint the base of Typhus to complement the overall theme. You can use earthy tones, like Rhinox Hide, and add texture using basing materials like rocks or tufts of grass. - Step 9: Varnish the model
To protect your hard work, apply a coat of varnish over the painted model. This will help preserve the paint job and provide a protective layer. - Step 10: Optional: Weathering effects
If you want to add weathering effects, you can use techniques like dry brushing or stippling to create a worn and weathered appearance on Typhus armor and weapons. Typhus Corrosion is going to make Typhus really look like he “has spent the last ten thousand years ravaging Imperial worlds”. 🙂

