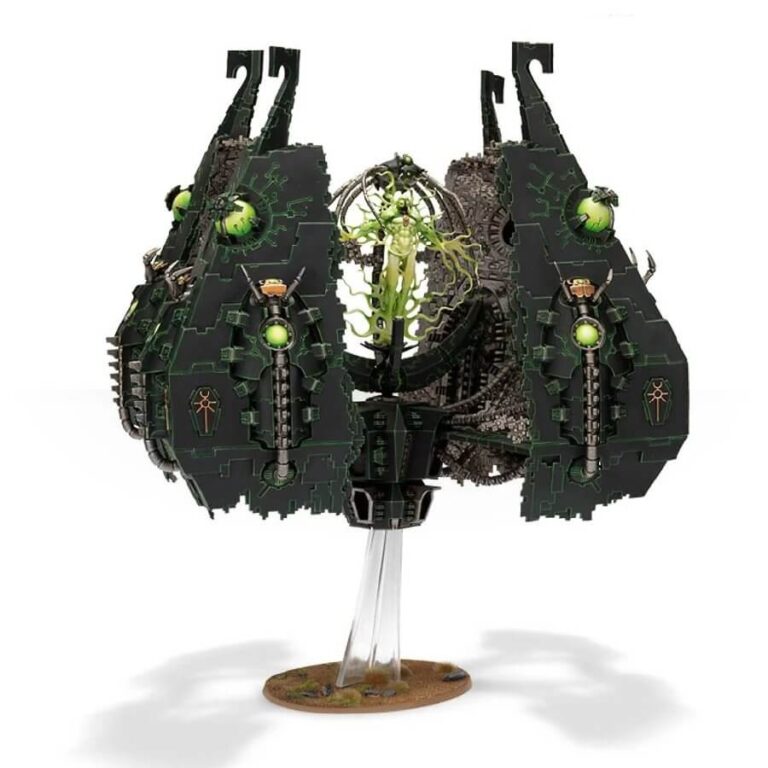
Rising majestically to an astonishing height of over 9 inches and spanning an impressive 10 inches in width, the Tesseract Vault exudes an imposing presence that dominates the entire tabletop. And this is just the beginning – imagine it mounted on its flight stand, elevating its grandeur to even greater heights!
The versatility of this kit is equally captivating. There are two equally captivating paths to explore when assembling it: the formidable Tesseract Vault or the enigmatic Obelisk, each with its own distinct allure and tactical potential.
Opt for the Tesseract Vault configuration, and you’ll experience the thrill of integrating the Transcendent C’Tan miniature as an integral part of the construction, weaving the essence of this powerful being seamlessly into your creation.
Whether you choose to wield the cataclysmic might of the Tesseract Vault or the mystique of the Obelisk, the possibilities are as boundless as the cosmos itself. Prepare to reshape the battlefield and command the very forces of the universe with this extraordinary addition to the Necron arsenal. Seize the power, unveil the secrets, and ascend to unparalleled dominion over the tabletop. The Necron Tesseract Vault awaits your command!
What’s in the Tesseract Vault box
- x57 plastic components that make one Tesseract Vault (or Obelisk) and 40 Scarabs.
- x1 Necron Transfer Sheet.
- x1 Citadel 120 x 92 mm flying base.
- x1 Citadel 60 mm flying Base.
How to paint the Tesseract Vault set
- Step 1: Apply the Basecoat
Begin by coating the entire Tesseract Vault with Abaddon Black. This creates a solid foundation for your painting. - Step 2: Detailing the Essence
Use Tesseract Glow to paint intricate details like the imprisoned C’tan, Necron Glyphs, or energy sources. Apply this paint carefully to bring out the otherworldly essence within these elements. Don’t worry if it seems a bit bright at this stage – we’ll refine it in the following steps. - Step 3: Layering the Vault
With a small brush, gently layer Warpstone Glow over the base coat of Abaddon Black. Concentrate on the raised areas and edges of the Tesseract Vault’s surfaces. This subtle transition adds depth, allowing the vibrant energy of Warpstone Glow to emerge softly from the crevices. - Step 4: Highlighting for Brilliance
Apply a delicate layer of Moot Green to the very edges of the previously painted details. This technique, called highlighting, establishes a striking contrast between the darker base and the luminous energy within the C’tan, Glyphs, and energy sources. Remember, a light touch ensures you achieve this effect beautifully. - Step 5: Shading for Depth
Enhance the visual depth of your Tesseract Vault by applying a wash like Nuln Oil to the recessed areas. This shading technique brings out the contours and intricacies of the structure, making it look more realistic and three-dimensional. - Step 6: Perfecting the Essence
After the wash dries, use Gauss Blaster Green to delicately touch up the details you highlighted earlier. This step refines the green essence, striking a balance between its vibrancy and the overall appearance of the Tesseract Vault. - Step 7: Elevate the Presentation (Basing)
Enhance the overall presentation of your Tesseract Vault by adding a simple base. Paint the base with colors that complement your model. You can use textures, like Astrogranite, to add depth and realism. Additionally, consider adding small details like tufts of grass or debris to create a dynamic scene that connects your Tesseract Vault to the battlefield. - Step 8: Seal Your Achievement
Protect your hard work by applying a coat of Citadel Munitorum Varnish Spray. Hold the spray can about 12 inches away from the model and apply a thin, even layer to prevent any unwanted glossiness or frosting. This step not only preserves your paintwork but also gives your Tesseract Vault a professional finish.

