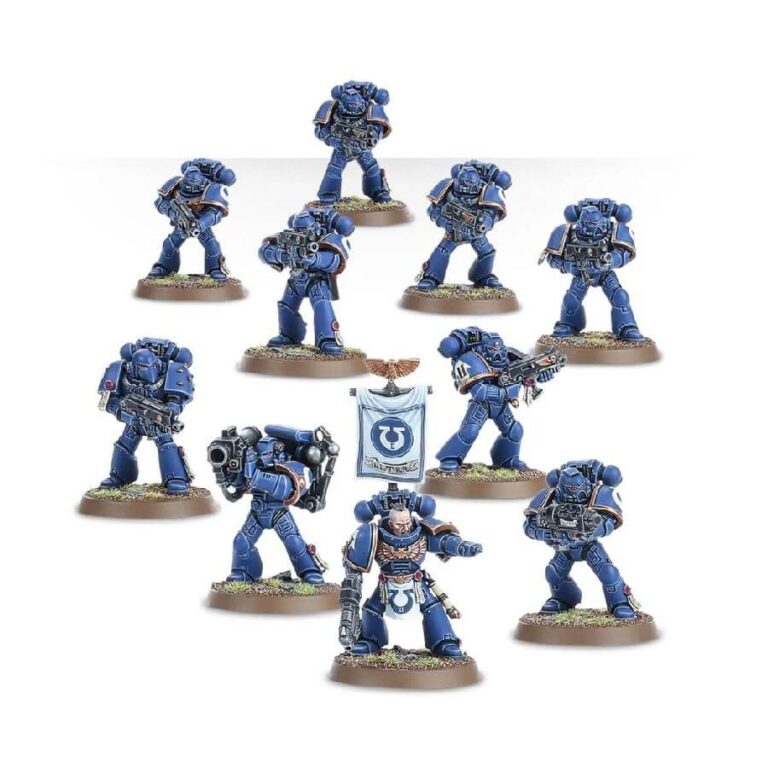
The Tactical Squad is the backbone of any Space Marine army, capable of holding ground, providing fire support, and charging into bloody melees as dictated by the ever-changing theatre of war. This highly customizable set comes with everything you need to create a 10-man Tactical Squad, including a Sergeant and a Special Weapon. With a plethora of options and extra details, this set offers a chance for players to create a highly personalized squad that suits their playstyle.
The set includes 11 torso fronts (with 10 unique designs), 10 different leg poses, 16 different heads (13 with helmets and 3 bare-headed), 22 shoulder pads, 10 backpacks (with 9 individual designs), and 10 sets of left and right arms.
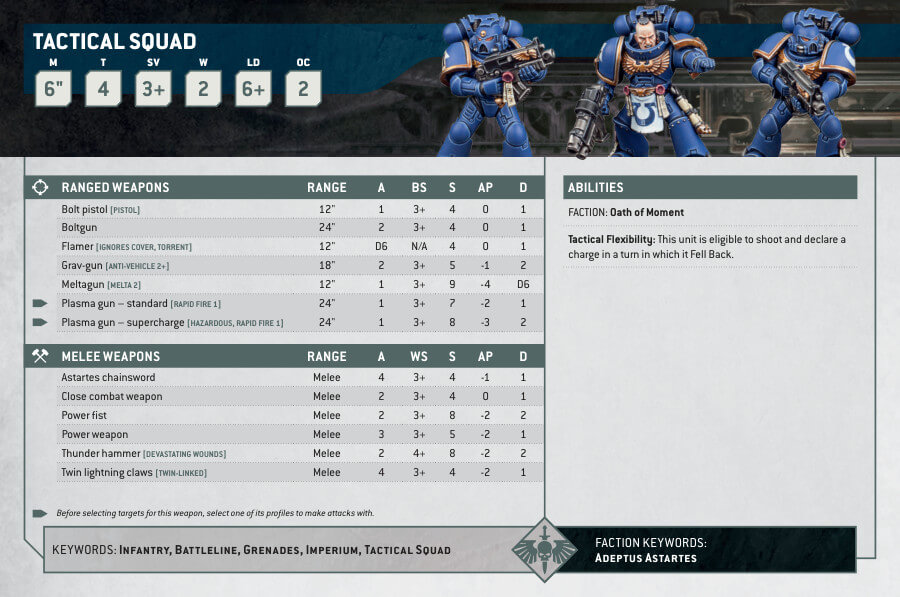
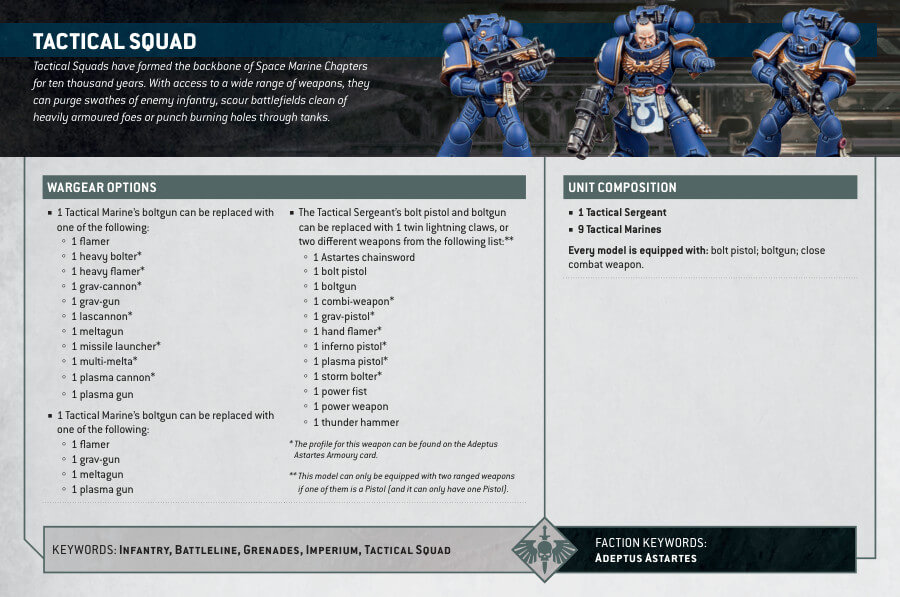
In terms of weapons, players have access to 10 unique boltguns, a gravgun, a meltagun, a plasma gun, a flamer, a missile launcher (including backpack and spare missiles), and a selection of combat knives. The squad Sergeant can be armed with a power fist, power sword, or chainsword, and a plasma pistol, grav pistol, or bolt pistol. Players can also make any one of the following combi-bolters – combi-grav, combi-melta, combi-plasma, or combi-flamer. The squad can also be armed with a melta bomb and enough Frag and Krak grenades to arm each Space Marine.
But that’s not all! The set also includes extra equipment such as a back banner for the squad Sergeant (with a choice of three different banner tops), a holstered bolt pistol, targeting scopes for the boltguns, parchments and purity seals, ammo pouches, an auspex, and three spare hands (one pointing, one holding a grenade, and one holding a boltgun cartridge).
Tactical Squad Datasheets
What’s in the Tactical Squad box
- x179 plastic components used to create a highly personalized 10 man Tactical Squad.
- x10 Citadel 32mm Round Bases.
- x2 Ultramarines Infantry Transfer Sheets with which to add Chapter iconography and squad markings.
How to paint the Tactical Squad Set
- Step 1: Priming the Miniatures
Begin by preparing your Tactical Squad for painting. Use an appropriate primer, such as Chaos Black, to create an ideal surface for the paint to adhere to. Ensure that the primer is applied evenly and covers all the miniatures. Let it dry thoroughly before moving on to the next step. - Step 2: Base Coating – Blue Armor
For the primary armor color, select Macragge Blue. Apply this base coat carefully to cover all the armor plates on your Tactical Squad. It’s essential to achieve a smooth and consistent coverage for a professional finish. - Step 3: Shading – Adding Depth
Enhance the depth of the blue armor by applying Drakenhof Nightshade as a shade. Focus on the recesses and crevices of the armor, allowing the shade to settle and create shadows. This step adds dimension and realism to your miniatures. - Step 4: Layering – Highlighting the Armor
To make the blue armor pop, use Altdorf Guard Blue for layering. Concentrate on raised areas and edges of the armor plates to create highlights. Layering brings out the details and makes your Tactical Squad stand out. - Step 5: Base Coating – Details
For the gold trims, utilize Retributor Armour as the base coat. Carefully paint the trim areas with precision and neatness. This step adds regal touches to the miniatures.
Paint the black details, including weapons and other elements, with Abaddon Black. Ensure an even application for crisp and defined details.
For the red eye lenses, use Mephiston Red. Apply this color to the lenses to achieve a vibrant and striking red appearance.
If any of your Tactical Squad members have exposed heads, use Kislev Flesh for the base coat. Paint their faces with care, paying attention to facial features to bring them to life. - Step 6: Shading – Adding Realism
Enhance depth and realism across all areas by applying the appropriate shade. Use shades that match the color you’re working on. For the blue armor, use Drakenhof Nightshade. For the black weapons and details, use Nuln Oil. When it comes to the red eye lenses, employ Carroburg Crimson. If any Tactical Squad members have exposed heads painted with a flesh tone, shade them with Reikland Fleshshade. Finally, for the gold trims, use Reikland Fleshshade or Agrax Earthshade, depending on the desired tone. - Step 7: Layering – Highlighting All Areas
To bring out dimension and emphasize the details of your Tactical Squad, you’ll need to highlight all areas by layering with slightly lighter shades of the base colors. For the blue armor, use a lighter blue shade like Altdorf Guard Blue for layering. When working on the black weapons and details, apply a lighter gray such as Dawnstone or Administratum Grey for a subtle highlight. For the gold trims, choose a brighter gold like Liberator Gold to make them stand out. This technique adds depth and character to your miniatures, enhancing their overall appearance. - Step 8: Painting the Base
Consider using texture paints like Astrogranite Debris or Armageddon Dunes for the bases. Apply the chosen texture paint evenly across the bases, and you can add small details like grass or rocks if desired. This step brings the miniatures to life and adds realism. - Step 9: Protecting Your Work
To safeguard your beautifully painted Tactical Squad and ensure long-lasting protection, use Munitorum Varnish. Shake the can thoroughly before applying. Hold it approximately 12 inches away from the models and give them a smooth, even coat of varnish. Allow the varnish to dry thoroughly before handling your miniatures. This varnish preserves your hard work and prepares your Tactical Squad for the tabletop.

