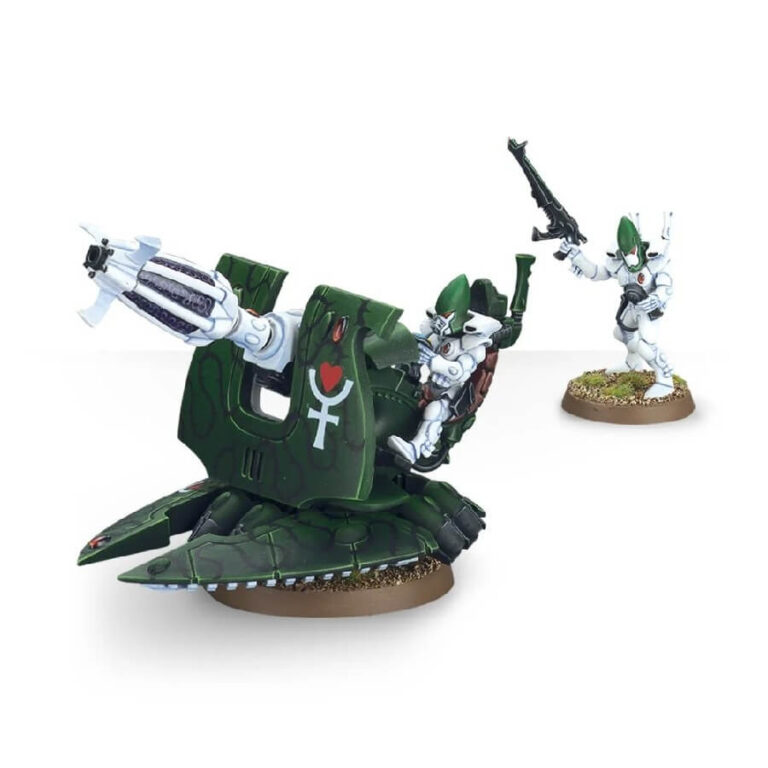
Step onto the battlefield with the Aeldari, where powerful support weapons reign supreme, providing long-range firepower to their warriors. These versatile Aeldari Support Weapons can be equipped with three distinctive and deadly guns, each tailored to fulfill different roles, be it anti-personnel or anti-tank duties, all in response to the ever-changing needs of the Craftworld.
Embrace the art of long-range warfare with the Aeldari Support Weapons, and wield their deadly arsenal to turn the tide of battles in your favor. Whether you’re engaging enemy infantry with devastating anti-personnel capabilities or taking down formidable tanks with their potent anti-tank firepower, these weapons serve as crucial assets in the Aeldari’s strategic arsenal.
What’s in the Support Weapon box
- x41 plastic components that make two Aeldari crew, and a D-cannon, vibro cannon or shadow weaver.
- x2 Citadel 25mm round Bases.
- x1 Citadel 40mm Round Base.
How to paint the Support Weapon set
- Step 1: Prime Your Support Weapon Set
Begin by priming your Support Weapon set with a neutral-colored primer. This will create a smooth surface for the paint to adhere to and ensure better paint coverage. - Step 2: Basecoat the Support Weapon
Using a medium-sized brush, apply a base coat of your chosen main color to the entire Support Weapon set. For example, if you want a blue Support Weapon, use Kantor Blue or a similar shade. - Step 3: Add Depth with Shades
To add depth and dimension to the Support Weapon, apply a wash of Nuln Oil or a similar dark wash. Use a small brush and focus on recessed areas, where shadows naturally occur. - Step 4: Highlight the Support Weapon
Using a fine-tip brush, add highlights to the raised areas of the Support Weapon with a lighter shade of your main color. For example, with a blue base, use Altdorf Guard Blue or a similar brighter shade. - Step 5: Metallic Accents
Base coat any metallic parts of the Support Weapon, such as weapons or machinery, with Leadbelcher or a similar silver metallic paint. - Step 6: Shine with Silver
Highlight the metallic areas using a lighter metallic color, like Runefang Steel. Apply this sparingly to the edges and raised areas for a realistic metallic effect. - Step 7: Paint Details
Using a fine-tip brush, carefully paint any intricate details on the Support Weapon, such as symbols, buttons, or lenses. For example, for lenses, you can use Warpstone Glow for a glowing green effect. - Step 8: Weathering Effects (Optional)
For a weathered look, you can add weathering effects like Typhus Corrosion for rust or Ryza Rust for chipped paint. Apply these effects sparingly to create a battle-worn appearance. - Step 9: Final Touches
Inspect your Support Weapon set for any imperfections or areas that need touch-ups. Make sure the colors are neat and well-defined for a polished finish. - Step 10: Varnish for Protection
To protect your hard work and ensure your Support Weapon set stays pristine, apply a layer of varnish. For a matte finish, you can use Munitorum Varnish, which will preserve the paint job while reducing shine. If you prefer a glossy look that enhances colors and adds depth, consider using Ardcoat for a lustrous finish. Choose the varnish that best complements your desired aesthetic and showcases your Support Weapon set in all its glory.

