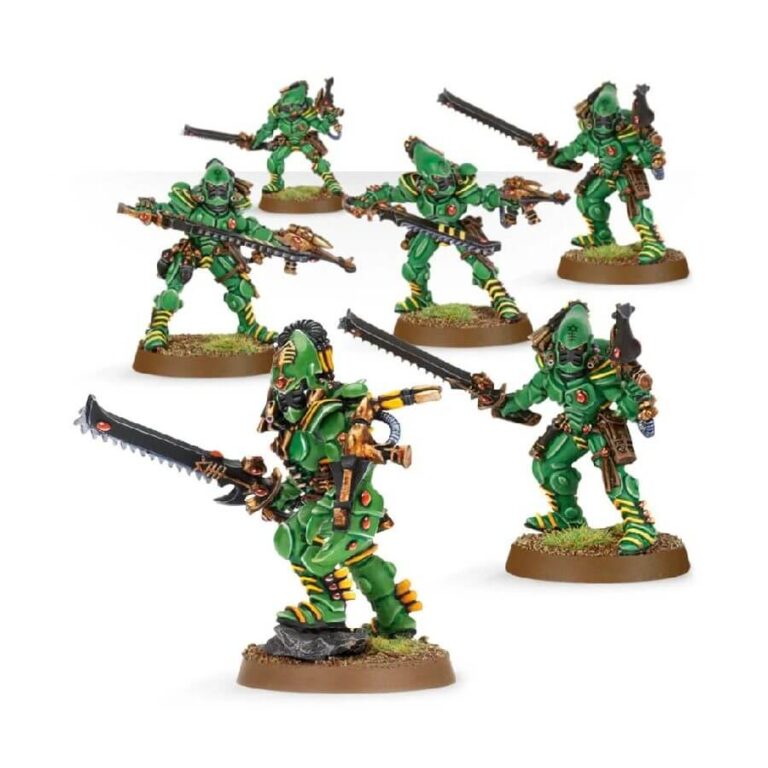
The Striking Scorpions, an esteemed Warrior Aspect of the Aeldari, embody the lethal characteristics of their namesake, making them unrivaled in close-quarters combat. These warriors possess an unwavering thirst for bloodshed and excel in the art of the hunt. Armed with shuriken pistols and scorpion chainswords, they wield devastating blades with diamond-toothed edges, capable of rending flesh with brutal efficiency.
What sets the Striking Scorpions apart is their signature attack, executed through weapon pods known as mandiblasters positioned on either side of their helmets. These unique mandiblasters, triggered by a psychic impulse, unleash a barrage of needle-thin shards that serve as conduits for highly charged lasers. When a volley of mandiblasters is unleashed, it creates a blistering storm of attacks that can eviscerate the very core of an enemy force.
What’s in the Striking Scorpions box
- x14 resin components that make 6 Striking Scorpions
- x6 Citadel 25mm Round Bases
How to paint the Striking Scorpions set
- Step 1: Get Your Miniature Ready
Start by making sure your Striking Scorpions model is clean and free from any dust or debris. A good tip is to gently wash the model with warm soapy water and let it dry before you begin painting. - Step 2: Give It a Base Coat
Grab your brush and apply a smooth, even coat of green paint to the armor parts of the model. Imagine giving your Striking Scorpions a strong, vibrant color that matches their fierce reputation. You can use a paint like Caliban Green to achieve this effect. - Step 3: Bring Out the Yellow Accents
Now, let’s add some boldness to the model by painting the yellow accents. Take your time and carefully apply the yellow paint to the trim or stripes on the armor. Imagine these accents as flashes of deadly energy radiating from your Striking Scorpions. Averland Sunset is a great choice for this vibrant yellow color. - Step 4: Sparkling Red Gems
Using a fine brush, paint the gems on the model with a vibrant red color. Imagine these gems as sources of power, glowing with intensity. Wazdakka Red will help you achieve this striking look. Make those gems shine! - Step 5: Masked in Mystery
Now it’s time to paint the masks and chainswords of your Striking Scorpions. Picture their masks as sleek and mysterious, concealing their identities. With a steady hand, cover the masks and chainswords with a rich black color. Abaddon Black is perfect for this task. - Step 6: Enhance the Armor
Take a smaller brush and apply a lighter shade of green to the raised areas of the armor. This step adds depth and highlights the intricate details of your Striking Scorpions. Imagine the play of light and shadow as you carefully paint on the Warpstone Glow. - Step 7: Highlighting the Accents
With a fine brush, add a touch of brilliance to the edges and raised parts of the yellow accents. This brings out the fine details and makes your Striking Scorpions pop! Imagine those yellow accents catching the light as you delicately apply Yriel Yellow. - Step 8: Bronze Elements of Distinction
Now, let’s bring some character to your model by painting the bronze elements. Picture these elements as unique and eye-catching features. With your small brush, carefully paint the buckles or decorative elements with a metallic bronze color like Hashut Copper. - Step 9: Deepening Shadows
Using a medium-sized brush, apply a wash of dark brown or black to the recessed areas of the model. This adds depth and shading to the details, giving your Striking Scorpions a more realistic appearance. Imagine the shadows settling into the crevices with a wash of Agrax Earthshade. - Step 10: Finishing Touches
With a fine brush, add those final touches that bring your Striking Scorpions to life. Paint their eyes with a color that captures their intensity and focus. Add any small insignias or details that personalize your models. Take your time and enjoy the process of adding those little finishing touches.

