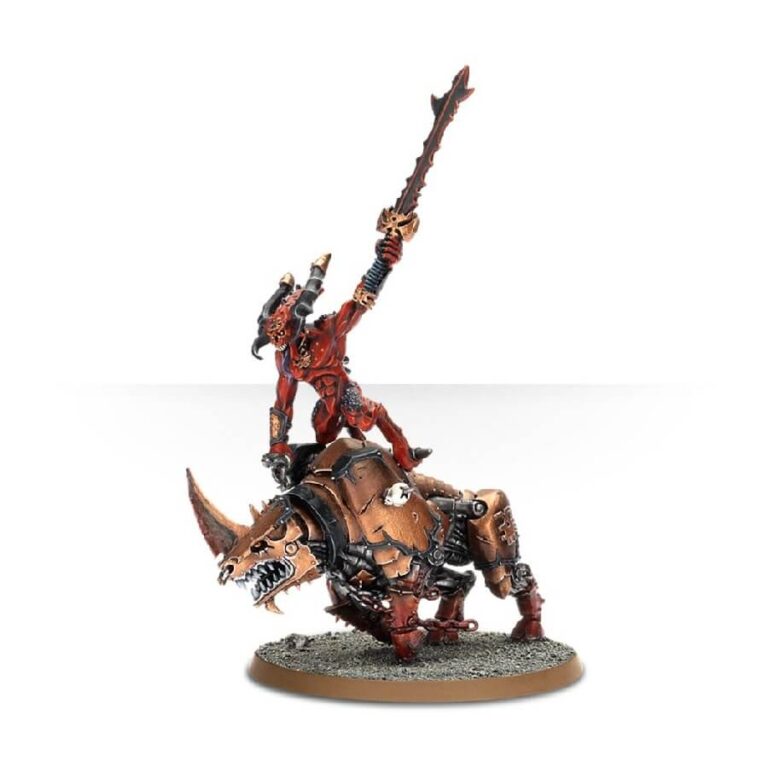
Mounted upon the Juggernaut, the Skullmaster, Herald of Khorne, commands both the ferocious steed and his own indomitable will. This formidable partnership surpasses the potency of either entity alone, instilling terror in all who dare to face them. The Juggernaut, a hulking manifestation of Khorne’s rage, delivers relentless attacks with its gnashing teeth and piercing horns. Any foe who manages to withstand its frenzied onslaught is met with the crushing weight of its brass-clad body or the lethal strikes of the Skullmaster’s hellblade.
The Juggernaut itself is a formidable sight, adorned with a menacing array of metal armor, jagged barbs, powerful pistons, wicked chains, and deadly blades, proudly displaying the symbol of Khorne. The battle scars and impaled skulls adorning its surface, meticulously crafted in Citadel Finecast, bear witness to its countless victories on the field of battle. Atop this monstrous beast rides the Skullmaster, a horned, sinewy servant of Khorne, radiating an aura of demonic power. With his muscular form and devilish countenance, he brandishes his hellblade with lethal intent, ready to strike down any who oppose the will of the Blood God.
What’s in the Skullmaster, Herald of Khorne on Juggernaut box
- x17 resin components with which to make one Herald of Khorne on Juggernaut of Khorne that can be used for games of both Warhammer and Warhammer 40,000
- x1 50 x 75mm square base
- x1 60mm round base
How to paint the Skullmaster, Herald of Khorne on Juggernaut set
- Step 1: Basecoat
Start by applying a basecoat to the Skullmaster and the Juggernaut using a suitable color for the model’s flesh, such as a dark red like Khorne Red or other deep tones, using a medium-sized brush. - Step 2: Base Colors
Choose the appropriate colors for different sections of the model. For the armor and weapons, select metallic shades like Retributor Armor or other suitable options. Additionally, consider using bold colors like Mephiston Red or other vibrant tones for details like spikes or banners. - Step 3: Detailing
Using a smaller brush, add fine details to the model. Paint the eyes with contrasting colors like Yriel Yellow or other suitable hues. You can also apply additional colors to highlight areas such as the skulls or horns, using tones like Zandri Dust or other earthy shades. - Step 4: Washes
Apply washes to the model to enhance depth and create shadows. Use a suitable shade like Nuln Oil or other dark washes for the metallic areas, and consider using Agrax Earthshade or other appropriate washes for the flesh and other detailed sections. - Step 5: Highlights and Drybrushing
Using a lighter shade of the base colors or a mix with white, carefully highlight the edges and raised areas of the model. This step adds dimension and brings out the details. Additionally, use a drybrush technique with a lighter color to lightly dust certain areas, like the skulls or armor, for added texture and a weathered appearance. - Step 6: Fine Details
Focus on painting smaller details such as the eyes, teeth, or symbols. Use contrasting colors to make them stand out, like painting the eyes with a bright color or using a suitable hue for the symbols. Take your time and be patient with these intricate details. - Step 7: Bases
Paint the base using colors that match your preferred theme, such as a rocky or infernal terrain. Consider using texture paints, drybrushing, or adding additional details like tufts of grass or small rocks to enhance the overall look. - Step 8: Varnish (Optional)
To protect your painted model and ensure its longevity, consider applying a varnish spray as a final step. This helps seal the paint, guarding against chipping, and adds a protective layer to the model.

