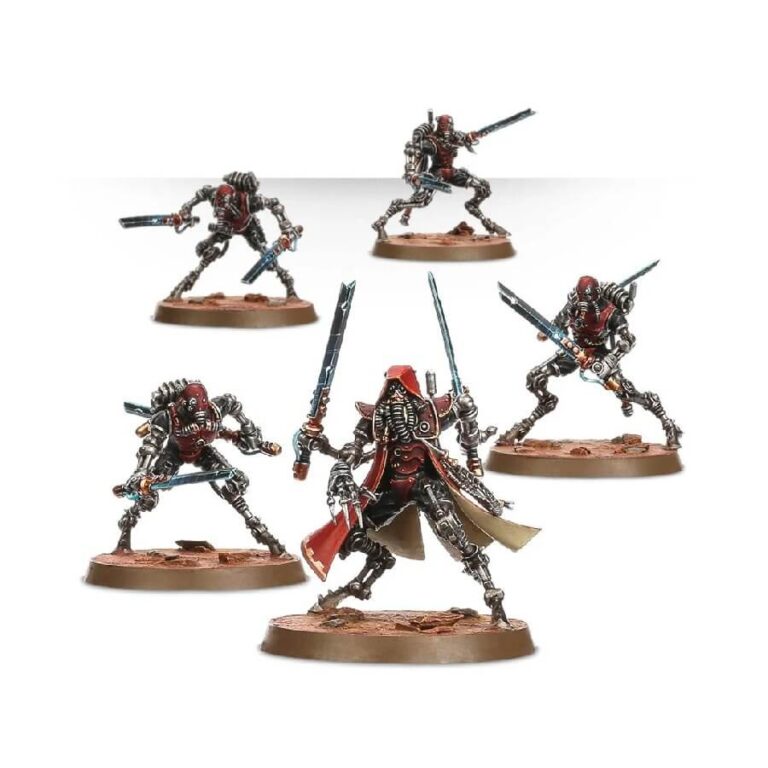
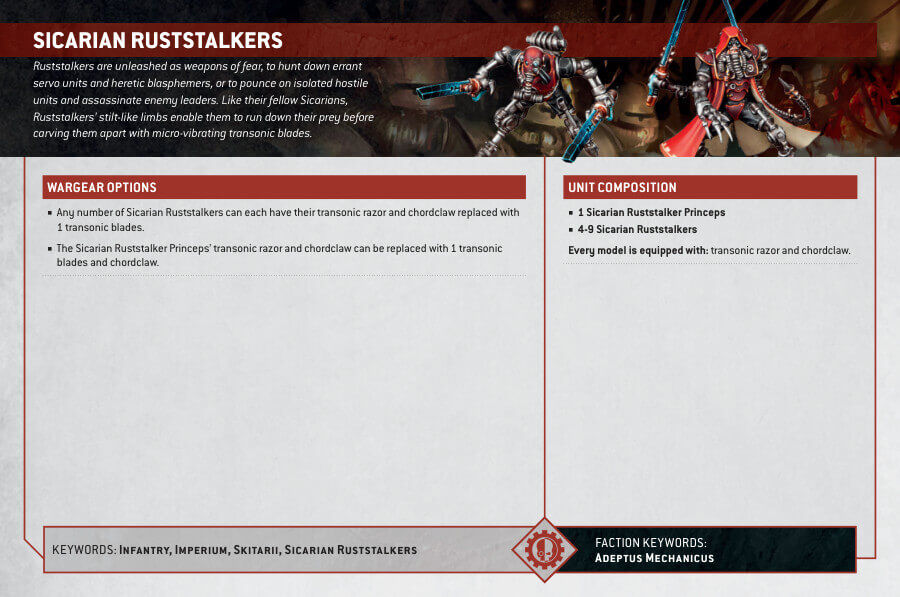
The Sicarian Ruststalkers, originally an elite assassination squad, have become front-line commandos renowned for their physics-manipulating abilities and devastating transonic weapons. This box contains 5 Sicarian Ruststalker models, each with a unique, cybernetically augmented gasmask-clad head that’s equipped with sensors and data-gathering devices. These Ruststalkers are more machine than man, encased in pressurized armor. The kit also comes with a variety of armament options, including two transonic blades each or a loadout of chordclaw, transonic razor, and grenade pack, totaling to 25 included weapon parts. Additionally, the princeps model includes a prehensile dataspike. This multipart plastic kit provides endless opportunities for customization and building a unique squad of Sicarian Ruststalkers.
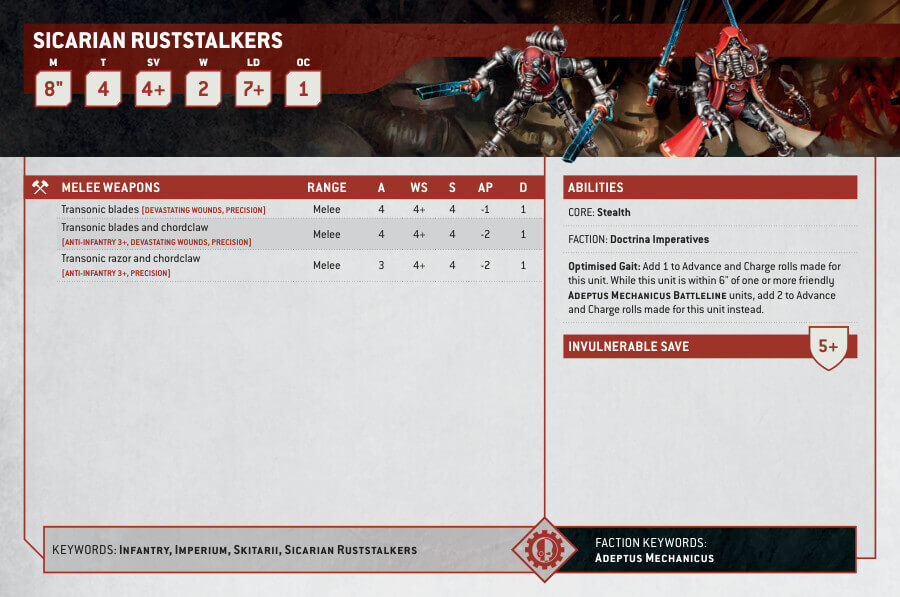
Sicarian Ruststalkers Datasheets
What’s in the Sicarian Ruststalkers box
- x117 plastic components to build five models of either Sicarian Ruststalkers (with one princeps) or Sicarian Infiltrators.
- x5 Citadel 40mm bases.
How to paint the Sicarian Ruststalkers Set
- Step 1: Priming
To begin, establish a solid foundation for your Sicarian Ruststalkers. Apply Chaos Black spray primer to ensure the paint adheres firmly. Allow it to dry thoroughly before moving on to the next step. - Step 2: Clothing
Embark on the journey by focusing on their attire. Mephiston Red is your choice of paint here, providing a striking and bold base. Apply it with care, ensuring even coverage across the fabric. Allow the paint to dry completely before advancing. - Step 3: Depth and Texture
Now, let’s breathe life into their clothing. Nuln Oil comes into play as a shading agent. With a steady hand, apply it selectively to the recesses and folds of the fabric. This creates depth and texture, making the clothing appear more realistic. Allow the shade to settle and dry. - Step 4: Highlights
To make the red clothing truly pop, it’s time for layering. Using Evil Sunz Scarlet, focus on the raised areas and edges. This creates highlights and accentuates the contours of the fabric. Take your time to ensure precision and even coverage. Let it dry completely before moving on. - Step 5: Metallic Limbs and Weapons
Shifting your attention to the mechanical elements, begin with Leadbelcher as the base coat. Apply it carefully to cover the metallic limbs and weapons evenly. The aim here is to create a solid foundation for the subsequent steps. Allow the paint to dry thoroughly. - Step 6: Adding Depth
Now, to infuse depth and realism into the mechanical components. Nuln Oil reappears, this time as a shade for the metal parts. Apply it judiciously, allowing it to seep into the crevices and recesses, creating shadows and dimension. Let the shade dry completely. - Step 7: Metallic Shine
Prepare to make those metallic limbs gleam. Using Ironbreaker, focus on the edges and raised sections. This brings out the shine and polish, making the metal appear as though it catches the light. Be meticulous in your application, and ensure it dries thoroughly. - Step 8: Attention to Details
Delicate details like skulls are worth the effort. Ushabti Bone is your tool to make these elements stand out against the backdrop of the red clothing. Take your time to bring these details to life. Allow it to dry before proceeding. - Step 9: Futuristic Tech
Moving into the realm of advanced technology, paint lenses and sensors with Baharroth Blue. This base coat sets the stage for their distinctive appearance. Apply it evenly, and ensure it dries completely. - Step 10: Metallic Details
Small metallic accents matter. Incorporate them using Brass Scorpion to add visual interest and depth. These subtle touches contribute to the overall look. Be meticulous in your application and allow it to dry fully. - Step 11: Crafting the Terrain
Immerse your Ruststalkers in a harsh terrain environment. Martian Ironearth texture paint transforms the base into a rugged wasteland. Use this paint generously to create the desired texture. To enhance realism, incorporate rocks or grass tufts into the base, evoking the harshness of their surroundings. Allow the base to dry thoroughly. - Step 12: Preserving Your Art
To protect your meticulously painted Sicarian Ruststalkers and provide a professional finish, apply a coat of Stormshield varnish. This final step safeguards your work and ensures it maintains its luster over time. Allow the varnish to dry completely.

