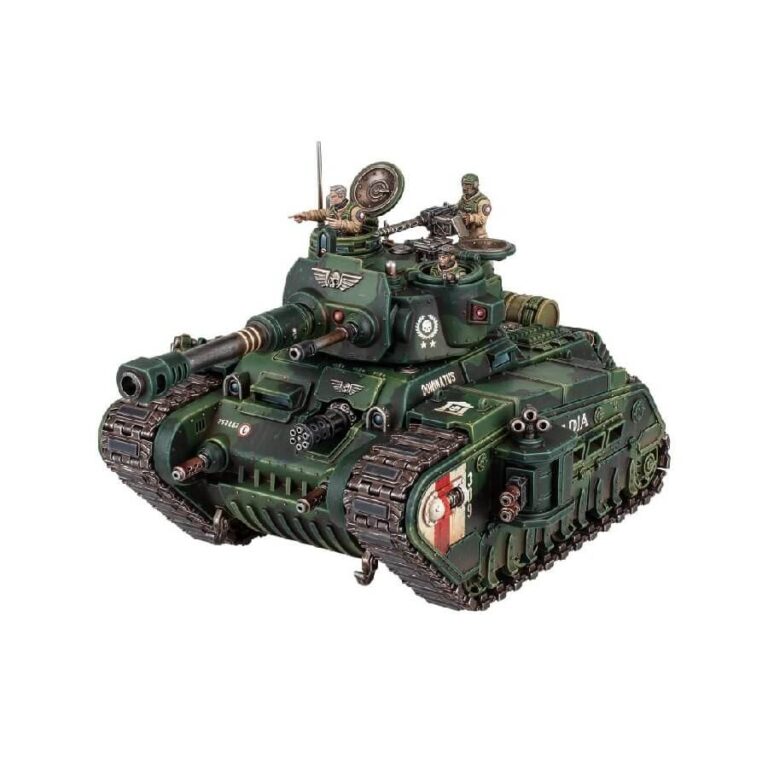
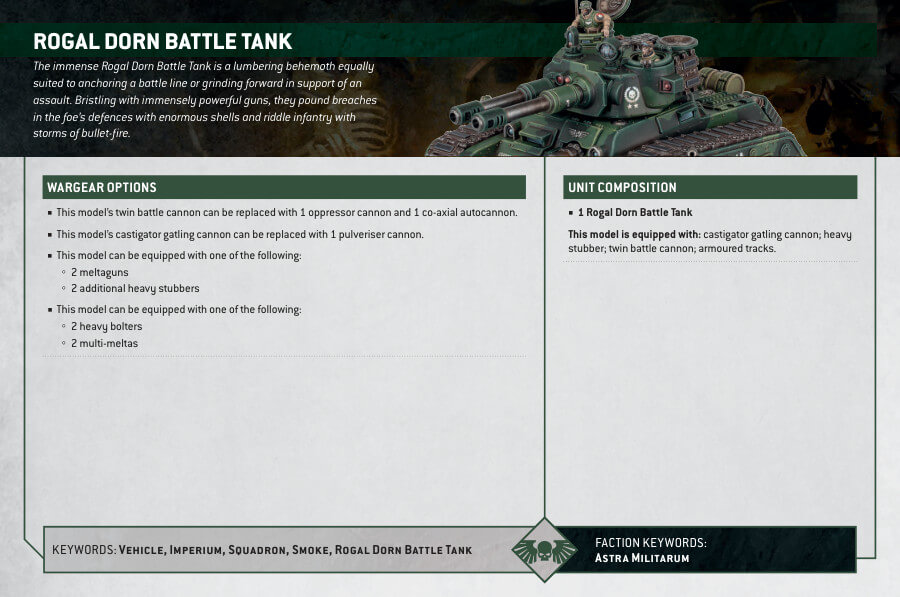
The Rogal Dorn Battle Tank is a formidable war machine, capable of holding the line or leading assaults with its massive firepower. This versatile multipart plastic kit allows you to construct a Rogal Dorn Battle Tank that surpasses the size of the mighty Leman Russ Battle Tank. Its main turret offers a choice between the relentless firepower of a twin battle cannon or the devastating might of an oppressor cannon with a co-axial autocannon.
Equipped with a secondary hard point on the hull, the Rogal Dorn can be armed with either a castigator gatling cannon to decimate hordes of infantry or a pulveriser cannon for engaging enemy armor. The kit also provides various optional weapon configurations, such as sponson mounts with heavy bolters or multi-meltas, as well as forward mounts for heavy stubbers or meltaguns. Enhancements like additional armor for the tracks, tow hooks, viewing slits, extra fuel, a search light, and stowed equipment allow for further customization.
In addition, the kit includes three crew members: a spotter, a tank officer, and a gunner for the pintle-mounted heavy stubber. The gunner can be assembled with a choice of five head options or replaced with closed hatches for added variety and personalization. With its extensive range of options and details, the Rogal Dorn Battle Tank offers an impressive centerpiece for your Astra Militarum forces, ready to unleash devastation on the battlefield.
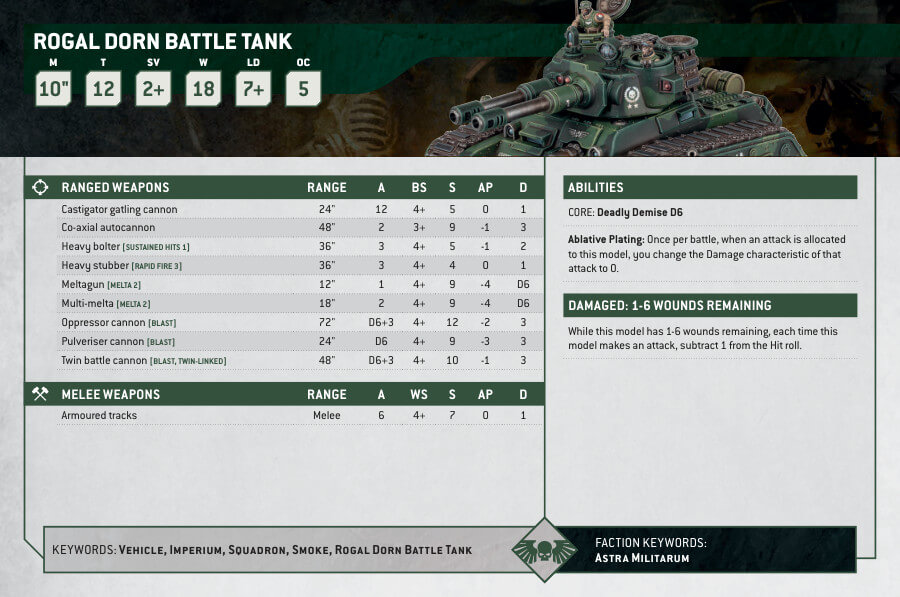
Rogal Dorn Battle Tank Datasheets
What’s in the Rogal Dorn Battle Tank box
- x171 plastic components that make The Rogal Dorn Battle Tank, providing a wealth of options for customization and assembly.
- x1 Astra Militarum Vehicle Transfer Sheet, featuring 475 transfers. These transfers offer numerals, sigils, and a wide range of regimental heraldry, allowing you to personalize your tank with the symbols and markings of your chosen regiment.
How to paint the Rogal Dorn Battle Tank
- Step 1: Prime the model
Apply a base coat of black or grey primer to the entire Rogal Dorn Battle Tank model. This will provide a smooth surface for the paint to adhere to and enhance the overall appearance. - Step 2: Base coat the hull and turret
Using a large brush, apply a base coat of your chosen color to the hull and turret of the tank. For example, you can use Mechanicus Standard Grey to achieve a neutral gray color. - Step 3: Highlight the edges
Using a smaller brush, carefully apply a lighter shade of gray, such as Administratum Grey, to the edges of the tank’s hull and turret. This will create depth and highlight the details. - Step 4: Paint the details
Using various brushes, paint the smaller details of the tank, such as the weapons, tracks, and additional components. You can use Abaddon Black for the tracks and Leadbelcher for the weapons. - Step 5: Apply decals and transfers
Using the Astra Militarum Vehicle Transfer Sheet, carefully apply the desired decals and transfers to the tank. These can include numerals, sigils, and regimental heraldry. Ensure they are properly aligned and adhere well to the model’s surface. - Step 6: Weathering effects
To add realism and depth, you can apply weathering effects to the tank. Dry brushing with a lighter shade of gray or brown can create a worn or battle-damaged appearance. Additionally, you can use washes to enhance the recessed areas and create shadows. - Step 7: Varnish the model
To protect your paintwork, apply a layer of varnish to the entire model. This will help preserve the colors and provide a protective finish. - Step 8: Final touches
Add any final details or touches to the tank, such as additional weathering effects, highlighting specific areas, or adding optional accessories like stowed equipment. This will personalize the model and make it unique to your army.

