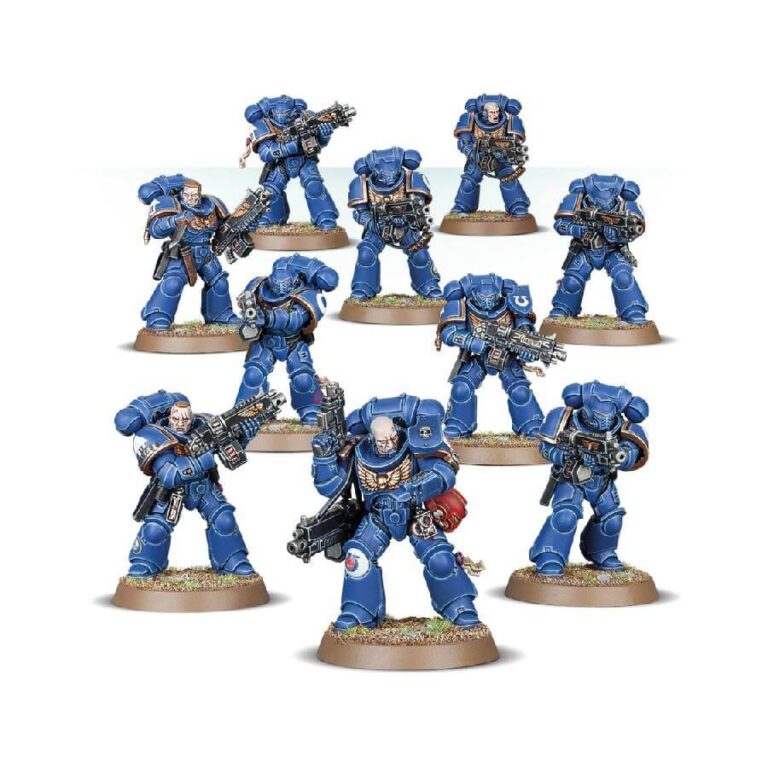
In any warzone, having a reliable and versatile group of warriors that can hold the line or advance with precision is essential for victory. That’s where the Primaris Intercessors come in – they are a core element of any Primaris Space Marine force, capable of delivering devastating salvoes of firepower with ease.
This multi-part plastic kit allows you to assemble a squad of 10 Primaris Intercessors, each donning the Mk X Tacticus armor for maximum protection and mobility on the battlefield. The Intercessors are equipped with bolt rifles that can be customized to suit your needs: the standard bolt rifle with sickle magazine, the auto bolt rifle with overcharger and box magazine, or the stalker bolt rifle with a longer-range sight and straight magazine.
The kit includes 16 right-hand shoulder pads adorned with the iconic Intercessor iconography, with enough variety to cover each of the different bolt rifle variants. Additionally, there are 24 different head options to choose from, including helmeted and bareheaded options. With this kit, you can assemble a 10-man squad or two separate 5-man squads, each led by their own unique Sergeant.
The Sergeants come equipped with mag-locked helmets and tilting plates to distinguish them from the rest of the squad. These models are highly customizable, allowing you to create a unique force that reflects your own strategic vision.
Also available in these box sets:
Primaris Intercessors Datasheets
What’s in the Primaris Intercessors box
- x266 plastic components that make 10 Primaris Intercessors, providing ample opportunity for customization and individualization.
- x10 Citadel 32mm Round bases for displaying your finished models.
- x1 transfer sheet is also included, allowing you to add additional details and symbols to your Intercessors armor.
How to paint the Primaris Intercessors
- Step 1: Assemble your miniature models
Before painting, assemble your Primaris Intercessors miniature models according to the instructions included in the kit. Make sure they are primed and fully dry before painting. - Step 2: Basecoat the miniature
Choose a basecoat color and apply it to the entire miniature using a medium-sized brush. It’s okay if it’s not completely even, as this will be covered in subsequent layers. Allow it to dry completely before moving on to the next step. Macragge Blue is a good shade for these miniatures. - Step 3: Paint the details
Using a small brush, carefully paint the details on the miniature, such as the weapons, armor, and accessories. Use multiple thin layers to build up the colors and create depth. You can use Abaddon Black for weapons, Leadbelcher for armor and Mephiston Red for accessories. - Step 4: Highlight the miniature
To add more depth and dimension to the miniature, use a lighter shade of paint to highlight the raised edges and details. This will make the miniature pop and stand out on the battlefield. Fenrisian Grey is a good option for highlighting the edges of the armor. - Step 5: Wash the miniature
To create shadow and depth in the recessed areas, apply a wash to the miniature. A wash is a thin, dark-colored paint that is applied to the entire miniature and allowed to settle into the recessed areas. This creates natural-looking shadows and depth. Can’t go wrong with Nuln Oil for a dark wash or Agrax Earthshade for a brown wash. - Step 6: Final touch-ups
Once the wash is dry, use a small brush to touch up any areas that need it, such as fixing mistakes or adding final details. You can also use a Runefang Steel to add highlights to weapons or accessories. - Step 7: Varnish for Protection
To protect your finely painted miniatures and give them a polished look with a satin/matte finish, apply Munitorum Varnish to the models. This step also helps reduce any unwanted shine from the paints.

