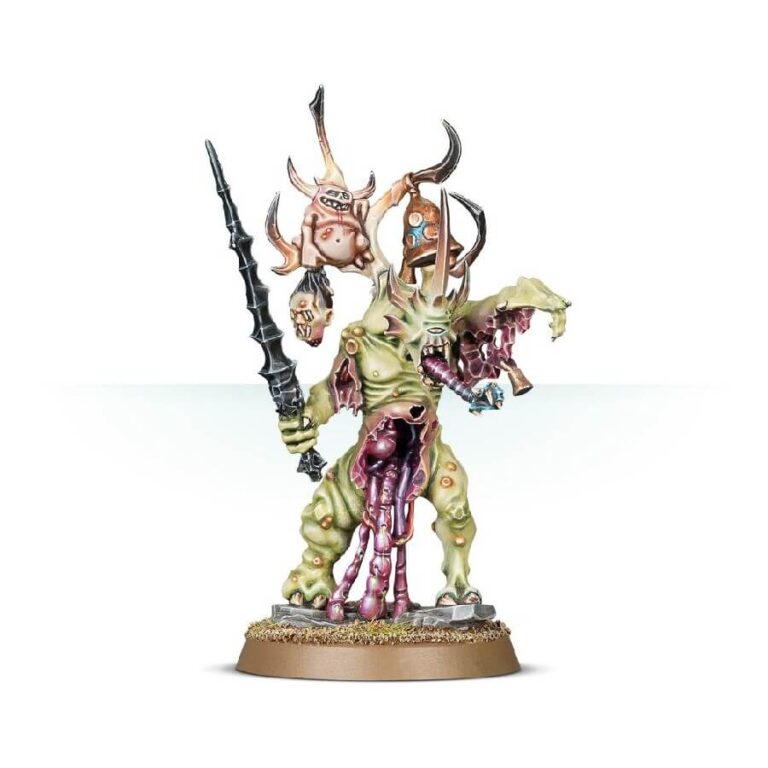
The Poxbringers, emanating an aura of sinister authority, tower over their Plaguebearer brethren with their imposing height and robustness. Adorned with grotesque antlers atop their decaying heads, these daemonic beings serve as the trusted lieutenants of the mighty Great Unclean Ones, ensuring their commands are executed meticulously. With their baleswords swung with immense strength, Poxbringers ruthlessly dispatch the enemies’ champions and sorcerers, while unleashing their own foul spells to corrupt and defile.
This multi-part plastic kit offers all the necessary components to construct a Poxbringer, a formidable Herald of Nurgle. With its wiry yet muscular physique, the Poxbringer exhibits a grotesquely deformed leg and exposed entrails that reach the ground. Its repulsive appearance is further accentuated by festering lesions, horn protrusions from its head, a ribbed tongue, and folds of decaying flesh. Striking a forward-gesturing pose with a spindly arm, the Poxbringer boasts a Nurgling perched atop one of its horns, while another horn sprouts from the top of its spine, adorned with a bell bearing the unmistakable symbol of Nurgle.
What’s in the Poxbringer box
- x7 plastic components that make The Poxbringer, a figurine can be added to both Warhammer 40,000 and Warhammer Age of Sigmar armies.
- x1 Citadel 32mm Round base
How to paint the Poxbringer set
- Step 1: Basecoat the Poxbringer
Apply a basecoat of dark green paint, such as Warpstone Green, to the entire model using a medium-sized brush. Ensure smooth and even coverage, allowing the details to show through. - Step 2: Paint the Skin
Using a smaller brush, carefully paint the exposed flesh areas with a pale green shade, like Nurgling Green. Take your time to highlight the creases and textures, adding depth to the skin. - Step 3: Highlight the Skin
Apply a lighter green, such as Moot Green, to the raised areas and edges of the flesh. This technique, known as dry brushing, adds highlights and brings out the details. - Step 4: Paint the Antlers and Horns
Using a fine brush, paint the antlers and horns with a bone-colored paint, like Ushabti Bone. Apply multiple thin layers to build up the color and create a weathered appearance. - Step 5: Detail the Face and Tongue
Using a small brush, carefully paint the facial features with appropriate colors. For the eyes, use a bright yellow shade like Flash Gitz Yellow. Paint the tongue with a deep red color, such as Khorne Red. - Step 6: Add Rust and Decay
Using a sponge or a stippling brush, dab on patches of rust and corrosion on the armor and exposed areas. Use colors like Rhinox Hide, Mephiston Red, and Doombull Brown to create a weathered and decayed effect. - Step 7: Paint the Balesword
Coat the balesword in a dark metallic paint, like Leadbelcher. Add washes of Agrax Earthshade to create shadows and depth. Highlight the edges with a lighter metallic, such as Ironbreaker. - Step 8: Finish with Details
Use a fine brush to paint the smaller details, such as the bell, Nurgling, and any other decorative elements. Be creative with your color choices, using contrasting shades to make them stand out. - Step 9: Apply a Varnish
Protect your finished model by applying a layer of varnish, like Ardcoat, to seal the paintwork and add a glossy finish. This step will ensure your Poxbringer stays vibrant and protected.

