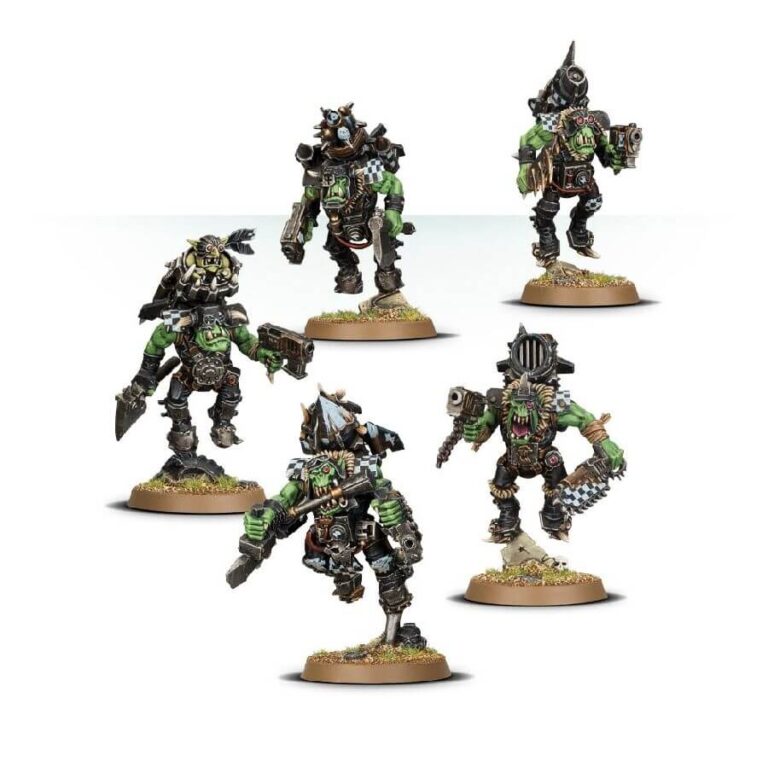
Stormboyz, Ork shock troops found in numerous victorious warbands, devote themselves to the ancient and revered martial practices of drilling, marching, and soaring through the skies. In pursuit of this singular purpose, they enter battle adorned with powerful rokkit packs that, once ignited, launch them forward on magnificent jets of inky black flames, propelling them towards their targets with breathtaking speed and force.
Prepare for a thrilling Waaagh! with this incredible box set featuring 5 multipart plastic Ork Stormboyz. Within this set, you’ll discover an array of customization options, including 10 head variations, 5 different torso-fronts, and 5 body variations, enabling you to assemble a truly one-of-a-kind squad. But the customization doesn’t stop there – this set also includes a wealth of accessories and additional parts, allowing you to further personalize your Stormboyz. As a delightful bonus, you’ll even find a mischievous Gretchin equipped with his very own rocket pack! Each model is supplied with a sturdy 32 mm round base, ready to leap into action on the tabletop battlefield. Get ready to unleash these airborne warriors upon your enemies and let the aerial assault commence!
What’s in the Ork Stormboyz box
- x71 plastic components that make 5 Ork Stormboyz.
- x5 Citadel 32mm round bases
How to paint the Ork Stormboyz set
- Step 1: Prepare Your Models for Painting
Before you begin, make sure your Ork Stormboyz models are clean and free of any dust or debris. This will ensure a smooth painting surface. - Step 2: Apply a Basecoat to the Skin
Using a brush, apply a basecoat of green paint, such as Waaagh! Flesh or Warboss Green, to the skin of the Stormboyz. Apply the paint evenly and let it dry completely. - Step 3: Highlight the Skin
Using a lighter shade of green, like Loren Forest or Nurgling Green, lightly brush over the raised areas of the skin to create highlights. This will add depth and dimension to the skin tone. - Step 4: Detail the Features
Use a fine-tipped brush to paint the eyes, weapons, and other small details on the model. Here are some ideas:
For the eyes, you can use colors like Mephiston Red or Yriel Yellow to make them stand out.
For the teeth you can use a bone color, such as Ushabti Bone.
To create a chessboard model on their shoulder pads, you can use Abaddon Black and White Scar. - Step 5: Basecoat the Armor
Apply a basecoat of black paint, such as Abaddon Black, to the armor of the Stormboyz. Make sure the paint covers the entire surface evenly. - Step 6: Highlight the Armor
Using a smaller brush, apply a highlight color like Leadbelcher or Balthasar Gold to the raised areas of the armor. This will create depth and make the armor pop. - Step 7: Add Additional Details
Use a fine-tipped brush to add scratches, weathering effects, or other colors for buttons and ornaments on the armor. Consider using shades like Agrax Earthshade or Nuln Oil to add shading and depth. - Step 8: Basecoat the Rokkit Packs
Choose a metallic color like Leadbelcher and apply a basecoat to the rokkit packs of the Stormboyz. Make sure the paint covers the packs evenly. - Step 9: Highlight the Rokkit Packs
Using a lighter shade of the base color, highlight the raised areas of the rokkit packs. This will give them a metallic shine and make them more visually appealing. - Step 10: Add Additional Rokkit Pack Details
Use a fine-tipped brush to add scratches, weathering effects, or other colors for wires and buttons on the rokkit packs. - Step 11: Base the Models
Apply texture paint or other materials to the bases of your Stormboyz models to create a realistic appearance. You can use Stirland Mud texture paint or incorporate small rocks and grass tufts for added detail. - Step 12: Apply Varnish for Protection
To protect your painted models, apply a layer of varnish. Choose between a matte or gloss finish, following the instructions on the varnish can for proper application. This will ensure your hard work is preserved.

