The ruling caste of the Orks, known as Nobz, are not born of privilege or inheritance, but rather by their sheer size and ferocity. In the Ork society, there is no nobility greater than that of a hulking, belligerent Ork claimant. Only the Warboss, towering above all, surpasses the Nobz in size and intimidation, and the Nobz take great pleasure in asserting their dominance over their lesser greenskin kin using their scarred fists and iron-clad boots.
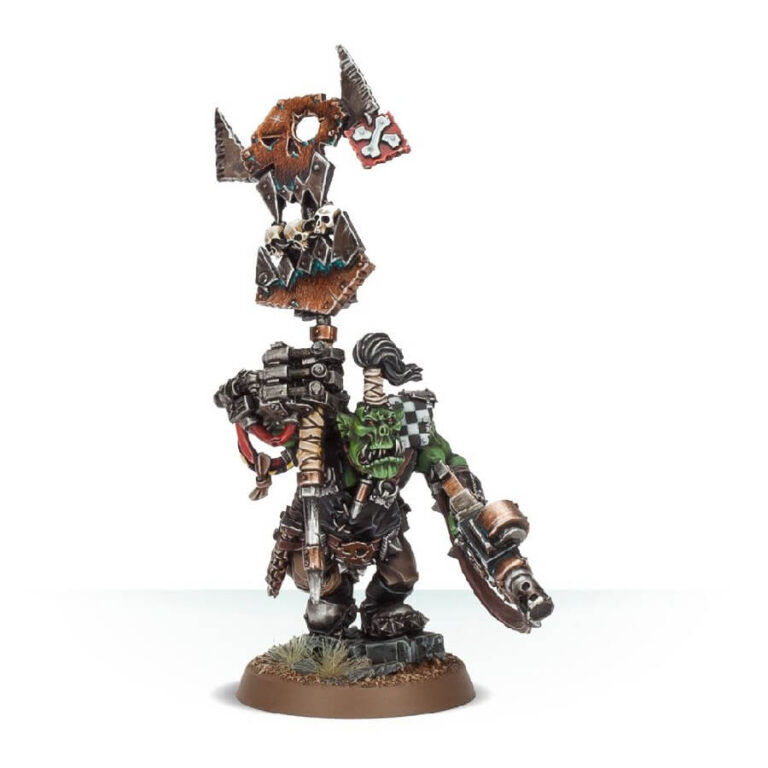
When a Nob earns the respect of a Warboss, he may carry a banner into battle—a symbol of his authority and prowess. Adorned with glyphs, trophies, and the blood of vanquished foes, the warband’s banner proudly showcases the danger and might of its owners. And if the banner alone doesn’t convey the message, the Nob’s powerful shoota, clutched firmly in his power klaw, certainly does. For the Orks, such a banner carries near-religious significance, inspiring them to fight even harder in the presence of their esteemed Nob.
What’s in the Ork Nob With Waaagh! Banner box
- x4 resin components, making 1 Ork Nob With Waaagh! Banner.
- x1 Citadel 32mm round base.
How to paint the Ork Nob With Waaagh! Banner set
- Step 1: Prime Your Miniature
Before you start painting, make sure your Ork Nob With Waaagh! Banner model is primed with Chaos Black or any other primer of your choice. This will create a smooth surface for the paint to adhere to. - Step 2: Basecoat the Model
Begin by applying a basecoat of green paint to the Ork Nob’s skin. You can use Warboss Green for this step. Make sure to cover the entire skin area evenly. - Step 3: Paint the Armor
Next, paint the armor of the Ork Nob using a brown color like Rhinox Hide or a similar shade. Apply the paint carefully to cover all the armor plates. - Step 4: Add Metal Details
With a silver paint like Leadbelcher, paint any metal details on the model, such as weapons, armor trims, or accessories. This will add contrast and depth to the miniature. - Step 5: Highlight the Skin
Using a lighter green color like Skarsnik Green, carefully apply highlights to the Ork Nob’s skin. Focus on the raised areas, such as the knuckles, nose, and cheekbones, to bring out the definition. - Step 6: Highlight the Armor
Now, highlight the armor by adding a lighter brown color such as Mournfang Brown to the edges and prominent areas. This step will make the armor look more dynamic and weathered. - Step 7: Paint the Banner
For the Waaagh! Banner, use a bright color like Wazdakka Red as the basecoat. Cover the entire banner with this vibrant hue. - Step 8: Add Glyphs and Details
With a fine brush and a contrasting color like Averland Sunset or any other bright color of your choice, paint glyphs and designs on the banner. Get creative and make the banner stand out. - Step 9: Highlight the Banner
Using a lighter shade of the base color (e.g. Wild Rider Red), carefully apply highlights to the edges and significant parts of the banner. This will add depth and dimension to the design. - Step 10: Paint the Bone
If the Ork Nob has any bone accessories or tusks, paint them with a bone color like Zandri Dust. - Step 11: Add Final Details
With a fine brush, add any final details, such as teeth, eyes, or tattoos, using contrasting colors like Ushabti Bone or any other color that suits your preference. - Step 12: Varnish and Protect
Finally, apply a protective layer of varnish over the entire model to preserve your hard work and protect it from damage.

