The touch of a Plague Surgeon alone is a malevolent contagion, spreading virulent infections with each contact. Their very breath carries a swirling miasma of spores and Daemon motes, permeating the air around them. As if that weren’t enough, their weapons and surgical instruments drip with a foul miasma, enhancing their devastating effect. It is a grave mistake for anyone foolish enough to engage in combat with a Plague Surgeon, for they will soon find themselves crawling with otherworldly diseases.
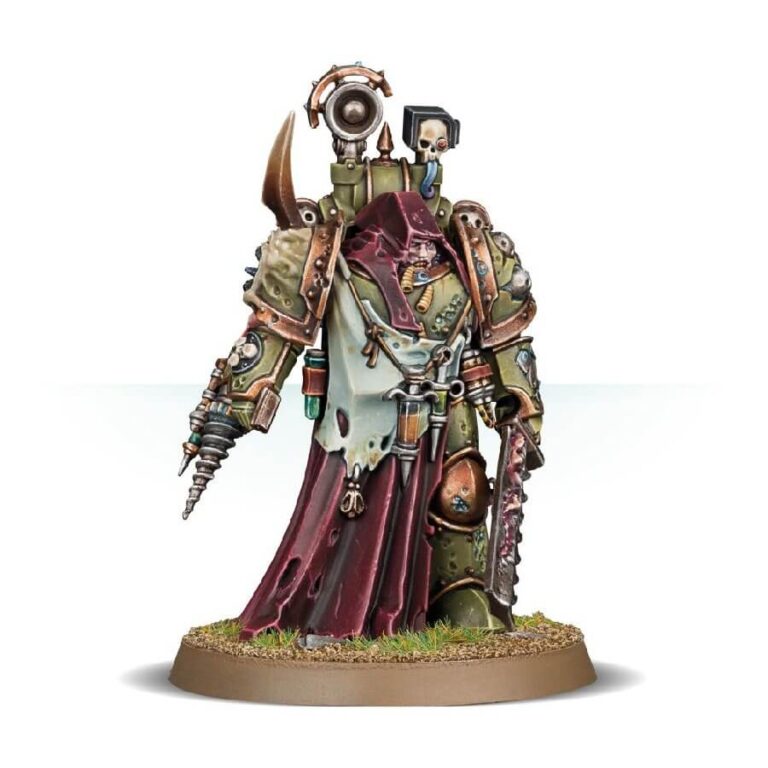
Prepare to assemble the Nauseous Rotbone with this remarkable multi-part plastic kit. Armed with a bolt pistol and a balesword, his true arsenal lies in the corrupted medical instruments that adorn his twisted form. Narthecium-like implements, brimming with horrifying plagues, cover his armor, while a rusted reductor on his right arm stands as a testament to his vile deeds of stealing gene-seeds. Much of his figure is concealed by a foreboding cowl and cloak, but the visible parts of his armor bear the unmistakable signs of decay, pitted with rust and corrosion, befitting a fervent follower of the Death Guard. A repugnant plaguebearer’s head adorns his right shoulder, a grotesque trophy of his allegiance. As for the device affixed to his back… it is best left unspoken, for its nature is best left to the darkest recesses of one’s imagination.
What’s in the Nauseous Rotbone, the Plague Surgeon box
- x9 plastic components that make a ghoulish spectre of death, the Plague Surgeon, sinister and hooded, drift through the chaos of battle.
- x1 Citadel 40mm Round base
How to paint the Nauseous Rotbone, the Plague Surgeon set
- Step 1: Prime the Model
Apply a thin, even coat of black or grey primer to the entire model, ensuring good coverage. - Step 2: Base Colors
Using a brush, apply the base colors to different areas of the model. For Nauseous Rotbone’s armor, use a dark green shade like Deathworld Forest or Waaagh! Flesh. For his cloak, choose a muted color like Nurgling Green or Caliban Green. Use a metallic paint, such as Leadbelcher, for the metal parts of his instruments. - Step 3: Wash
Apply a wash, like Agrax Earthshade, to the entire model to add depth and shadow. Make sure to get into the recesses and crevices to enhance the details. - Step 4: Highlighting
Using a lighter shade of the base color, carefully apply highlights to the raised areas of the model. This will create contrast and bring out the details. For example, you can use Straken Green to highlight the edges of the armor and Moot Green for the cloak. - Step 5: Details
Paint the smaller details of the model, such as the Plague Surgeon’s head, the instruments, and the plaguebearer’s head on his shoulder. Use colors like Rakarth Flesh for the head, Screamer Pink for the tongue, and Ushabti Bone for the exposed bones. - Step 6: Weathering
Add weathering effects to the model to enhance its grim appearance. Use a sponge or a stippling brush to apply small dabs of a darker color, such as Ryza Rust, to simulate rust or corrosion on the armor and instruments. - Step 7: Basing
Finish the model by painting the base. Use a combination of textures, such as Stirland Mud and Astrogranite Debris, to create a realistic ground. Paint the base with earthy tones and add some tufts or static grass for extra detail.

