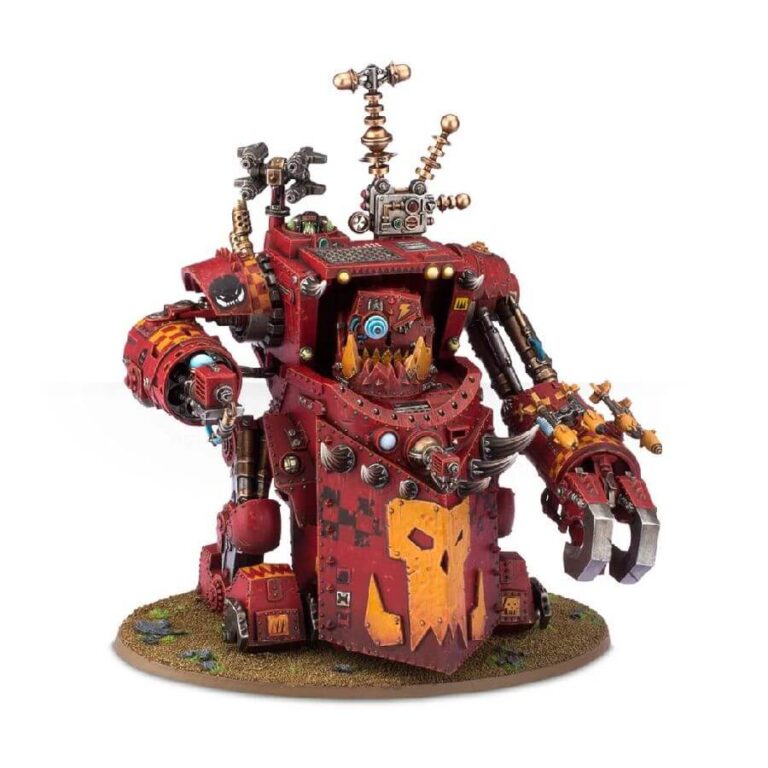
Step into the captivating world of the Morkanaut – a marvel personally crafted and piloted by the ingenious Ork Mekboys. This formidable war machine embodies the deadly cunning of Mork, packed with an array of glowy gubbinz straight from the Mek’s workshop, all intended for one glorious purpose – to unleash unbridled carnage.
Mighty Arsenal of Destruction
At the heart of the Morkanaut’s power lies its primary weapon, the awe-inspiring Kustom Mega-Kannon. This potent firearm brims with worky gubbinz and zappy bits, ready to unleash devastation on the battlefield. With its firepower, enemies are left quivering in fear, knowing that their fate is sealed in the hands of this mechanical monster.
A Multitude of Lethal Armaments
The Morkanaut boasts an impressive array of secondary armaments, making it a versatile and deadly adversary. Twin-linked big shootas rain a hail of bullets upon unsuspecting foes, while rokkit launchas add a touch of explosive chaos to the mix. For close encounters, the Kustom Mega-Blasta delivers a blistering blast, ensuring no enemy can escape unscathed.
The Unyielding Klaw of Gork (or Possibly Mork)
As if the Morkanaut’s arsenal wasn’t fearsome enough, it wields the mighty Klaw of Gork (or maybe Mork). With this colossal power claw, the Morkanaut can crush anything that dares to stand in its path. The thrill of witnessing this behemoth in action is matched only by the terror it strikes in the hearts of its adversaries.
The Morkanaut is the epitome of Orkish innovation and ferocity, a sight that sends shivers down the spines of even the most battle-hardened warriors. Its construction exemplifies the art of brutality and ingenious engineering in equal measure, a testament to the Orks’ mastery of destruction.
What’s in the Morkanaut box
- x133 plastic components that make one Ork Morkanaut or one Ork Gorkanaut and its packed with optional extras so you can add your own personalised finishing touches.
- x1 Citadel 170mm Oval Base.
How to paint the Morkanaut set
- Step 1: Prime Your Morkanaut
Begin by priming your Morkanaut model with a white primer. This will create a strong base for the red color scheme and help the subsequent layers of paint adhere better. Ensure you cover the entire model evenly to avoid any bare spots. - Step 2: Basecoat the Red
Using a large brush, apply a base coat of red paint, such as Mephiston Red, to the entire model. This will serve as the primary color for your Morkanaut. Apply the paint evenly, covering all areas thoroughly. - Step 3: Highlight with Brighter Reds
Switch to a smaller brush and add highlights to the model using a brighter red shade like Evil Sunz Scarlet. Concentrate on raised surfaces and edges to create depth and bring out details. Be precise with your brush strokes for a clean and polished appearance. - Step 4: Add Yellow Details
For the yellow details, start by applying a base coat of Averland Sunset to the designated areas. Use multiple thin coats to achieve a smooth and solid coverage. This color will complement the red and add eye-catching details to your model. - Step 5: Create Depth with Shades
Enhance the yellow details and create depth by applying a wash of Agrax Earthshade. This will add shadows and definition, making the details pop and giving your Morkanaut a more realistic and captivating appearance. - Step 6: Metallic Accents
Base coat the metallic parts of your Morkanaut, such as weapons and machinery, with Leadbelcher. This will be the foundation for achieving a metallic appearance. Ensure even coverage to create a consistent and striking effect. - Step 7: Shine with Silver
Highlight the metallic areas using a silver shade like Runefang Steel. This step will give the metallic parts a polished and shiny finish, adding extra visual interest to your model. - Step 8: Weathering Effects (Optional)
For an extra touch of realism and battle-worn appearance, you can add weathering effects. Use Typhus Corrosion to create rusted areas and Ryza Rust for a textured rust effect. Apply these sparingly and strategically for a convincing weathered look. - Step 9: Final Touches
Take a moment to inspect your Morkanaut model. Make any necessary touch-ups to ensure a clean and professional finish. Pay attention to details and correct any smudges or imperfections to achieve a high-quality result. - Step 10: Protect with Varnish
To preserve your hard work and ensure your Morkanaut looks stunning for battles to come, apply a layer of varnish over the entire model. Choose between matte or gloss varnish, depending on your preference, to protect the paint job and give your model a finished look.

