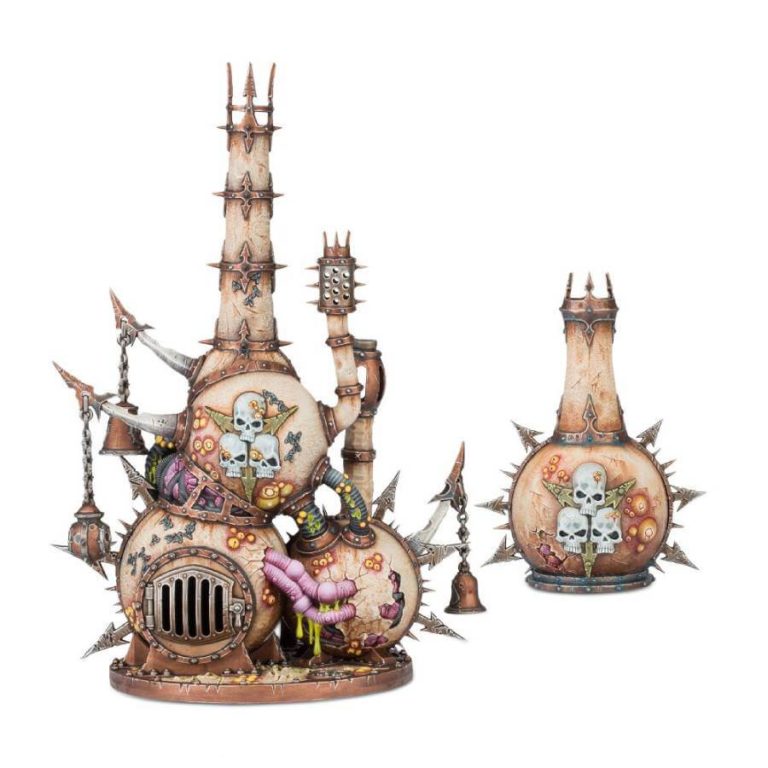
Embrace the vile essence of Nurgle as you deploy the Miasmic Malignifiers, adorned with swaying plague censers and tainted bells that emit thick clouds of noxious fumes from their rusted chimneys. These insidious machines act as parasitic entities, spreading their filth and polluting every aspect of the target worlds they infest.
Unleash the toxic presence of the Miasmic Malignifiers across every battlefield your army encounters. This kit includes the main chimney and a smaller pox furnace, allowing you to manifest the blessings or curses of Nurgle on your tabletop. The Miasmic Malignifiers have been expertly crafted to seamlessly fit on top of the Sector Mechanicus Ferratonic Furnace, creating a truly immense engine of corruption that will strike fear into the hearts of your opponents.
With the Miasmic Malignifiers, you have the power to unleash the full force of Nurgle’s decay and pestilence. Watch as these sinister contraptions contaminate the very fabric of the world, enveloping it in a cloud of noxious miasma. Embrace the role of the harbinger of corruption and revel in the chaos you sow upon the battlefield.
What’s in the Miasmic Malignifier box
- x55 plastic components kit that makes one Miasmic Malignifier, a Death Guard-specific piece of terrain for use in games of Warhammer 40,000.
How to paint the Miasmic Malignifier set
- Step 1: Prime your model
Apply a thin, even coat of primer to your Miasmic Malignifier. Choose a suitable color, such as black or grey, to provide a good base for painting. - Step 2: Basecoat the main structure
Using a medium-sized brush, apply a basecoat to the main structure of the Miasmic Malignifier. For example, you can use a dark green color like Caliban Green or a rusty brown shade like XV-88 but of course, you also have the obvious options such as Death Guard Green or Nurgling Green. Ensure complete coverage over the surface. - Step 3: Highlight the edges
With a smaller brush, carefully paint the edges of the main structure using a brighter shade of green or brown. This will create highlights and add depth to the model. For example, you can use Warpstone Glow for green or Baneblade Brown for brown. - Step 4: Add weathering effects
Using a sponge or a stippling brush, lightly dab a darker shade of green or brown onto the model to create weathering effects. This simulates dirt, rust, or corrosion. Examples of suitable colors include Typhus Corrosion or Rhinox Hide. - Step 5: Paint the details
Using a fine brush, paint the smaller details of the Miasmic Malignifier, such as the pipes, vents, or decorative elements. You can use metallic paints, like Leadbelcher, for metallic parts and other suitable colors for different details, like Abaddon Black or Rakarth Flesh. - Step 6: Apply wash for shading
Using a wash, such as Nuln Oil or Agrax Earthshade, carefully apply it to the model. This will settle into the recesses, enhancing the shadows and adding depth to the details. Apply the wash sparingly and let it dry completely. - Step 7: Highlight the details
Using a fine brush, apply highlights to the smaller details by using a lighter shade of the base color. This will make the details stand out. For example, you can use Moot Green for green details or Skrag Brown for brown details. - Step 8: Paint the toxic gas effects
Using a brush or sponge, paint the areas of the Miasmic Malignifier that emit toxic gases with a vibrant color. For instance, you can use Mephiston Red, Yriel Yellow, or Ahriman Blue to represent the noxious fumes. - Step 9: Finishing touches
Add final touches to your model, such as dry brushing a light color over the weathered areas to create highlights, or using a gloss varnish to make the toxic gas effects appear more vibrant and glossy. - Step 10: Base the model
Finish by painting the base of your Miasmic Malignifier. You can use texture paints, like Stirland Mud or Astrogranite, to add texture and realism. Then, paint the base edges with a color that complements the overall scheme.

