Immerse yourself in the captivating world of Speed Freeks and grounded Flyboyz as you discover the legendary Megatrakk Scrapjets—a beloved choice among Ork enthusiasts. These remarkable vehicles offer an adrenaline-fueled combination of rocket-propelled speed, formidable firepower, and the sheer joy of ramming headfirst into enemy lines with a colossal, thrust-driven drill.
Former Ork pilots can now relish in the nostalgia of wreaking havoc at close range, even if it often led to their own crashes. Witness explosions blooming amidst the chaos as rokkits and missiles collide with their targets, while Grot tail-gunners rain down a relentless hail of chattering big shootas. The fearsome array of weaponry, carefully welded, bolted, riveted, and lashed onto a Megatrakk Scrapjet, is nothing short of awe-inspiring.
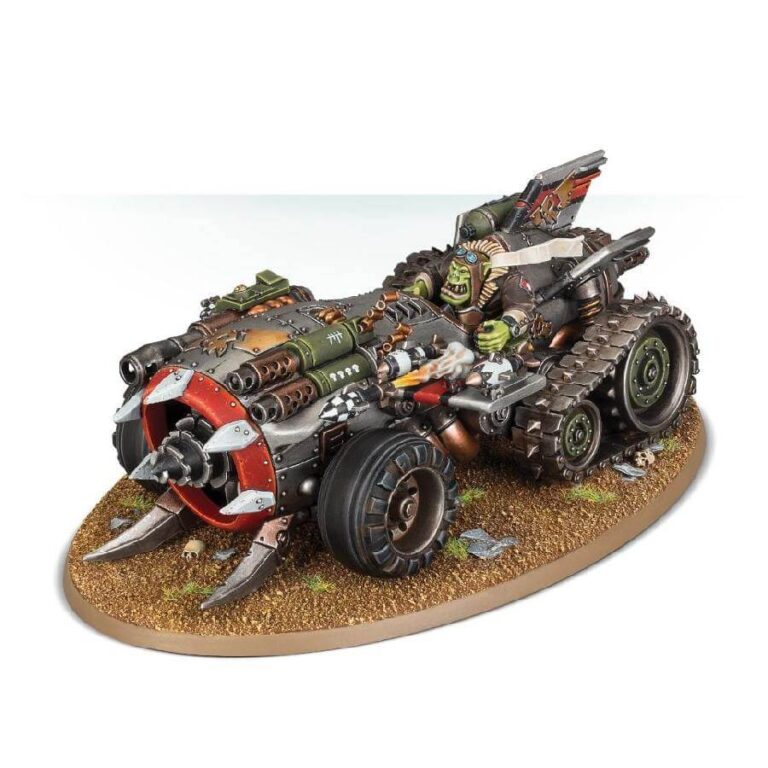
Inside this multipart plastic kit, you’ll find all the components required to construct your own Megatrakk Scrapjet. Crafted around the fuselage of a downed Ork aircraft, this awe-inspiring vehicle can be likened to a menacing metal tube adorned with instruments of destruction. It features a front-mounted rokkit kannon with a continuous supply of belt-fed rokkits, along with dynamically modelled mid-launch missiles. A drill, accompanied by spiked rams, is prominently attached to the front turbine. Positioned at the front are twin big shootas, and there’s an additional crewed twin big shoota at the rear, expertly operated by a diligent Grot gunner. Despite the unfortunate loss of its wings in the accident that grounded the Scrapjet, it remains proudly adorned with fins and ailerons—because, of course, looking cool is an integral aspect of being a Flyboy!
The pilot himself exudes an undeniable charm, donning a flight jacket, goggles, and a billowing scarf, paying little attention to the array of instruments within the cockpit. Propelling this behemoth forward is a massive jet exhaust at the rear, which tirelessly drives the vehicle along via its sturdy tracked wheels.
What’s in the Megatrakk Scrapjet box
- x65 plastic components that make 1 Megatrakk Scrapjet.
- x1 Citadel 150mm Oval base.
How to paint the Megatrakk Scrapjet set
- Step 1: Basecoat
Begin by applying a basecoat of a bright color like red to the vehicle’s body and other desired areas. Use a medium-sized brush to ensure even coverage. For example, you can use Mephiston Red. - Step 2: Metallic Parts
Next, paint the metallic parts of the Scrapjet, such as the rivets, exhaust pipes, and blades. Use a metallic paint like Leadbelcher or Ironbreaker. Apply the paint smoothly, and if needed, you can use a smaller brush for more intricate areas. - Step 3: Shading
To add depth and definition to your model, apply a suitable shade or wash, such as Nuln Oil, to the recessed areas and panel lines. This will create shadows and enhance the details. Apply the shade with a small brush, allowing it to flow into the crevices. - Step 4: Details
Now it’s time to add some details to make your Megatrakk Scrapjet stand out. For example, you can paint the teeth in the Ork’s mouth with a bone color like Ushabti Bone, and the eyes with a bright color like Yriel Yellow or Flash Gitz Yellow. Use a small brush for precision. - Step 5: Ork Skin
For the Ork skin areas, paint them with a green color like Waaagh! Flesh or Caliban Green. Use thin layers to build up the color gradually, ensuring smooth coverage. Don’t forget to add some details like warts or scars with a darker green shade like Warboss Green. - Step 6: Weathering
To give your Scrapjet a weathered appearance, use a dry brush technique. Lightly dip a dry brush into a brown or black paint, such as Rhinox Hide or Abaddon Black, and then remove most of the paint by brushing it on a tissue. Lightly brush over the raised areas to create a worn and weathered effect. - Step 7: Highlights
To bring out the details and create visual interest, apply highlights to the raised areas using a lighter shade of the base color or a suitable lighter color. For example, you can highlight the edges of the metallic parts with a silver paint like Stormhost Silver. - Step 8: Final Touches
Inspect your model and make any necessary touch-ups or corrections. Add any additional details like glyphs, Ork clan symbols, or weathering effects using a fine brush and suitable colors. Take this opportunity to make your Scrapjet truly unique. - Step 9: Varnish
Once you are satisfied with your paint job, protect it by applying a layer of varnish. This will ensure the longevity of your work and protect it from wear and tear. Use a matte or gloss varnish, depending on the finish you prefer.

