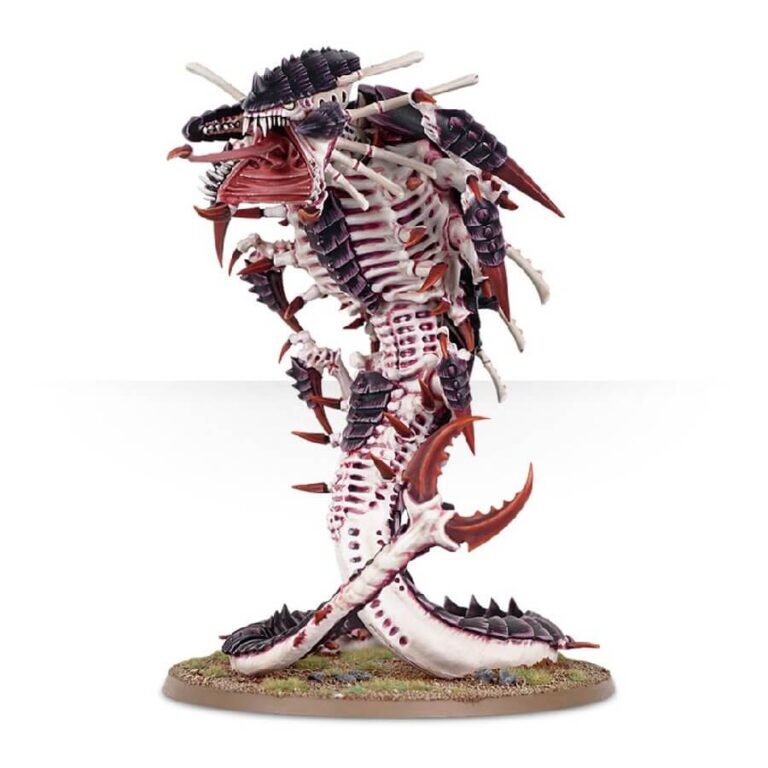
Prepare to be mesmerized by the Mawloc’s nightmarish features. From its chitinous shell to its fleshy, skeletal underbody, every aspect of this creature exudes terror. Its massive, many-teethed maw and the eerie chimneys lining its back only add to the spine-chilling spectacle.
Gaze upon the Mawloc, and you’ll discover a multitude of strange protrusions sprouting from its neck and head. Its limbs possess sharp, deadly ends, while its cobra-like pose, towering on an immense tail, leaves no doubt that it’s ready to strike with lethal precision.
In the ever-evolving universe of Warhammer 40,000, the Mawloc stands as an extraordinary example of the Tyranid’s relentless pursuit of perfection through evolution. This living nightmare personifies the terrifying efficiency of the Hive Mind’s creations.
The Mawloc’s presence on the battlefield is an omen of impending doom. Its ability to strike with swift and savage force makes it a formidable opponent that demands respect and strategy from any who dare to challenge it.
Whether you’re a seasoned Warhammer 40,000 player or a newcomer seeking to experience the awe-inspiring might of the Tyranids, the Mawloc promises an unforgettable addition to your army. Its grotesque yet captivating appearance, coupled with its deadly capabilities, makes it an exceptional centerpiece on the tabletop.
What’s in the Mawloc box
- x97 plastic components with which to make either a Tyranid Mawloc or Tyranid Trygon.
- x1 Citadel 120mm oval base.
How to paint the Mawloc set
- Step 1: Carapace – Base Coat
Using a medium-sized brush, paint the Mawloc’s carapace with Naggaroth Night. Apply a smooth and even coat, ensuring full coverage of the surface. - Step 2: Carapace – Shade
With a fine-tipped brush, apply a wash of a dark purple shade, like Druchii Violet or a mix of Drakenhof Nightshade with a touch of Abaddon Black, to the carapace. This will create shadows and add depth to the model. - Step 3: Carapace – Layer
Using a medium brush, add a layer of a lighter purple shade, such as Genestealer Purple or Xereus Purple, to the raised areas of the carapace. This layering will create highlights and make the carapace stand out. - Step 4: Carapace – Highlight
For a final highlight, use a fine-tipped brush to add a small amount of White Scar to the edges and most prominent sections of the carapace. This will make the carapace look vibrant and visually striking. - Step 5: Flesh – Base Coat
Switch to a clean brush and apply Rakarth Flesh to the exposed flesh areas of the Mawloc. Take your time and ensure a solid and consistent coverage. - Step 6: Flesh – Shade
Using a fine-tipped brush, apply a wash of Carroburg Crimson to the flesh areas. This will add depth and give the flesh a realistic, organic look. - Step 7: Flesh – Layer
With a medium brush, add a layer of Pallid Wych Flesh to the raised areas of the flesh, such as muscles and facial features. This layering will create highlights and bring out the details of the model. - Step 8: Flesh – Highlight
Using a fine-tipped brush, carefully apply small dots or lines of White Scar to the highest points of the flesh, such as cheekbones and knuckles. This will add a touch of brilliance and create a more lifelike appearance. - Step 9: Spikes, Tail Spikes, and Mouth – Base Coat
Now, focus on the Mawloc’s spikes and mouth. Use a medium-sized brush to paint these areas with Khorne Red. Make sure to cover them thoroughly. - Step 10: Spikes, Tail Spikes, and Mouth – Shade
With a fine-tipped brush, apply a wash of Carroburg Crimson to the spikes and mouth. This will add depth and make them look menacing and vibrant. - Step 11: Spikes, Tail Spikes, and Mouth – Layer
Using a fine-tipped brush, add a layer of Evil Sunz Scarlet to the raised areas of the spikes and mouth. This will create highlights and make these features pop. - Step 12: Final Touches
Once you have completed the layering and shading for all the relevant parts, take a step back and assess your work. Check for any areas that may need touch-ups or additional details, ensuring the model looks cohesive and well-painted.

