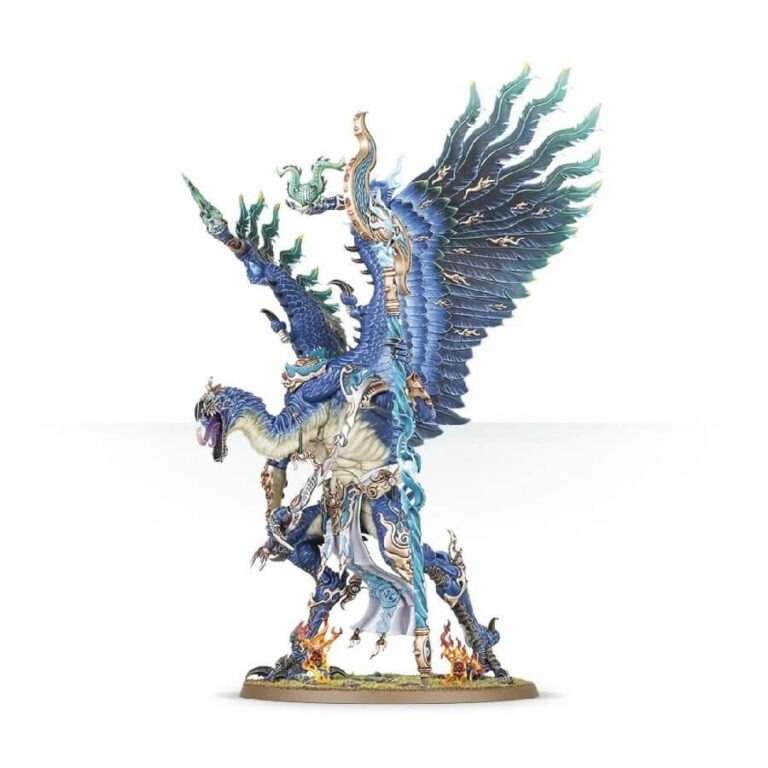
Behold the magnificent Lords of Change, the mightiest daemons of Tzeentch, exuding an ethereal aura of pure magic. With a mere gesture of their clawed hands, they can plunge their adversaries into nightmarish realms or unleash the arcane fires of Tzeentch upon their foes. These cunning beings possess the ability to steal spells from their opponents, harnessing their power for their own purposes, and they can unleash mutating rays from their rods of sorcery, obliterating entire enemy formations.
Contained within this multi-part plastic kit are all the components needed to assemble a Lord of Change, a truly awe-inspiring centerpiece for any Tzeentchian army. This colossal model is adorned with intricate symbols of Tzeentch, signifying its mastery over magic. Its massive wings offer two different positioning options, allowing for customization, and it boasts a selection of three sinister heads to convey its otherworldly presence. The Lord of Change wields a staff of Tzeentch, which can be adorned with either the symbol of Tzeentch or a flaming blade. Alternatively, it can brandish a baleful sword and a Tzeentchian wand. Accompanying this majestic daemon are two Brimstone Horrors that can be added to its base, adding further visual interest to the model.
What’s in the Lord of Change box
- x72 plastic components you can use to build a Lord of Change or Kairos Fateweaver
- x1 Citadel 100mm Round base
How to paint the Lord of Change set
- Step 1: Base Coat
Start by applying a base coat of Retributor Armor to the Lord of Change’s armor, staff, and other metallic areas. Use a medium-sized brush for larger areas and a small brush for intricate details. - Step 2: Feathering the Wings
Mix a 1:1 ratio of Lothern Blue and White Scar on your palette to create a light blue color.
Using a large brush, apply the light blue mixture to the edges of the Lord of Change’s wings, starting from the base and gradually feathering out towards the tips. This technique creates a smooth transition from dark to light, giving the wings a vibrant appearance. - Step 3: Armor Details
For the armor details, paint the various sections using the following Citadel Colour paints:
Khorne Red for the decorative armor sections.
Warpstone Glow for the energy runes and glyphs.
Brass Scorpion for the small accents and trims.
Use a small brush and take your time to ensure clean and precise application. - Step 4: Skin and Feathers
Paint the skin of the Lord of Change using the following Citadel Colour paints:
Bugman’s Glow for the base coat.
Reikland Fleshshade for shading the recesses.
Cadian Fleshtone for highlighting the raised areas.
Apply thin layers and build up the color gradually for a smooth and natural look.
For the feathers, use Celestra Grey as the base coat, followed by a light dry brush of Ulthuan Grey to bring out the texture. - Step 5: Eyes and Staff
Use Mephiston Red for the eyes of the Lord of Change. Apply a small dot in the center of each eye socket.
Paint the staff with XV-88 as the base coat, followed by a wash of Agrax Earthshade to add depth and shadows.
Highlight the staff using Balthasar Gold for the decorative elements and a final dry brush of Auric Armour Gold for a metallic sheen. - Step 6: Final Touches
Apply highlights and final touches to the various parts of the Lord of Change, such as the armor, skin, and feathers, using appropriate shades and highlights to add depth and detail.
Clean up any mistakes or areas where different colors may have overlapped.
Optional: Apply a coat of Munitorum Varnish-Spray or another varnish to protect your paintwork.
We also left you a more detalied video tutorial here. The “miniature” truly looks otherwordly, but this guy is also extremely talented so keep that into account 😉

