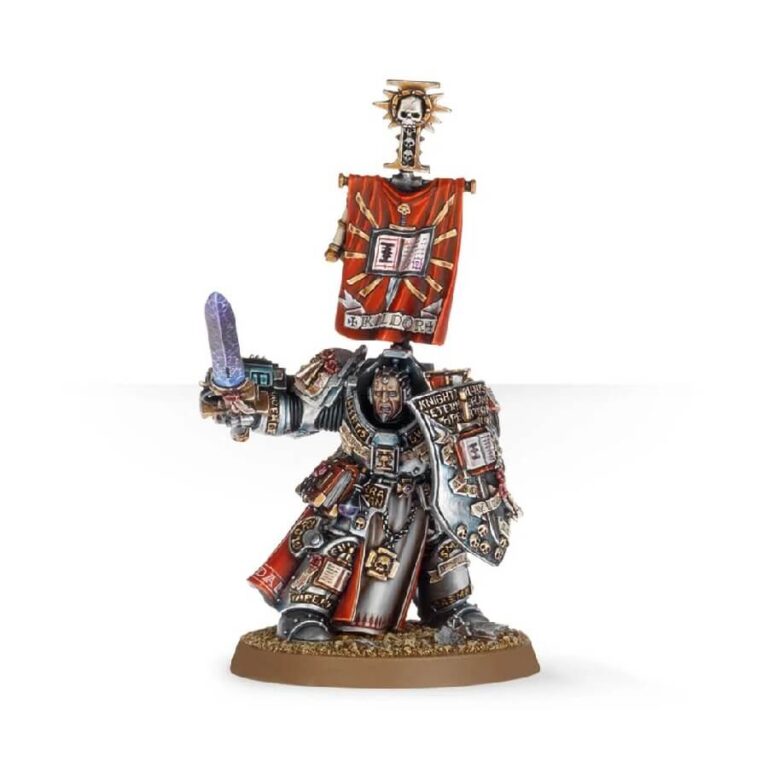
Kaldor Draigo is a legendary hero of the Grey Knights, known for his exceptional martial skill and unwavering devotion to the Emperor. He first gained notoriety as a young Battle-Brother, where he was able to defeat the Daemon Prince M’kar the Reborn and banish him back to the Warp. Since then, Draigo has risen through the ranks of the Grey Knights to become their Supreme Grand Master.
However, his victory over M’kar came with a terrible price. Draigo is now cursed to exist within the Warp, the chaotic realm of the Ruinous Powers. Despite this, he has managed to retain his sanity and purity, a testament to his incredible strength of will and unshakeable faith.
This multi-part plastic kit allows you to build Kaldor Draigo, complete with his signature Daemonhammer and ornate power armour. The kit includes various options to customise your model, such as a choice of heads and a banner.
Lord Kaldor Draigo Datasheets
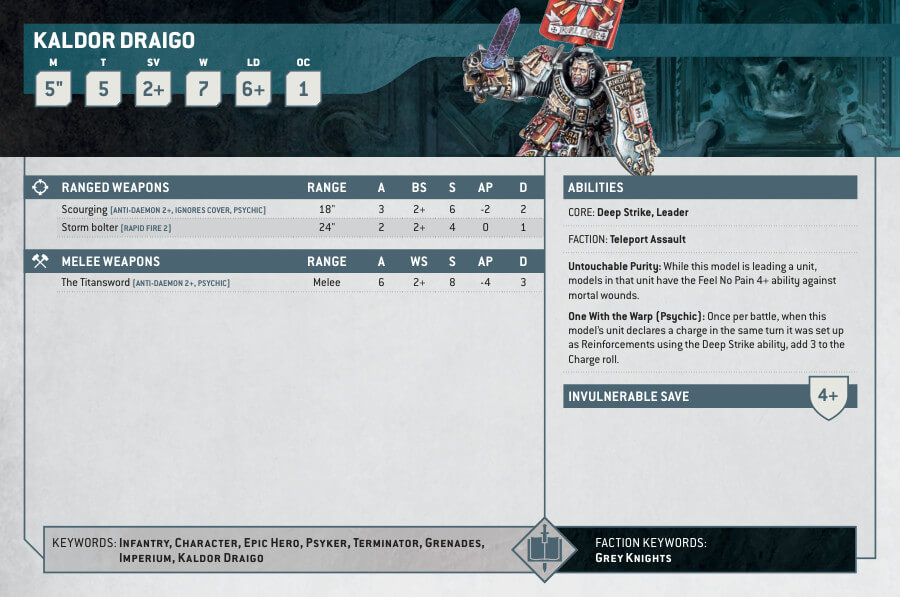
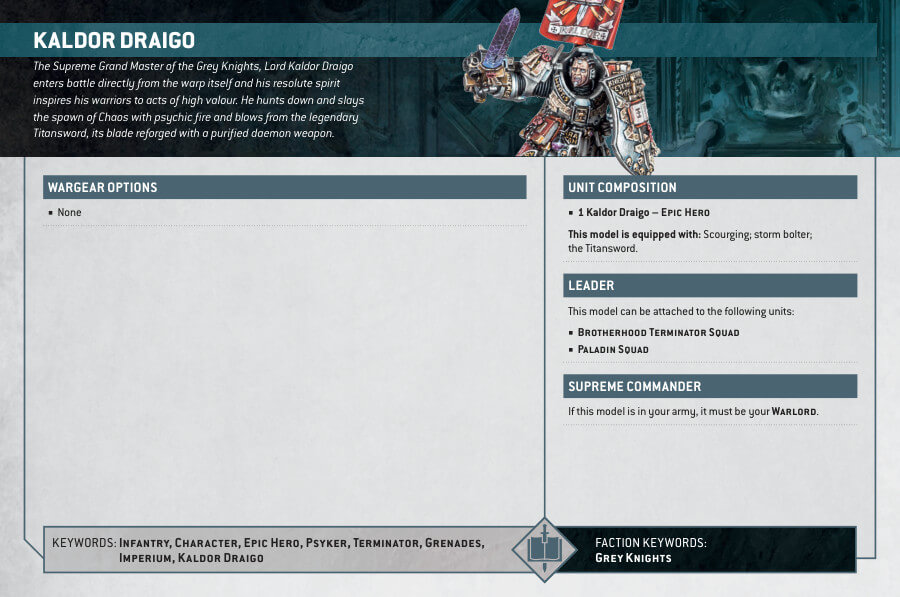
What’s in the Lord Kaldor Draigo box
- x4 resin components that create Lord Kaldor Draigo.
- x1 Citadel 40mm round base.
How to paint the Lord Kaldor Draigo
- Step 1: Priming with Chaos Black
Begin by thoroughly priming the Lord Kaldor Draigo miniature with Chaos Black spray paint. This step provides a solid base for the subsequent layers of paint and ensures a uniform starting point. - Step 2: Armor and Metal Parts
For the armor, sword, and various metal components, employ Leadbelcher. Take your time to apply this base coat evenly, ensuring that all metallic surfaces are adequately covered. - Step 3: Shading with Nuln Oil
Apply Nuln Oil to the armor and metal parts. This shade will seep into the recesses, creating shadows and enhancing the three-dimensional appearance of these areas. Allow it to dry thoroughly before proceeding. - Step 4: Highlighting Armor and Metal
Highlight the armor and metal parts with Ironbreaker. Concentrate on the edges and raised sections to simulate light catching on these surfaces. This step adds depth and contrast. - Step 5: Gold Details
Use Retributor Armour to paint the intricate gold details found on the armor, sword, and banner. Pay close attention to ornate designs and symbols, striving for precision. - Step 6: Shading Gold Details
Enhance the gold details with Reikland Fleshshade. Apply this shade carefully, allowing it to settle into the recesses. It imparts depth and a rich, antique appearance to the gold. - Step 7: Highlighting Gold Details
Highlight the gold details using Liberator Gold. Focus on edges and raised surfaces, replicating the effect of light reflecting off these areas. This step brings a radiant sheen to the gold embellishments. - Step 8: Cape, Eyes, and Purity Seals
Coat the cape, eyes, and purity seals with Mephiston Red. Take your time to achieve a smooth and even application, ensuring that the red is vibrant and consistent across these areas. - Step 9: Shading Cape, Eyes, and Purity Seals
Apply Agrax Earthshade to the cape, eyes, and purity seals. This shade adds depth and dimension to these red areas, creating a sense of realism. - Step 10: Highlighting Cape, Eyes, and Purity Seals
Highlight the cape, eyes, and purity seals with Evil Sunz Scarlet. Focus on edges and raised details to give them a brighter, eye-catching appearance. - Step 11: Skin and Clothing
Paint Lord Kaldor Draigo’s exposed skin and any clothing areas with Rakarth Flesh or Kislev Flesh. Ensure a neat and thorough application, especially on the skin for a lifelike complexion. - Step 12: Shading Skin and Clothing
Apply Druchii Violet to the skin and clothing areas to introduce shading and depth. Concentrate on the recesses and areas where shadows naturally form. - Step 13: Highlighting Skin and Clothing
Highlight the skin and clothing using Pallid Wych Flesh. This step should emphasize the raised areas and edges, giving the skin a healthy glow and the clothing a textured appearance. - Step 14: Clothing Details
Complete the painting process by using Ushabti Bone to add any additional details to the clothing, ensuring that they complement the overall color scheme and aesthetic. - Step 15: Applying Munitorum Varnish
After completing the intricate painting process of Lord Kaldor Draigo, it’s crucial to protect your masterpiece. Apply Munitorum Varnish as the final step to preserve your work and ensure its longevity on the gaming table.

