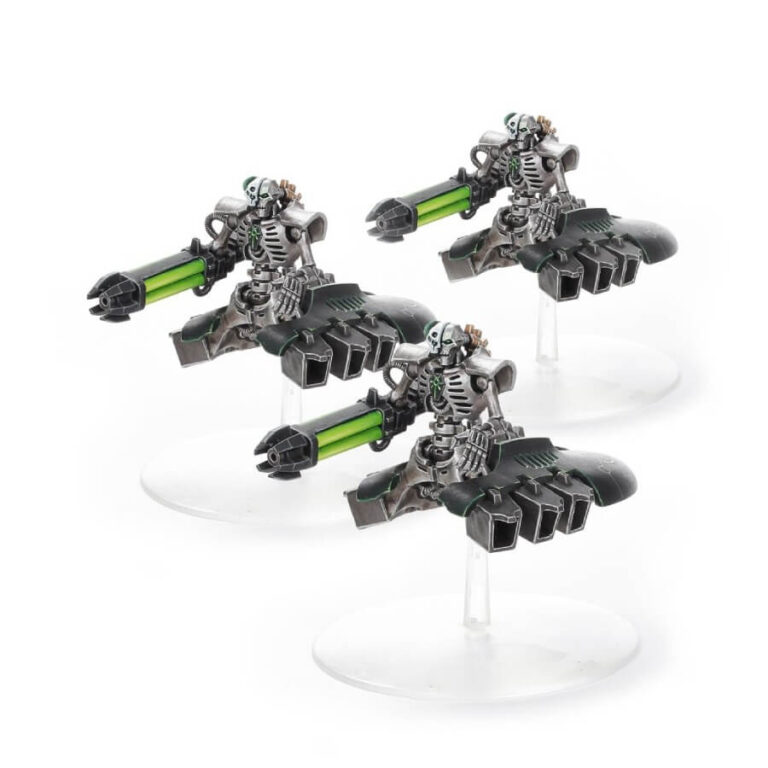
The Lokhust Destroyers: formidable Necron agents of annihilation driven by an unyielding thirst to extinguish the flames of existence itself. These relentless forces stand as harbingers of destruction, leaving no survivors in their wake. On the battlefield, they unleash torrents of heavy fire that shatter enemy formations, only to swoop down upon any survivors with a ruthless resolve to eradicate all signs of life.
This kit allows you to build a Lokhust Destroyer Squadron, equipped with gauss destructors, a formidable Heavy Support option for your necron armies.
What’s in the Lokhust Destroyer Squadron box
- x51 plastic components to make three Lokhust Destroyers.
- x1 Destroyer Transfer Sheet.
- x3 Citadel 60mm flying bases.
How to paint the Lokhust Destroyer Squadron set
- Step 1: Prime the Miniatures
Start by priming your miniatures. Apply a thin layer of primer to ensure paint adherence and a smooth finish. For this guide, we’ll use Chaos Black primer, which provides a solid base for painting. - Step 2: Base Coat
Begin painting the miniatures’ bodies with Leadbelcher. Apply this metallic color evenly to create a strong foundation. The metallic base will set the tone for further detailing. - Step 3: Detail the Guns
Moving on to the guns, apply Tesseract Glow to add a vibrant detail. This luminescent color brings energy to the weaponry. Carefully paint this onto the guns, enhancing their distinct appearance. - Step 4: Propulsors
For the propulsors, opt for a bold contrast. Paint them with Abaddon Black, allowing them to stand out against the metallic body. This dark hue complements the metallic base and adds visual depth. - Step 5: Layering
As before, apply thin layers of paint to build up colors smoothly. This preserves details and adds dimension. Highlight raised areas using a lighter shade, such as Ironbreaker, which complements the metallic base. - Step 6: Contrast Paints
Utilize contrast paints to enhance intricate details. For example, consider applying Blood Angels Red contrast paint on certain elements to create dynamic visual interest. - Step 7: Shade with Washes
Apply washes to deepen shadows and add depth. Choose Nuln Oil to create realistic contrast between shadows and highlights. - Step 8: Attend to Bases
Pay attention to the miniature’s bases, reflecting your desired battlefield environment. For a desolate look, consider using Stirland Mud and dry brushing with Ushabti Bone. - Step 9: Preserve with Varnish
Finally, protect your work by applying a protective varnish. This ensures your miniatures stay vibrant and detailed through gaming sessions and displays.

