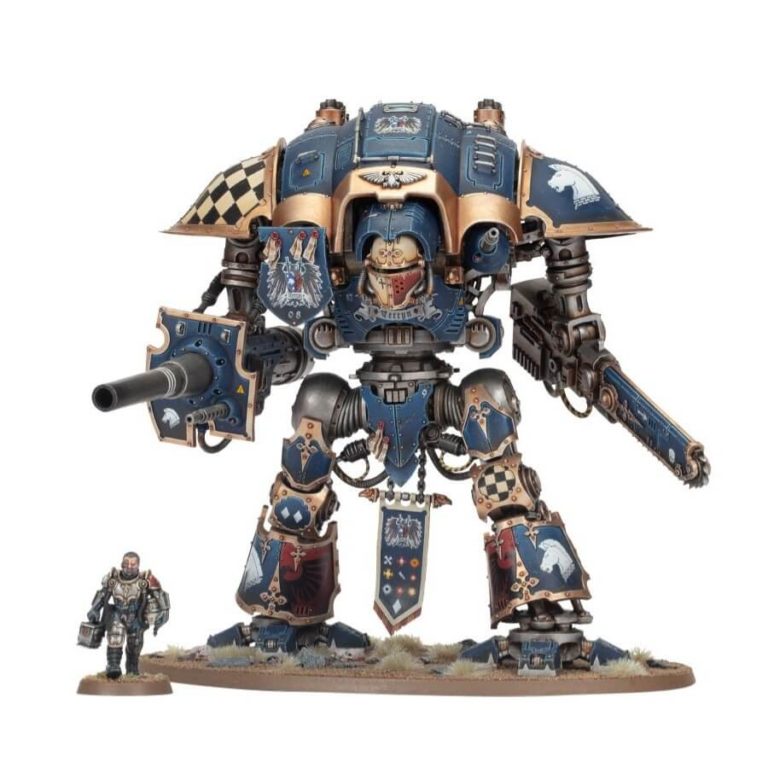
The Knights Paladin are the unsung heroes of many lance formations, providing a strategic backbone that’s highly valued by noble houses across the Imperium. While they may not specialize in a single role, their versatility makes them a favorite choice among houses. These noble war machines are equipped with a rapid-fire battle cannon, a devastating artillery piece aimed directly at the enemy, coupled with a formidable close combat weapon. Seasoned Nobles cherish these mighty steeds, as their experience on the battlefield allows them to fully exploit the tactical flexibility of the Paladin.
This multi-part plastic kit allows you to construct your very own Knight Paladin, a potent Lords of War selection for your Imperial Knights armies, or a wandering Freeblade ready to aid other Imperium forces. This super-heavy walker boasts a rapid-fire battle cannon and offers a range of options for melee and carapace-mounted weaponry. Additionally, it has the unique capability to provide guidance to allied Armiger-class squires. The Knight Paladin is not only a formidable force on the tabletop but also an exciting painting project. With a wealth of customization possibilities and meticulously detailed components, you can fashion a truly distinct engine of war.
But that’s not all! This versatile kit can also be assembled into various other Questoris-class Imperial Knights, including the Errant, Crusader, Gallant, Preceptor, Warden, or the renowned knight known as Canis Rex. Alternatively, it can take the form of a Knight Despoiler, ready to serve the forces of Chaos Knights. Any remaining weapons, faceplates, or accessories can be kept as spares for your other Knight kits. Additionally, this kit includes parts to construct an exposed pilot seated within the Knight’s chassis or a pilot on foot, adding an extra layer of detail and narrative to your model.
With the Knights Paladin kit, you have the power to create a truly iconic addition to your collection, whether you’re a seasoned collector or just embarking on your journey into the world of Imperial Knights.
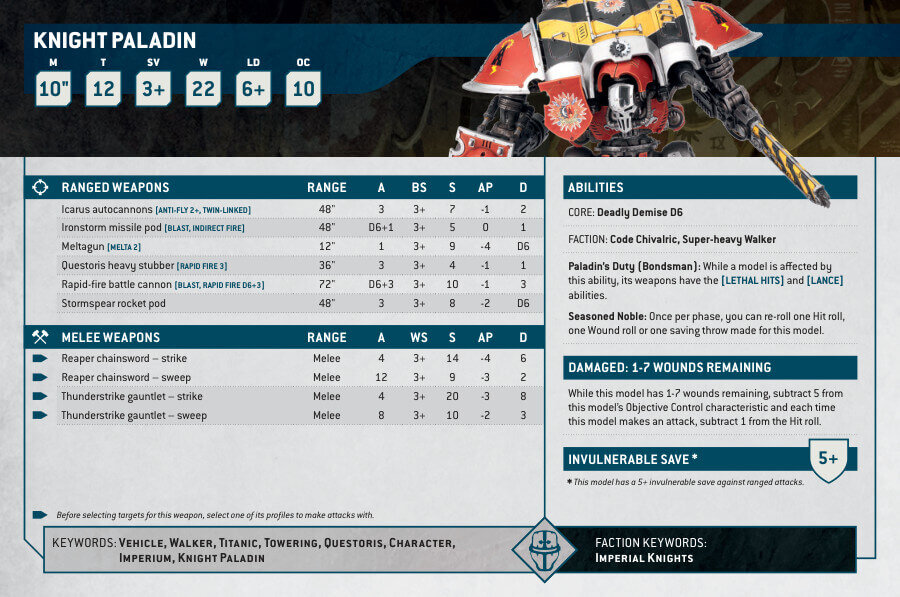
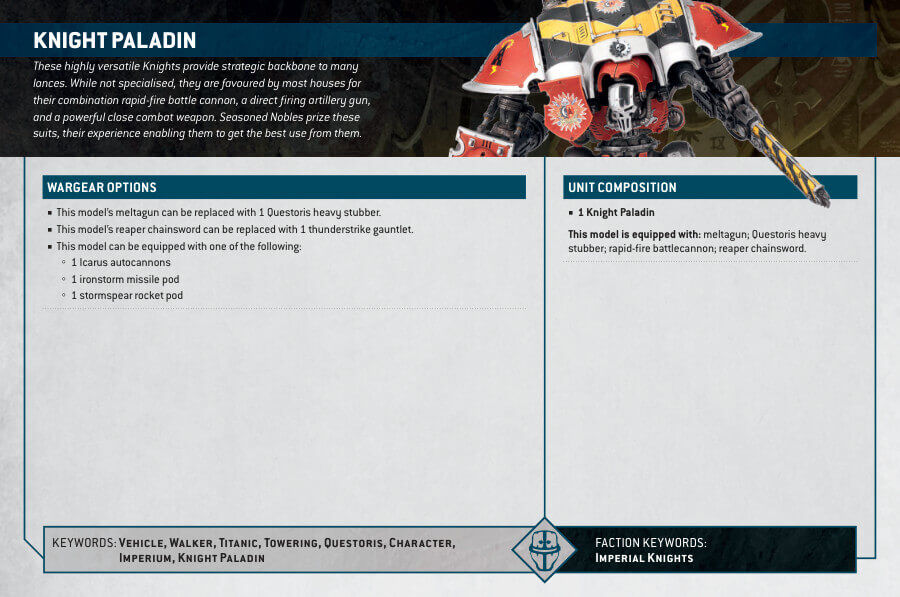
Knight Paladin Datasheets
What’s in the Knight Paladin box
- x250 plastic components that make one Knight Paladin or other Questoris-class Knights(mentioned above).
- x1 Citadel 170 x 109 mm Oval Base.
- x1 Citadel 25mm Round Base.
- x1 transfer sheet, featuring heraldry for Imperial Knights.
How to paint the Knight Paladin Set
- Step 1: Priming
To start your painting journey with the Knight Paladin, begin by priming your model with Leadbelcher spray primer. This essential step provides a solid metallic foundation for your paint to adhere to. Ensure that the entire model is evenly primed, and allow it to dry thoroughly before proceeding. - Step 2: Armor Plates
Moving on to the armor plates, apply Caledor Sky or any other blue paint you want, to establish an even and consistent base color for your Knight’s armor. Make sure the coverage is smooth and complete. - Step 3: Adding Depth to Armor
Enhance the armor’s depth and definition by applying Drakenhof Nightshade as a shade. Concentrate on the recesses and shadowed areas. Once the shade is dry, layer the armor with Hoeth Blue. Focus on raised sections and edges to create highlights and dimension. To intensify the highlights, add an additional layer of Hoeth Blue. - Step 4: Metallic Parts
For the metallic components, use Nuln Oil to shade and achieve a weathered appearance. Let the shade settle into the crevices and recesses. Once dry, layer the metallic parts with Stormhost Silver, giving special attention to raised areas for a polished, gleaming finish. No additional base coat is required due to the earlier use of Leadbelcher spray. - Step 5: Trims and Gold Details
Apply Retributor Armour as the base coat for trims and gold details, ensuring thorough and even application. Shade the gold areas with Reikland Fleshshade to add depth and warmth. Layer the shaded gold with Auric Armour Gold for enhanced brilliance. To make the details stand out, apply a final layer of Liberator Gold. - Step 6: Details
You can create a unique checkerboard pattern on the right shoulder pad and other armor plates, and just paint details in general on this knight using Tau Light Ochre, Ungor Flesh, and Abaddon Black. These colors will provide contrast and intricacy to your Knight’s appearance. Shade the tau ochre areas with Agrax Earthshade for depth and realism. Layer the shaded areas with the respective colors to create highlights. - Step 7: Other Small Details
Give attention to the smaller details on your Knight Paladin. Use White Scar or Mephiston Red to paint symbols, emblems, and intricate elements with precision and clarity. - Step 8: Weathering (Optional)
For a weathered appearance, consider adding Typhus Corrosion or Ryza Rust sparingly to simulate wear and tear. This step adds authenticity to your Knight’s look. - Step 9: Base and Varnishing
Complete the base according to your chosen style, whether it’s a scenic base or textured paint. Options include Martian Ironearth for a rugged terrain or Stirland Mud for a muddy, earthy appearance. Add terrain elements as desired.
Finally, to protect your meticulously painted Knight Paladin and give it a professional finish, apply a layer of Munitorum varnish. This step ensures the durability of your paintwork while preserving the details and textures on the base.

