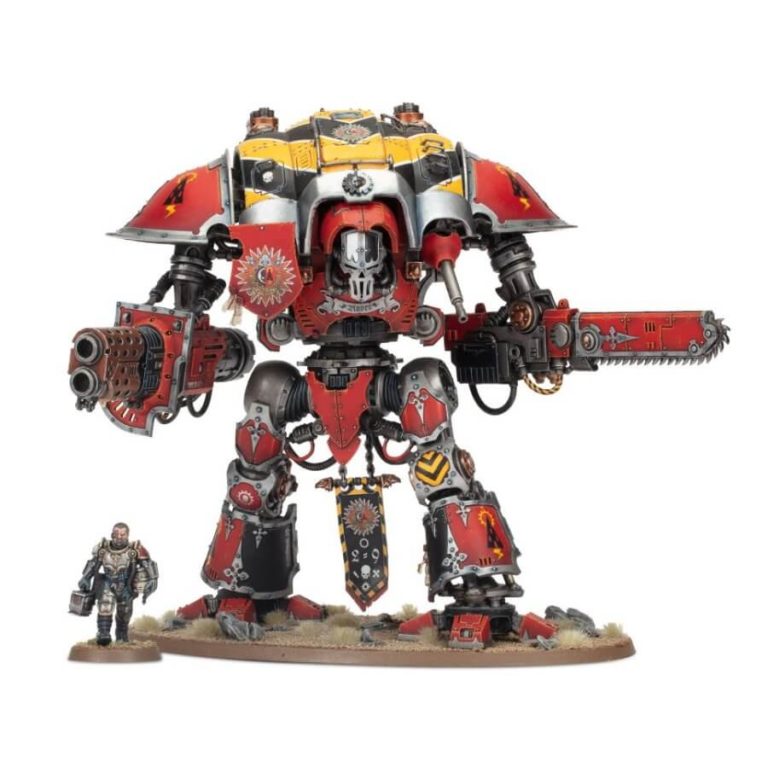
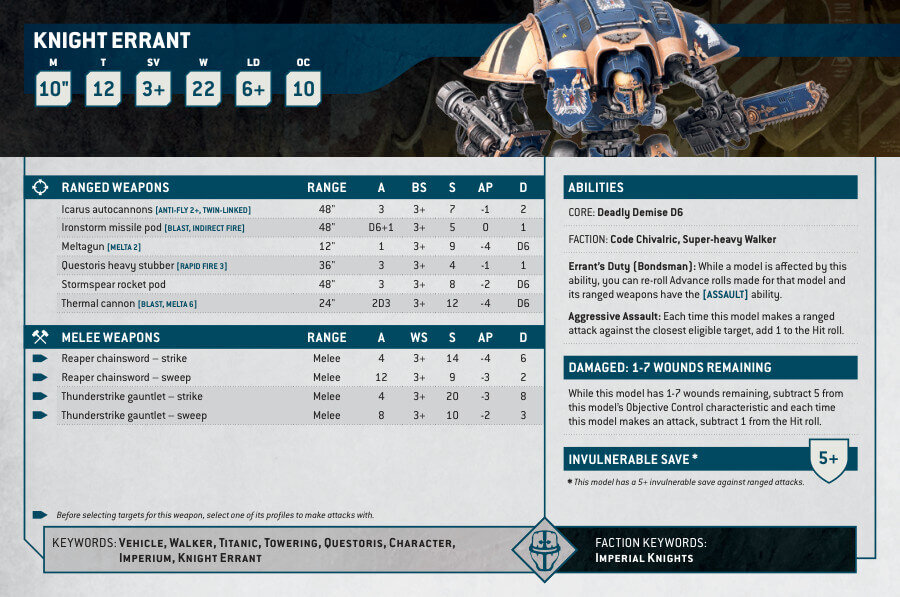
With the ability to goad allied Armiger-class Knights into battle, the Knight Errant is a top choice for those looking to bolster their Imperial Knights armies or add a wandering Freeblade to their Imperium forces. The super-heavy walker is armed with a thermal cannon and can be equipped with a range of melee and carapace-mounted weapons, making it a versatile and deadly addition to any collection.
But that’s not all – this multi-part plastic kit can also be assembled as a variety of other Questoris-class Imperial Knights, including the Crusader, Paladin, Gallant, Preceptor, Warden, or the named knight Canis Rex. And for those who prefer to fight on the side of chaos, the kit can also be used to create a Knight Despoiler for Chaos Knights.
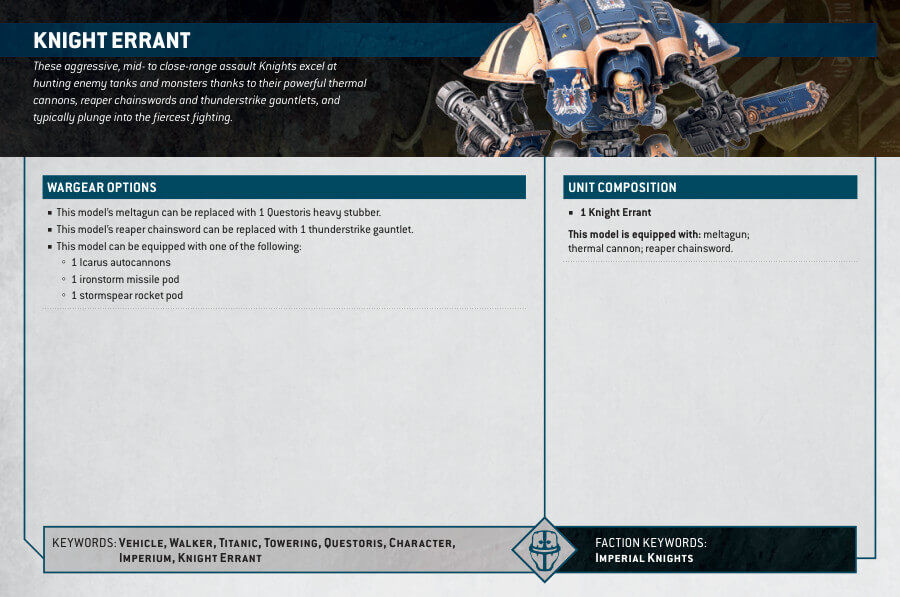
Knight Errant Datasheets
What’s in the Knight Errant box
- x250 plastic components that make the Knight Errant.
- x1 Citadel 170mm Oval Base.
- x1 Citadel 25mm Round Base.
- x1 transfer sheet, featuring heraldry for Imperial Knights.
How to paint the Knight Errant Set
- Step 1: Lay the Metallic Foundation
Kickstart your journey by priming your Knight Errant with Leadbelcher spray primer. This pivotal step provides a sturdy metallic canvas for your paint to cling to. Ensure an even application, and allow it to dry completely before proceeding. - Step 2: The Base Coat Symphony
Begin by skillfully applying a uniform base coat of Mephiston Red across all the armor plates and the chainsword. This initial layer sets the stage for your Knight’s distinctive armor color. Precision is key, and patience as it dries is a virtue. - Step 3: Shading with Earthly Grace
Now, breathe life into your armor by using Nuln Oil for shading. Concentrate on the recesses and naturally shadowed areas. The Earthshade not only enriches the red hue but also imparts a sense of depth. Allow it to settle, deepening the visual narrative. - Step 4: Illuminate the Edges
Elevate your Knight’s presence by highlighting the edges of the armor. Opt for a lighter shade of your base color. This technique defines the model’s contours and creates a captivating 3D effect. For instance, Evil Sunz Scarlet is a splendid choice for the red armor plates. - Step 5: The Final Flourish
Elevate your artistry by adding a concluding layer of Wild Rider Red. Concentrate on the most raised surfaces. This additional layer crafts a captivating gradient from shadow to light, infusing your Knight with dynamic energy. - Step 6: Shading the Metal Majesty
With the Leadbelcher foundation ready, embrace the weathered allure of your metallic components using Agrax Earthshade for shading. Generously apply it, allowing it to seep into every crevice and recess. This shading step introduces depth and authenticity to the metal elements and makes them look weathered. Ensure the shade dries thoroughly. - Step 7: Metallic Brilliance
Bring your metallic components to life by layering them with Ironbreaker. Focus on the edges and elevated details. This transformative step bestows a polished, reflective sheen upon the metal, animating your Knight’s mechanical soul. - Step 8: Craftsmanship in Detail
For the smaller but equally vital details on your Knight Errant, employ these colors:
Averland Sunset and Abaddon Black, ideal for crafting danger zone patterns on shoulder pads or enhancing other intricate features.
Warplock Bronze, perfect for adding luster to elements like gun barrels or mechanical parts.
White Scar, your brush of precision, to adorn your model with symbols and emblems, ensuring clarity and attention to detail. - Step 9: The Majestic Base
Elevate your Knight Errant’s presence by creating a captivating base for it to stand upon. Employ textured paints like Astrogranite or Stirland Mud to introduce dimension and authenticity. Then, paint the base to harmonize with your envisioned theme, whether it’s a sandy desert or a lush grassy expanse. A final touch of tufts or static grass enhances the realism. - Step 10: Shield Your Masterpiece
To safeguard your masterpiece and add a refined finish, apply a protective varnish to your painted model. Opt for either matte or gloss spray varnish, depending on your preference. Evenly coat your creation, following the instructions on the varnish can. This step ensures the longevity and durability of your exquisite work while providing a consistent, professional finish.

