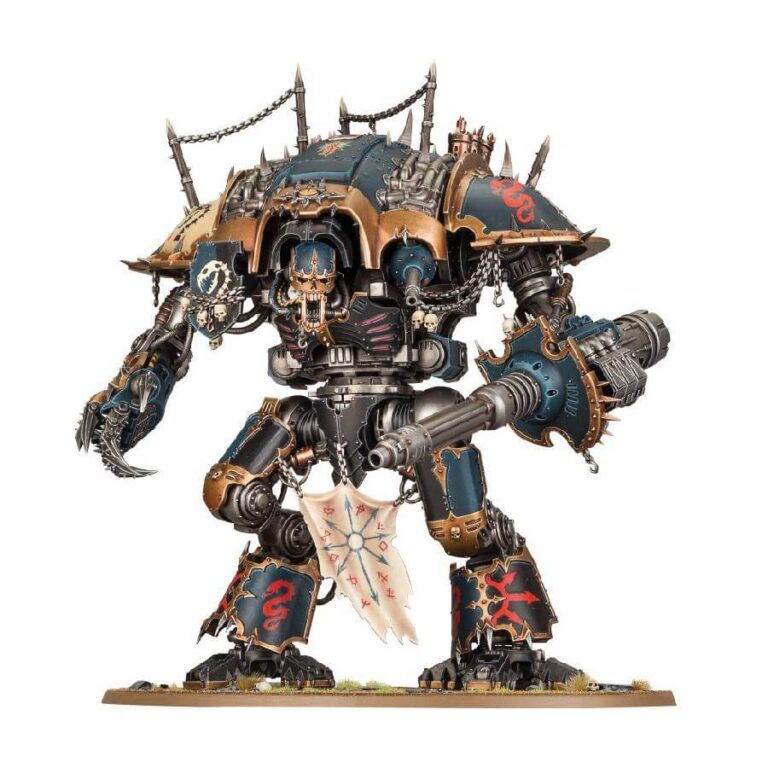
The Knights Desecrator bring devastation to all who stand in their path, employing formidable weaponry to dismantle enemy war machines and crush swarming hordes. As imposing figures on the battlefield, these titanic Lords of War instill fear in their adversaries while commanding their loyal War Dog followers.
This multi-part plastic kit enables you to construct a Knight Desecrator, a magnificent addition to your Chaos Knights forces or a formidable Dreadblade for your Chaos armies. The colossal walker is equipped with a lethal Desecrator laser destructor, capable of eliminating targets at extreme distances. It also features a carapace-mounted diabolus heavy stubber for additional firepower, and the choice between a menacing reaper chainsword or a vicious warpstrike claw for deadly close-quarters combat. Towering over other models on the tabletop, the Knight Desecrator serves as an exceptional canvas for your painting skills. With intricate components including striking faceplates and optional chains, pipes, spikes, and horns, you have the opportunity to craft a truly unique engine of malevolence.
What’s in the Knight Desecrator box
- x176 plastic components that make this model. This kit can also be assembled as a Knight Abominant or Knight Rampager and any remaining weapons, faceplates, or accessories can be used as spares for your other Knight kits.
- x1 Citadel 170mm Oval Base
- x1 Chaos Knights transfer sheet featuring 339 runes, sigils, and iconography various Dread Households.
How to paint the Knight Desecrator set
- Step 1: Basecoat the model’s armor using a dark metallic color like Leadbelcher, ensuring that the entire surface is evenly covered with paint. This will provide a solid foundation for the subsequent layers of paint.
- Step 2: Use a smaller brush to carefully paint the trim and details on the armor with a contrasting color, such as Mephiston Red or Kantor Blue, depending on your desired scheme. Take your time to achieve clean and precise lines, adding visual interest to the model.
- Step 3: Apply a wash of Nuln Oil or Agrax Earthshade to the recesses of the armor, using a thin layer to enhance the shadows and create depth. Allow the wash to flow naturally into the crevices for realistic shading.
- Step 4: Highlight the raised areas of the armor by dry brushing with a lighter metallic color like Ironbreaker or Stormhost Silver. Use a dry brush technique, removing most of the paint from the brush, and gently sweep it over the edges and surfaces to bring out the details.
- Step 5: Paint the Desecrator laser destructor with a bright energy color like Warpstone Glow or Temple Guard Blue, gradually layering the paint to create a vibrant and powerful effect. Apply multiple thin coats to achieve a smooth and even finish.
- Step 6: Add additional details and accents, such as pipes, spikes, and horns, using appropriate colors. For example, you can paint the spikes with XV-88 or the horns with Zandri Dust, adding depth and texture to the model.
- Step 7: Paint the carapace-mounted diabolus heavy stubber with a dark metallic color like Leadbelcher, ensuring it matches the armor. Then, use a bright color like Evil Sunz Scarlet or Averland Sunset to highlight the gun casing or muzzle, making it stand out.
- Step 8: Use a fine brush to carefully paint the Knight Desecrator’s faceplate, using colors like Wazdakka Red or Caliban Green to create distinctive facial features. Highlight the eyes or other details with a contrasting color for added realism.
- Step 9: Once the paint is dry, apply a matte varnish like Stormshield to protect the model’s finish and reduce any unwanted shine. Follow the instructions on the varnish for the best results.
- Step 10: Base the model’s base with a suitable color such as Stirland Mud or Astrogranite Debris, then add texture using materials like Citadel Texture paints or fine sand. Paint the base to match your desired theme, whether it’s a desolate wasteland or a battle-scarred battlefield, using colors like Steel Legion Drab or Agrellan Earth.

