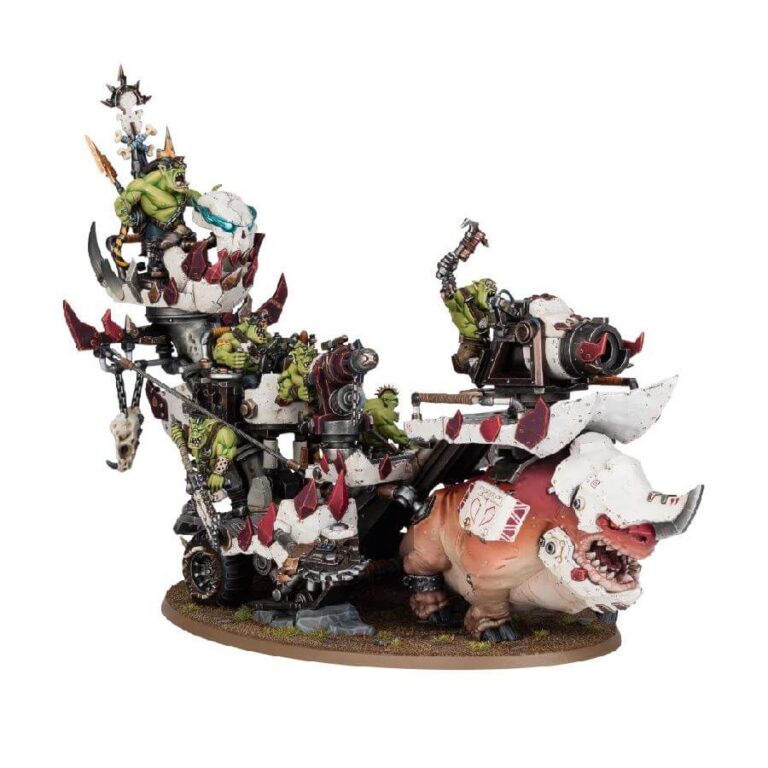
Prepare for the terrifying arrival of the Ork Kill Rig, a mobile death platform brimming with savage Orks and pulled by a colossal tramplasquig. From its wurrtower, a Wurrboy unleashes powerful bolts of psychic energy, while the crew operates ‘eavy lobbas and stikka kannons for maximum destruction. This rickety war platform is a centerpiece for any Ork Waaagh!, boasting formidable melee and ranged weapons, and serves as a versatile transport for Beast Snagga Boyz or a mobile command post for a Wurrboy. Get ready for the cacophony of battle and witness the devastation unleashed by the fearsome Kill Rig!
What’s in the Kill Rig box
- x111 plastic components that allow you to build one Kill Rig. The multiple emplacements on the rig can be mounted in a number of different places. Alternatively, this kit can be built as a Hunta Rig with a separate Wurrboy.
- x1 Citadel 170mm Oval base.
How to paint the Kill Rig set
- Step 1: Basecoat the Rig
Begin by painting the Kill Rig with metallic colors like Leadbelcher or Iron Warriors. Use a fine detail brush to apply the paint to the rig’s metal parts, giving it a metallic appearance. - Step 2: Paint the Black and Bone Plates
Next, use a dark black color, such as Abaddon Black, to paint the rig’s body areas that you want to be black. Then, with a lighter color like Ushabti Bone or Screaming Skull, paint the bone plates and details on the rig for a contrasting effect. - Step 3: Paint the Squig
For the squig’s back, use a vibrant red color like Mephiston Red. Gradually transition the color to a flesh color, such as Cadian Fleshtone, as you move towards the middle. Finally, paint the belly with a white color like White Scar. - Step 4: Paint the Orks
Paint the Orks riding the rig with green colors like Caliban Green or Waaagh! Flesh for their skin. Then, use various colors to paint their clothing, guns, and other details, adding personality to each Ork. - Step 5: Add Details and Highlights
Once the base colors are dry, add additional details to the rig, squig, and Orks using appropriate colors. Use lighter shades of the base colors to highlight edges and add depth to the model. - Step 6: Apply a Wash
Apply a wash like Agrax Earthshade or Nuln Oil to the entire model. This will add depth to the colors, bring out the details, and create shadows, enhancing the overall appearance. - Step 7: Final Touches
Add any final touches to the model, such as painting the eyes of the Orks or adding weathering effects to the rig. You can use colors like Athonian Camoshade for a dirty or rusted look. - Step 8: Varnish
To protect your paintwork and give your model a finished look, apply a matte or gloss varnish to the entire model. This will help preserve the paint and provide a consistent finish.

