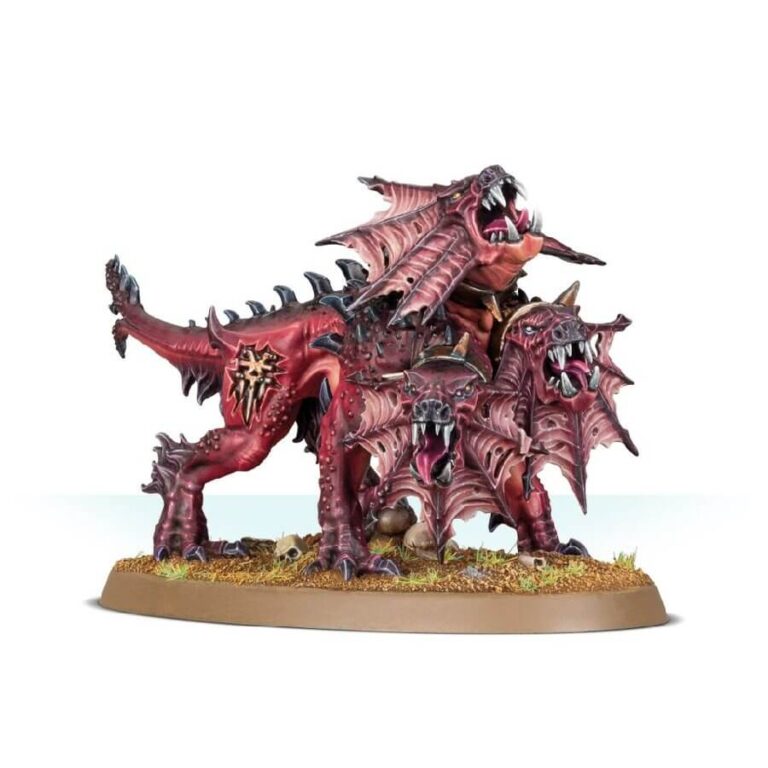
Whether you engage in the battles of Warhammer 40,000 or delve into the realms of Warhammer Age of Sigmar, Karanak stands as a formidable Daemon at your command. With his unmatched prowess as a hero-hunter, he effortlessly rends even the sturdiest adversaries asunder. His exceptional ability to nullify psychic powers and dispel dark sorcery makes him an invaluable asset, countering those who cowardly hide behind wicked magic.
Karanak’s presence on the battlefield is an exhilarating force to be reckoned with. His unwavering determination and insatiable appetite for destruction are sure to captivate players across both gaming systems. Prepare to unleash this fearsome predator and witness the havoc he wreaks upon the enemies of chaos. Embrace the thrill of commanding Karanak, as he embodies the essence of relentless pursuit and unbridled power in the Warhammer universes.
What’s in the Karanak, The Hound of Vengeance box
- x13 plastic components.This set allows you to build Karanak, the Hound of Vengeance for yourself. This three-headed hound will look great alongside your other Flesh Hounds, or as a striking painter’s project.
- x1 75mm oval base
How to paint the Karanak, The Hound of Vengeance set
- Step 1: Prime the model
Apply a thin, even coat of black or grey primer to Karanak. This helps the paint adhere better and provides a good base for further layers. - Step 2: Basecoat the model
Using a medium-sized brush, apply a basecoat of Mephiston Red to Karanak’s body, ensuring even coverage. This vibrant red will serve as the foundation for the model’s color scheme. - Step 3: Highlight the model
Using a smaller brush, carefully apply a layer of Evil Sunz Scarlet to the raised areas of Karanak’s body, such as the muscles, edges, and protrusions. This technique, called highlighting, adds depth and definition to the model. - Step 4: Paint the details
Switch to a fine detail brush to paint the smaller features. Use Abaddon Black for the claws, teeth, and eyes to make them stand out. For the collar and chains, use Leadbelcher to create a metallic effect. - Step 5: Apply washes
To add depth and shading, apply a wash of Agrax Earthshade to the entire model. This will settle into the recesses, enhancing the details and providing a more realistic appearance. - Step 6: Add final highlights
Using a small brush, carefully apply a final highlight of Wazdakka Red to the edges and raised areas that were previously highlighted with Evil Sunz Scarlet. This brings out the sharpness and adds a finishing touch to the model. - Step 7: Bases and finishing touches
Paint the base with a layer of texture paint or apply sand and rocks using PVA glue for a realistic look. Once dry, you can paint the base to match your preferred style. Consider drybrushing with Tyrant Skull for a bone-like effect

