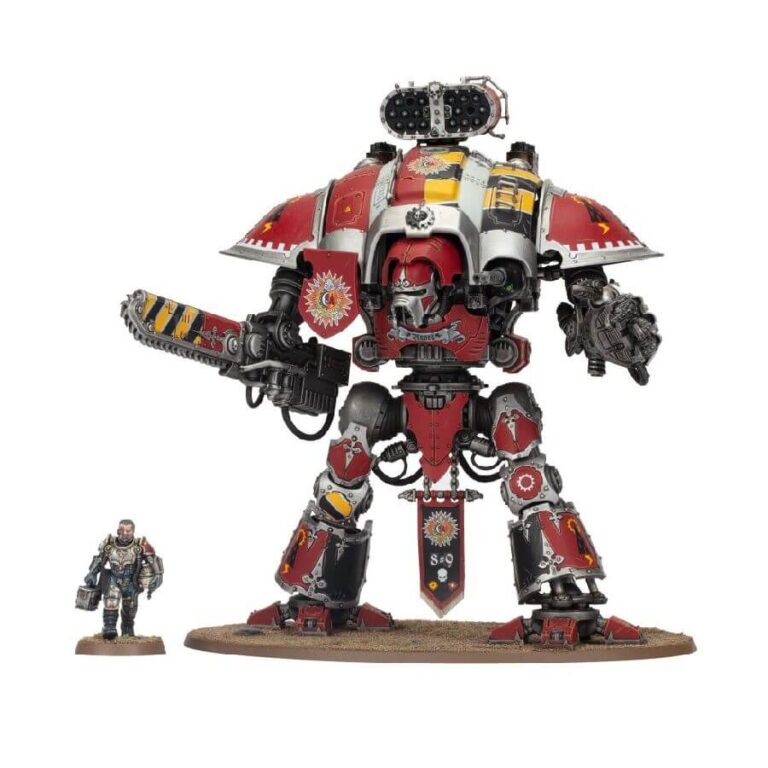
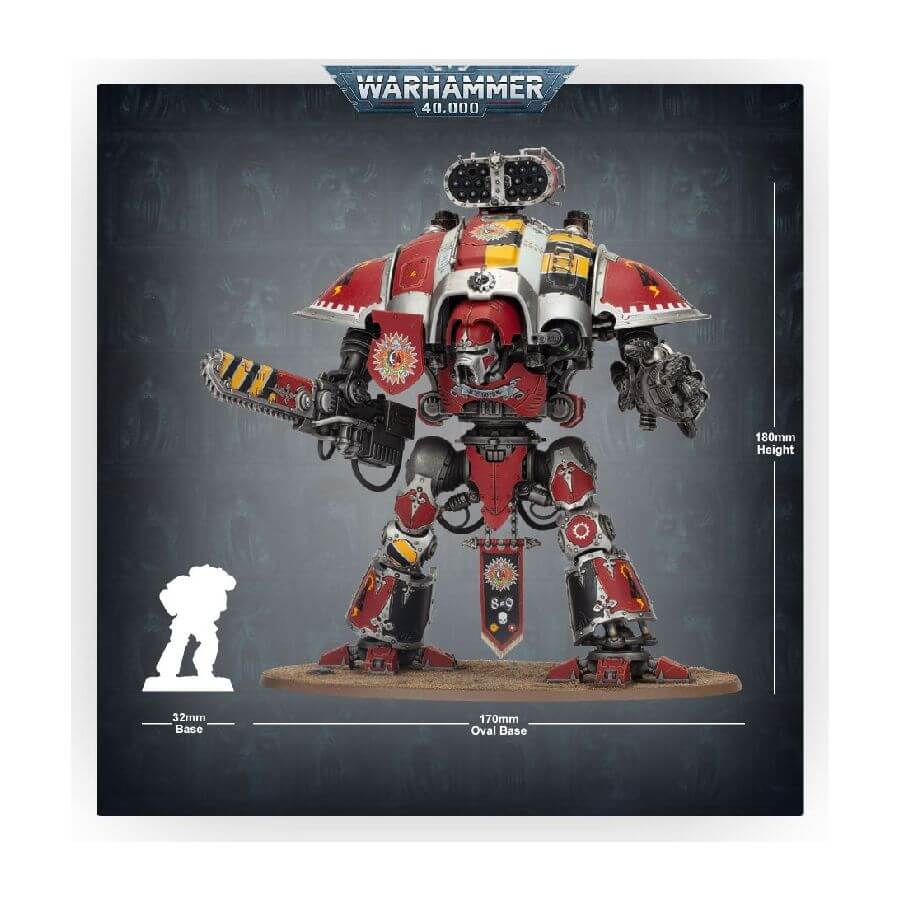
In the grim and distant future of the Warhammer 40,000 universe, where battles are waged on a colossal scale, the Imperial Knight Gallant stands as a juggernaut of destruction. Engineered for one purpose – close-range annihilation of foes – this formidable war machine leaves very few adversaries standing after its initial assault.
As the ground trembles beneath its colossal feet, the Imperial Knight Gallant advances relentlessly, closing the gap between itself and its prey with astonishing speed. Its imposing robotic form, though massive, belies its deceptive agility. Within moments, it is within striking range, poised to unleash a torrent of devastation with both its reaper chainsword and thunderstrike gauntlet. When a Knight Gallant charges into the fray, it resembles a tidal wave crashing upon the enemy lines, emerging from the chaos unscathed.
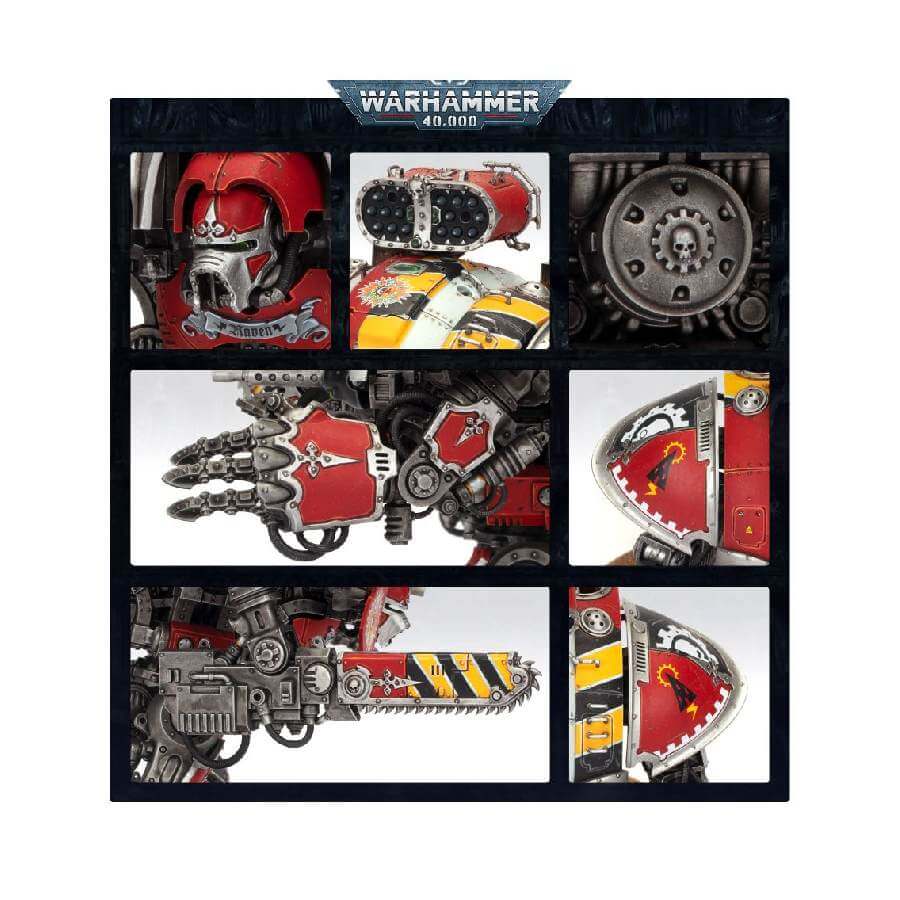
This multi-part plastic kit provides all the components necessary to construct your own Imperial Knight Gallant, a true embodiment of Imperial might and power. The model’s sheer presence is awe-inspiring, from its menacing faceplate to the raw, industrial aesthetics of its exposed hydraulics system, which fuels its brutal assaults.
A Detailed Breakdown of Components
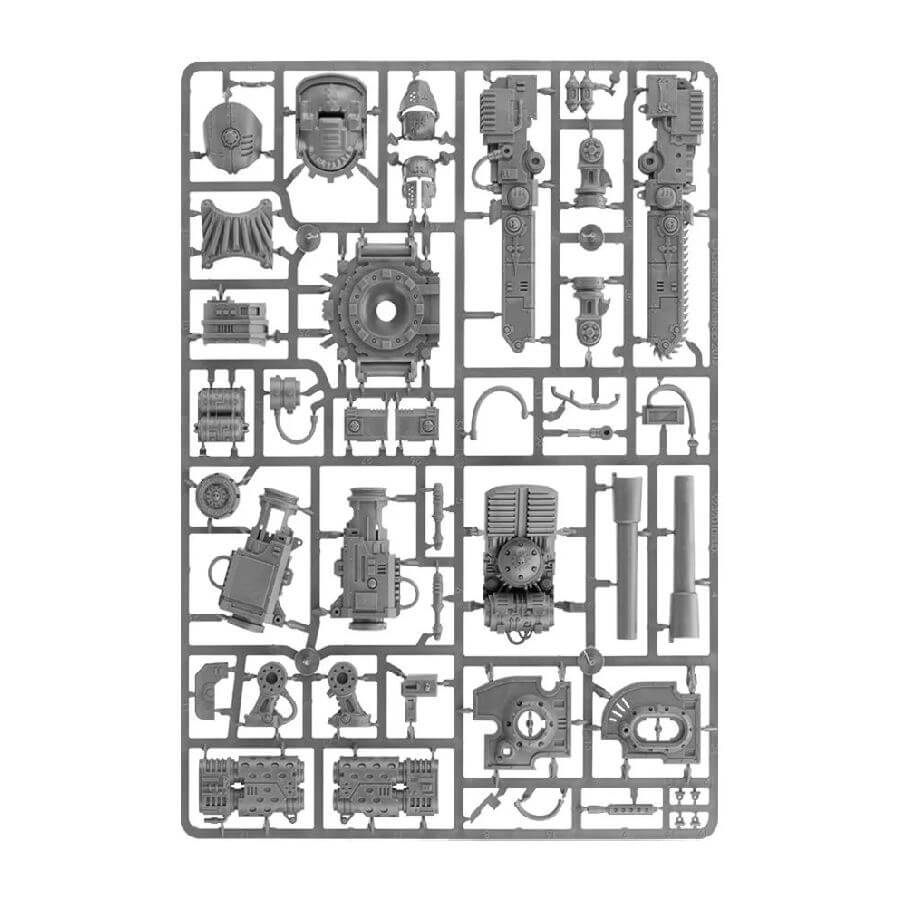
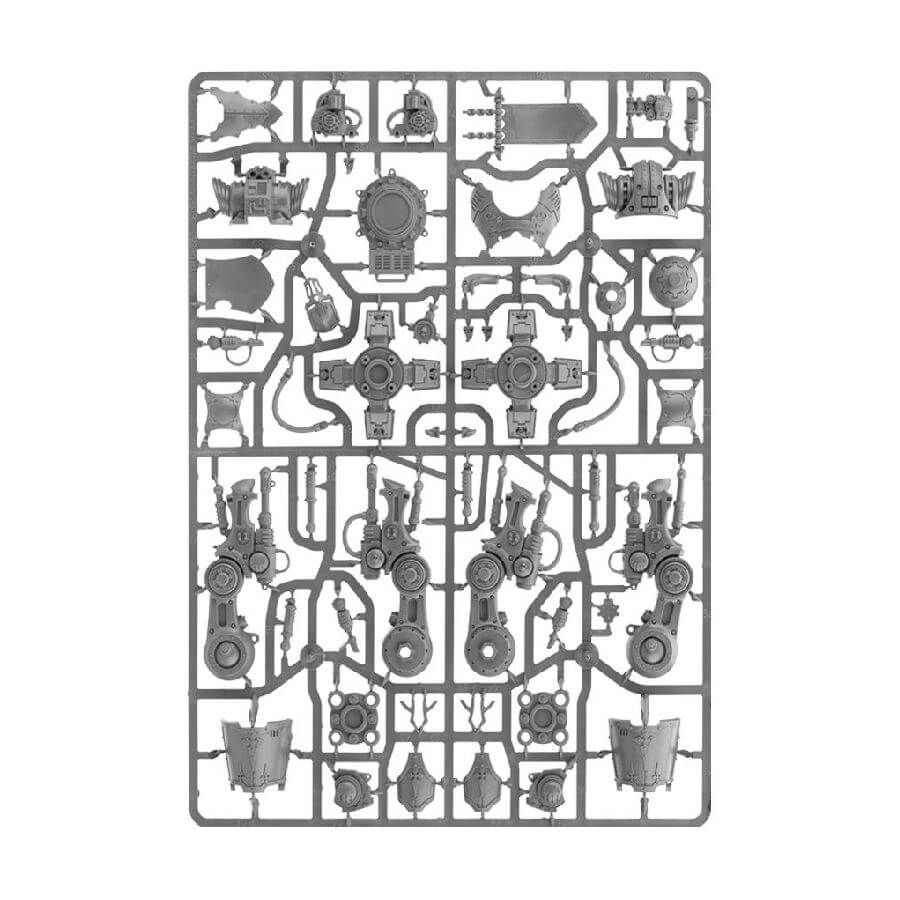
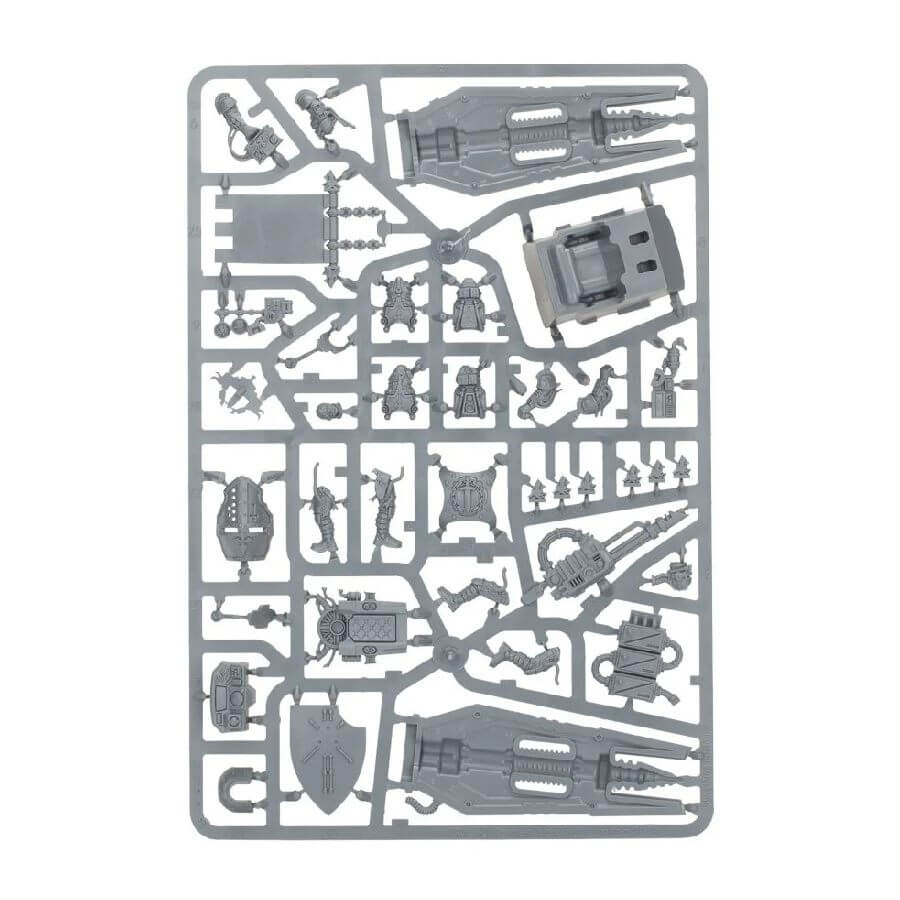
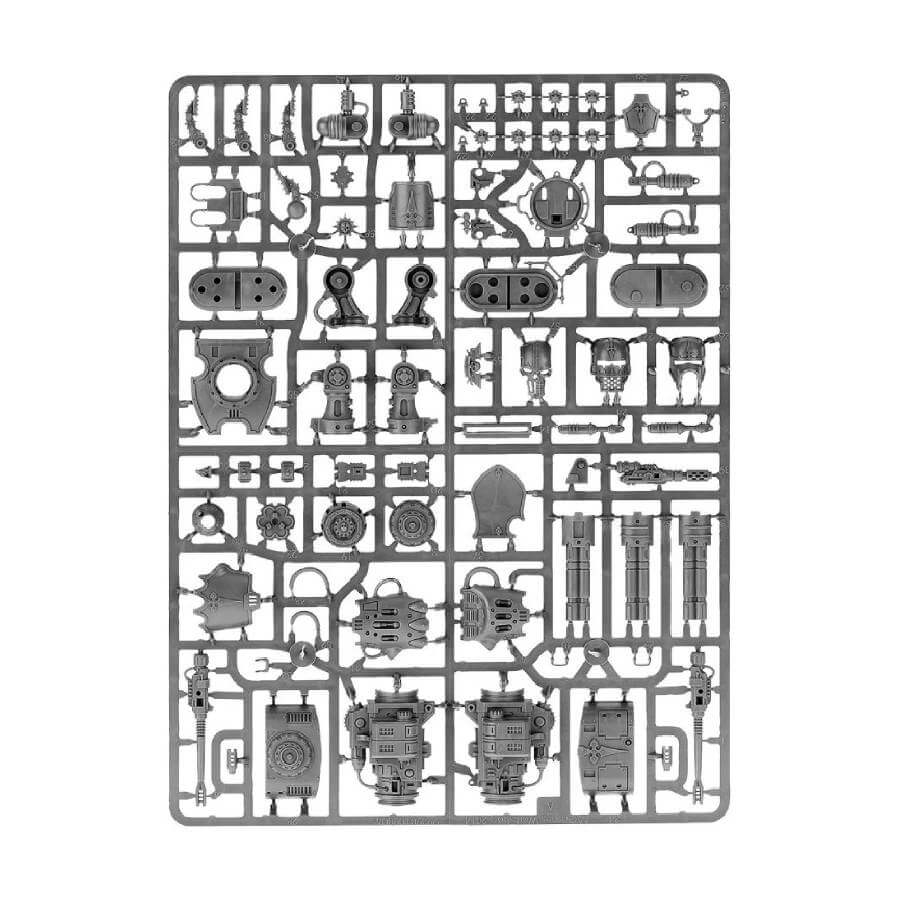
Contained within this kit are four frames of plastic components, each meticulously crafted to assemble the Imperial Knight Gallant:
- Imperial Knight Carapace Components: This frame includes the knight’s imposing carapace, engine block assembly, shoulder pads, shoulder joints, two sets of carapace heraldry, and a heavy stubber.
- Imperial Knight Leg Components: Construct the knight’s legs and feet assemblies, greaves, waist assembly, chestplates, faceplates, a pennant, tilting plate, and armor plates for the knees and groin.
- Imperial Knight Weapons: Arm your knight with a thermal cannon, rapid-fire battlecannon, heavy stubber, two alternate faceplates, and torso assembly.
- Imperial Knight Warden Frame: This frame provides the thunderstrike gauntlet, avenger gatling cannon, carapace-mounted twin icarus autocannon, carapace-mounted missile launcher with the choice of ironstorm, shieldbreaker, or stormspear missile pods, meltagun, three alternate faceplates, and tilting plate.
Using these carefully crafted frames, you can construct the foundational structure of this Imperial Knight. Add the reaper chainsword and thunderstrike gauntlet, and you have a fully-fledged Imperial Knight Gallant ready to bring righteous fury to the battlefield.
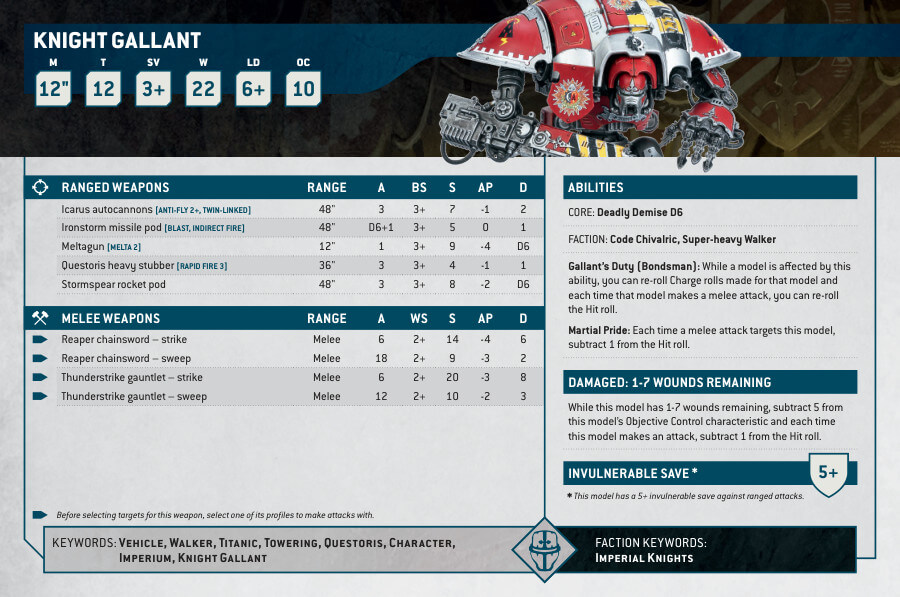
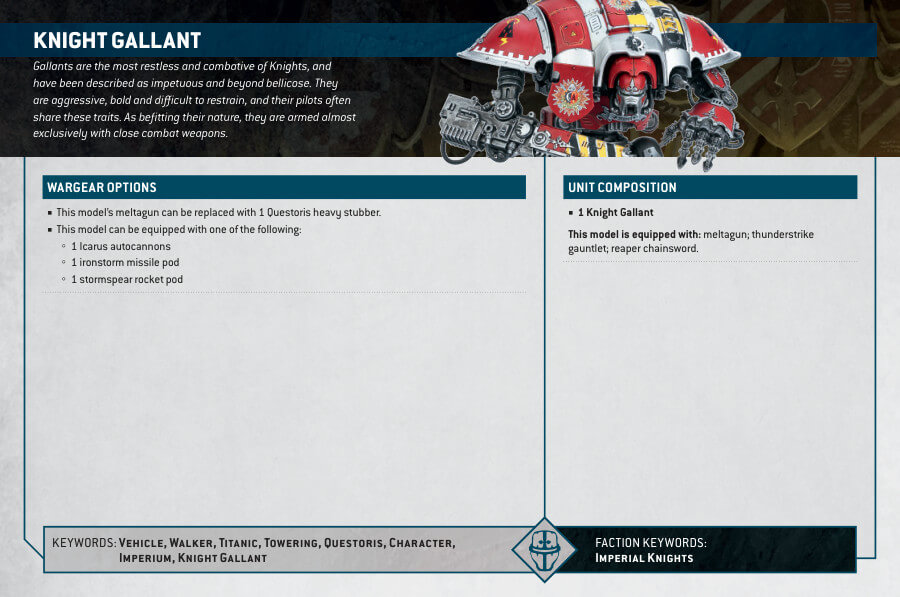
Imperial Knight Gallant Datasheets
What’s in the Imperial Knight Gallant box
- x250 components that make one Imperial Knight Gallant. Aditionally, this kit can be built as either a Paladin, Errant, Warden, or Crusader. The weapons and faceplates are interchangeable and can be used as spares for any other Knight kits you might have.
- x1 Citadel 170mm Oval base.
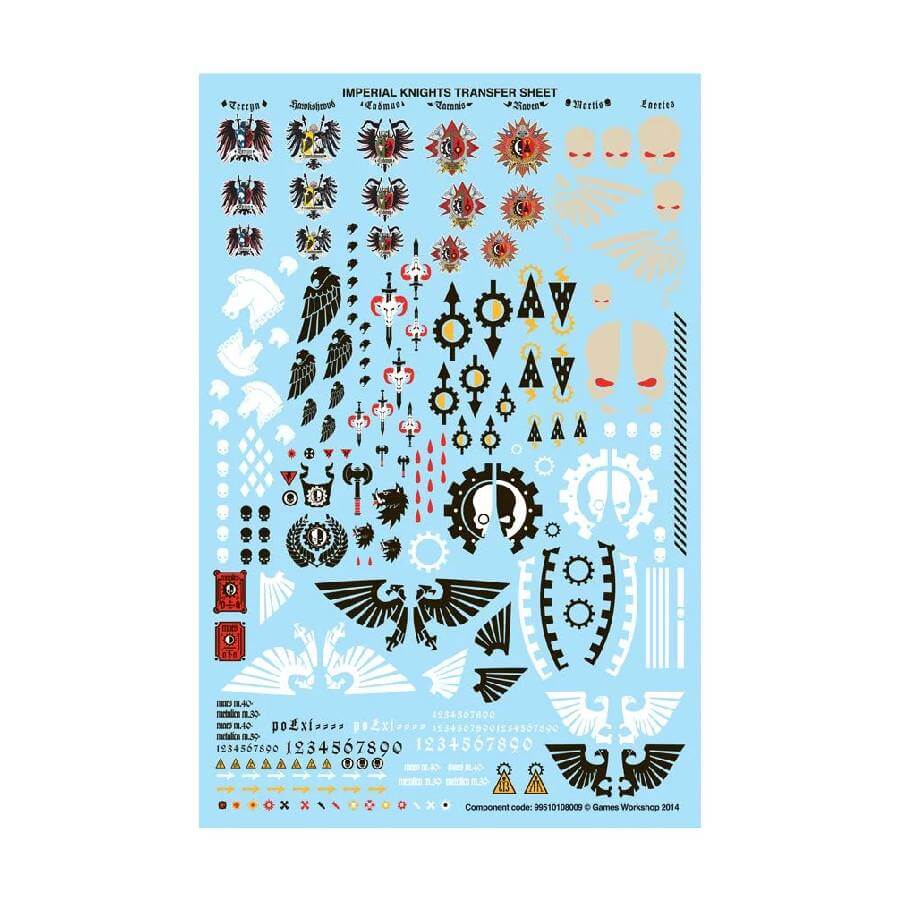
- x1 transfer sheet featuring heraldry for Imperial Knights.
How to paint the Imperial Knight Gallant Set
- Step 1: Primer
Start by priming your Knight Errant with Leadbelcher spray primer. This pivotal step provides a sturdy metallic canvas for your paint to cling to. Ensure an even application, and allow it to dry completely before proceeding. - Step 2: The Base Coat
Begin by skillfully applying a uniform base coat of Mephiston Red across all the armor plates and the chainsword. This initial layer sets the stage for your Knight’s distinctive armor color. Precision is key, and patience as it dries is a virtue. - Step 3: Shading with Earthly Grace
Now, breathe life into your armor by using Nuln Oil for shading. Concentrate on the recesses and naturally shadowed areas. The Earthshade not only enriches the red hue but also imparts a sense of depth. Allow it to settle, deepening the visual narrative. - Step 4: Illuminate the Edges
Elevate your Knight’s presence by highlighting the edges of the armor. Opt for a lighter shade of your base color. This technique defines the model’s contours and creates a captivating 3D effect. For instance, Evil Sunz Scarlet is a splendid choice for the red armor plates. - Step 5: The Final Flourish
Elevate your artistry by adding a concluding layer of Wild Rider Red. Concentrate on the most raised surfaces. This additional layer crafts a captivating gradient from shadow to light, infusing your Knight with dynamic energy. - Step 6: Shading the Metal Majesty
Since we used Leadbelcher Spray to basecoat the miniature, we can go straight into shading/layering the metallic components. Create a weathered allure of your metallic components using Agrax Earthshade for shading. Generously apply it, allowing it to seep into every crevice and recess. This shading step introduces depth and authenticity to the metal elements and makes them look weathered. Ensure the shade dries thoroughly. - Step 7: Metallic Brilliance
Bring your metallic components to life by layering them with Ironbreaker. Focus on the edges and elevated details. This transformative step bestows a polished, reflective sheen upon the metal, animating your Knight’s mechanical soul. - Step 8: Craftsmanship in Detail
For the smaller but equally vital details on your Knight Errant, employ these colors:
Averland Sunset and Abaddon Black, ideal for crafting danger zone patterns the armour.
Balthasar Gold, perfect for adding luster to elements like gun barrels or mechanical parts.
White Scar, your brush of precision, to adorn your model with symbols and emblems, ensuring clarity and attention to detail. - Step 9: The Majestic Base
Elevate your Knight Errant’s presence by creating a captivating base for it to stand upon. Employ textured paints like Astrogranite Debris or Stirland Mud to introduce dimension and authenticity. Then, paint the base to harmonize with your envisioned theme, whether it’s a sandy desert or a lush grassy expanse. A final touch of tufts or static grass enhances the realism. - Step 10: Shield Your Masterpiece
To safeguard your masterpiece and add a refined finish, apply a protective varnish to your painted model. Opt for either matte or gloss spray varnish, depending on your preference. Evenly coat your creation, following the instructions on the varnish can. This step ensures the longevity and durability of your exquisite work while providing a consistent, professional finish.

