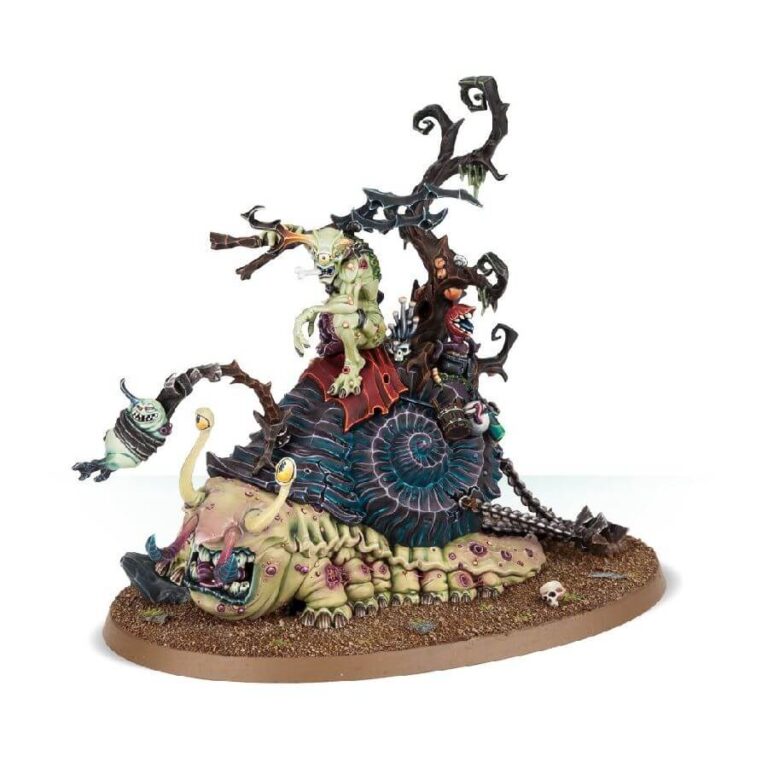
Horticulous Slimux, the pragmatic and no-nonsense Grand Cultivator of the Garden of Nurgle, can be assembled from this multipart plastic kit. Mounted atop his lumbering molluscoid steed, Mulch, he wields enormous lopping shears to trim Nurgle’s garden and confront his foes. With grotesquely amusing details, such as a twisted tree adorned with pots, potions, fertilizers, and mushrooms, Horticulous directs the growth of the festering flora. Mulch, enticed by a dangling Nurgling, pulls a gruntleplough chained to his shell, always hungry for a tasty snack.
What’s in the Horticulous Slimux box
- x32 plastic components that make Horticulous Slimux, the Grand Cultivator of the Garden of Nurgle
- x1 Citadel 105x70mm Oval Base
How to paint the Horticulous Slimux set
- Step 1: Clean the Model
Ensure your Horticulous Slimux model is clean and free from any dust or debris. Use a soft brush or cloth to gently remove any particles that may affect the paint application. - Step 2: Prime the Model
Apply a suitable primer to the model. Priming helps the paint adhere better and provides a smooth surface for painting. Use a spray or brush-on primer, such as a gray or black primer, ensuring even coverage across the entire model. - Step 3: Basecoat
Apply the base colors to the model using a suitable brush. For example, you can use Mephiston Red for the cloth, Leadbelcher for metallic parts, and Nurgling Green for the skin. Apply thin, even coats, allowing each layer to dry before moving on to the next. - Step 4: Wash and Shade
Apply washes or shades to enhance the depth and details of the model. Use a wash like Agrax Earthshade for the red areas and Nuln Oil for the metallic parts. Apply the wash to recessed areas and let it flow naturally to create shadows and definition. - Step 5: Highlights
Highlight raised areas and edges to create contrast and add dimension. Use a lighter shade of the base color or a suitable highlight color. For example, you can use Evil Sunz Scarlet to highlight the edges of the red areas and Ironbreaker for the metallic highlights. Apply these highlights sparingly, focusing on the most prominent areas. - Step 6: Detailing
Add finer details to bring your Horticulous Slimux to life. Use a smaller brush and appropriate colors to paint the smaller elements such as the face, tools, and accessories. Consider using Ushabti Bone for the teeth and Screamer Pink for the wounds. You can also use Nurgles Rot to depict decay, slime, or oozing substances. - Step 7: Basing
Prepare the base of the model to complement the paint scheme. Apply texture paint or flocking material for a realistic ground effect. You can also add additional elements like rocks, skulls, or small plants to enhance the overall look of the base. - Step 8: Varnish
Protect your finished paintwork with a suitable varnish. Apply a thin, even coat of matte, satin, or gloss varnish to preserve the colors and provide a protective layer. - Step 9: Final Touches
Add any final touches to your Horticulous Slimux, such as weathering effects or freehand designs, to further personalize the model. You can use techniques like drybrushing with Ryza Rust for rust effects or applying small scratches with a fine brush and Eshin Grey.

