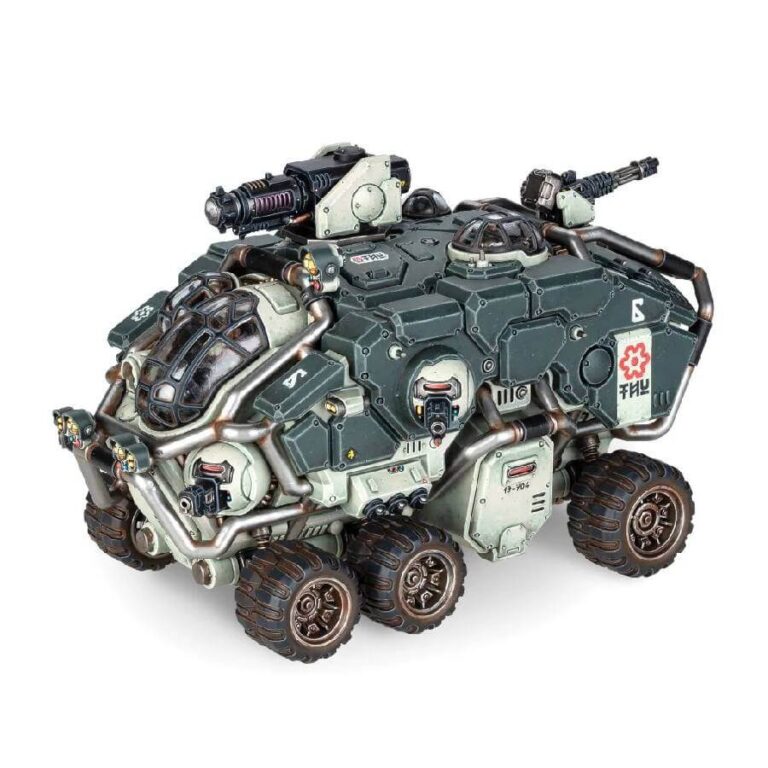
Crafted from multipart plastic, this kit allows you to construct a single Leagues of Votann Hekaton Land Fortress – a mighty heavy transport armed with formidable weaponry. With its six-wheeled design, the vehicle offers flexibility and strength. The kit presents three options for the turret weapon: a cyclic ion cannon for obliterating heavy infantry, an SP heavy conversion beamer capable of cutting through any target, or a heavy magna-rail cannon designed to reduce even the sturdiest tanks to molten slag. Complementing this main gun are adjustable ball-turret sponson weapons, offering a choice between bolt cannons or ion beamers.
The Hekaton Land Fortress also features a rear-facing MATR autocannon and a pan spectral scanner, which can be replaced with a missile silo housing either a Kin’s Wrath, Mountain Breaker, or Ancestor’s Vengeance wearhead. Reinforced layers of armor provide exceptional protection, while transport hatches facilitate the deployment of its resolute occupants. A pilot can be glimpsed beneath a clear plastic screen, and the kit provides three distinct head options for personalizing your driver. Additionally, optional lights for the rollbars add an extra touch of detail to this impressive model. Embodying power, adaptability, and sophistication, the Hekaton Land Fortress is a true force to be reckoned with on the battlefield.
What’s in the Hekaton Land Fortress box
- x88 plastic components that make 1 Hekaton Land Fortress.
- x5 clear plastic components.
- x1 Leagues of Votann Transfer Sheet with 555 numerals, runes, and markings for prominent Leagues.
How to paint the Hekaton Land Fortress set
- Step 1: Prime the Model
Begin by applying a thin layer of Chaos Black primer to the Hekaton Land Fortress. This provides a solid base for the upcoming layers of paint. - Step 2: Basecoat the Body
Use White Scar paint to cover the body of the Hekaton Land Fortress. Apply smooth and even coats to achieve full coverage. This step sets the foundation for the color scheme. - Step 3: Shade the Armor Panels
Apply Coelia Greenshade shade to the armor panels of the model. Focus on the areas where the panels meet and where shadows naturally occur. The shade adds depth and contrast. - Step 4: Layering for Depth
Layering adds richness to the colors. Use Fenrisian Grey to gently layer over the White Scar areas, leaving the recesses and edges untouched. This technique adds dimension and texture. - Step 5: Highlight the Armor
With White Scar again, highlight the edges and raised areas of the armor panels. This technique brings out the details and gives a more realistic appearance. - Step 6: Metallic Elements
For metallic components like weapons and machinery, use Leadbelcher paint. Apply it carefully to ensure the metallic parts stand out against the rest of the model. - Step 7: Detailing and Small Elements
Focus on smaller elements like guns, hatches, and optional lights. Use Abaddon Black for guns and Averland Sunset for lights, adding intricate detail to the model. - Step 8: Weathering Effects (Optional)
To achieve a weathered and battle-worn look, dry brush Ryza Rust onto edges and areas prone to wear. This adds a sense of realism and history to your model. - Step 9: Fine Detailing
Pay attention to finer details like insignias, markings, and any unique features on the Hekaton Land Fortress. Use appropriate colors like Wazdakka Red for markings and Macragge Blue for symbols. - Step 10: Choose Your Varnish (Optional)
For a protective finish, consider using Munitorum Varnish Spray. This varnish will shield your painted model from damage and help preserve your hard work.

