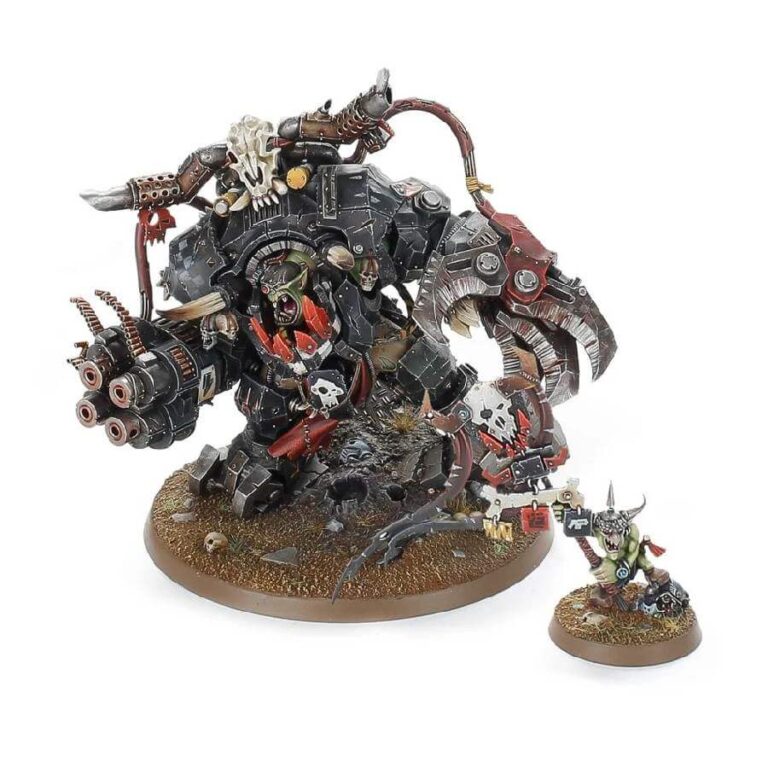
Take charge of your Ork forces with this extraordinary centerpiece model. Ghazghkull can be assembled in two dynamic poses, leaning to his right as he rains destruction upon his enemies with the fearsome four-barrelled Mork’s Roar, or leaning to his left, ready to unleash devastating devastation with the mighty Gork’s Klaw. Accompanying him into battle is his loyal banner waver, Makari. Whether you seek a formidable force on the tabletop or an exhilarating painting challenge, Ghazghkull Thraka is the epitome of Ork might. Embrace the power of the Waaagh! with this iconic prophet by your side.
What’s in the Ghazghkull Thraka box
- x61 plastic components that make 1 Ghazghkull Thraka and 1 Makari.
- x1 Citadel 80mm round base.
- x1 Citadel 25mm round base.
How to paint the Ghazghkull Thraka set
- Step 1: Basecoat
Apply a basecoat of a suitable color, such as a dark green like Waaagh! Flesh or a similar shade, to the ork inside the mech. Use a medium-sized brush to ensure smooth and even coverage. - Step 2: Ork Skin Tones
Paint the skin areas using a lighter green shade, such as Warboss Green or a similar color. Focus on the face, hands, and any exposed skin areas. Apply multiple thin coats for a smooth and natural look. - Step 3: Armor and Clothing
Paint the armor and clothing using a contrasting color, such as a dark brown or metallic shade. For example, you can use Rhinox Hide for armor plates or Leadbelcher for metallic elements. Apply these colors with care to ensure neat and clean lines. - Step 4: Details and Accessories
Add additional colors for details and accessories. Use different shades for weapons, belts, and other decorative elements. For example, you can use Abaddon Black for weapons, Balthasar Gold for jewelry or ornaments, and Skrag Brown for clothing. Apply these colors with precision to highlight the details and create a realistic appearance. - Step 5: Ork Glyphs and Symbols
Add Ork glyphs and symbols to Ghazghkull Thraka’s armor using contrasting colors, such as White Scar or bone colors like Ushabti Bone. Paint these markings carefully, focusing on creating legible and visually striking designs. - Step 6: Fine Details and Highlights
Add fine details and highlights to enhance the model. Use lighter shades or mixtures to create highlights on raised areas, such as edges of armor or facial features. Apply these highlights sparingly for a subtle effect. - Step 7: Weathering and Battle Damage (Optional)
For a weathered and battle-worn look, add weathering effects and battle damage using darker washes or dry-brushing techniques. This step is optional but can add depth and realism to the model. Typhus Corrosion and Ryza Rust are 2 good paints that can help you add rust effects. - Step 8: Base
Paint the base to match your desired theme or battlefield environment. Apply texture using sand or small rocks, and paint it accordingly. Enhance the base further by adding grass tufts or other scenic elements for a finished look. - Step 9: Varnish
Once you are satisfied with your paint job, protect it by applying a layer of varnish. This will ensure the longevity of your work and protect it from wear and tear. Choose a matte, gloss, or satin varnish based on your preferred finish.

