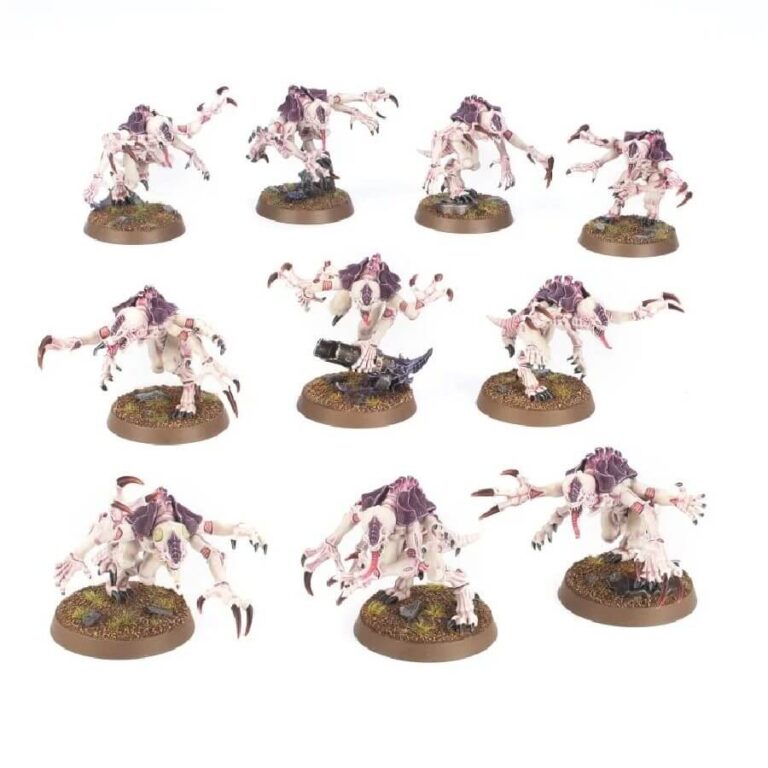
Genestealers, renowned for their predatory prowess, are swift and formidable creatures adorned with protective chitinous armor, boasting exceptional strength and agility. These advanced organisms operate as precursors, venturing far ahead of the Tyranid hive fleets to locate new feeding grounds and disseminate their genetic contagion among unsuspecting defenders. When the invasion finally descends, Genestealers emerge from concealment, commencing a brutal onslaught.
This multipart plastic kit offers the opportunity to assemble ten Genestealers, formidable melee combatants suitable for both Tyranids and Genestealer Cults forces. These fearsome beings possess clutching talons and lethal rending claws, each dynamically posed to convey a sense of stalking across the battlefield. The kit provides various cosmetic head options, enabling you to create a diverse brood with options for fanged maws and slavering tongues, or even the iconic Ymgarl appearance. Mix and match for evolutionary diversity, and discover four heads featuring protruding barbed ovipositors, ready to deliver the infamous Genestealer’s Kiss.
Genestealers Datasheets
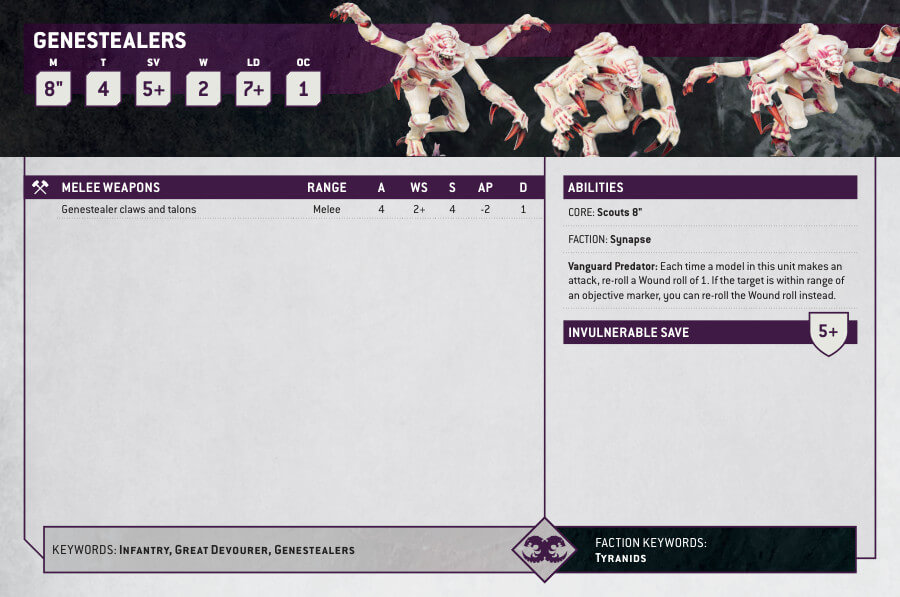
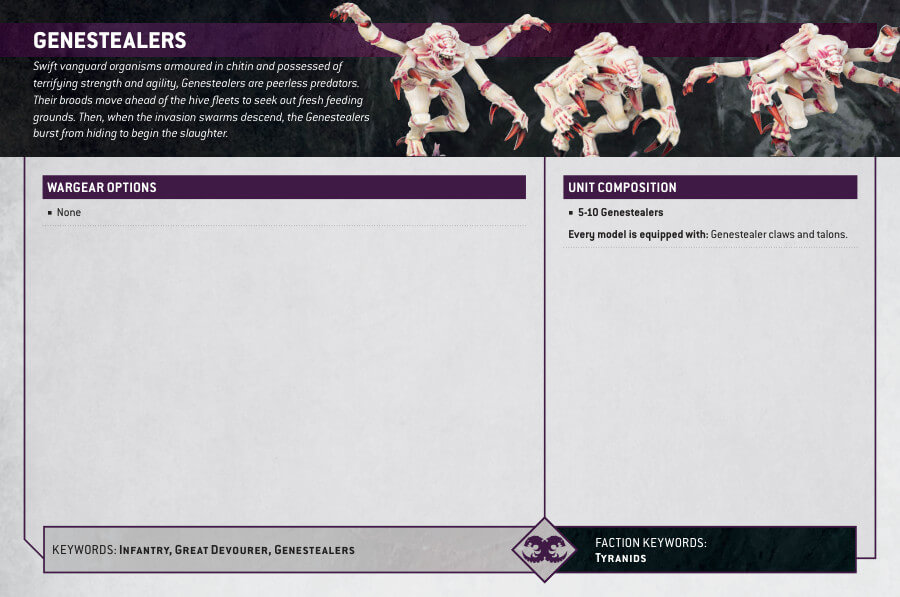
What’s in the Genestealers box
- x109 plastic components that make 10 Genestealers.
- x10 Citadel 32mm Round Bases.
How to paint the Genestealers
- Step 1: Priming – Setting the Foundation
Begin by priming your Genestealers with Wraithbone spray. This provides a solid base for your paints and helps them adhere well. - Step 2: Base Coat – Chitinous Armor
Start by painting their chitinous plates with Naggaroth Night. Apply this paint evenly, covering all the armor plates on the Genestealers. - Step 3: Shading – Adding Depth to the Armor
To add depth to the chitin plates, use Druchii Violet shade. Apply this shade to the plates, ensuring it settles into the recesses, creating shadows. - Step 4: Layering – Bringing Out the Detail
Now, layer the chitin plates with Xereus Purple to enhance the texture and details. Make sure to leave the shaded areas intact to maintain the depth. - Step 5: Final Highlight – Vibrant Chitin
Finish the chitinous armor by adding a final layer of Genestealer Purple. Focus on the raised areas to make them pop with color. - Step 6: Base Coat – Tyranid Skin
Moving on to their skin, use Rakarth Flesh as the base coat. Apply it evenly to cover all the exposed skin areas on the Genestealers. - Step 7: Shading – Adding Realism to the Skin
To add realism to their skin, apply Reikland Fleshshade. This shade will settle in the skin’s crevices and enhance the texture. - Step 8: Layering – Highlighting the Skin
Layer the skin with Flayed One Flesh, focusing on the prominent areas to bring out the skin’s texture and highlights. - Step 9: Final Touch – Pale Skin
Finish the skin by applying Pallid Wych Flesh to the most pronounced features, like the ridges and raised sections. - Step 10: Detailing – Adding Character
Now it’s time to paint the smaller details. Use Pink Horror for their tongues, Abaddon Black for environmental details, Flash Gitz Yellow for their eyes, and Mephiston Red for their claws. - Step 11: Shading and Layering Details
Apply shades and layers to the details to make them stand out. Use Carroburg Crimson for the tongues, Yriel Yellow for highlighting the eyes, and highlight the claws with Evil Sunz Scarlet. - Step 12: Painting the Bases – Creating the Terrain
To complete your Genestealers, paint their bases with texture paints. Apply Astrogranite Debris or Armageddon Dunes to create a realistic terrain effect. Allow the texture paint to dry thoroughly before moving on to the next step. - Step 13: Varnishing – Protecting Your Work
To protect your beautifully painted Genestealers, consider applying a varnish. Stormshield is a suitable choice for a matte finish that safeguards your miniatures without altering their appearance. Ensure the models are entirely dry before varnishing.

