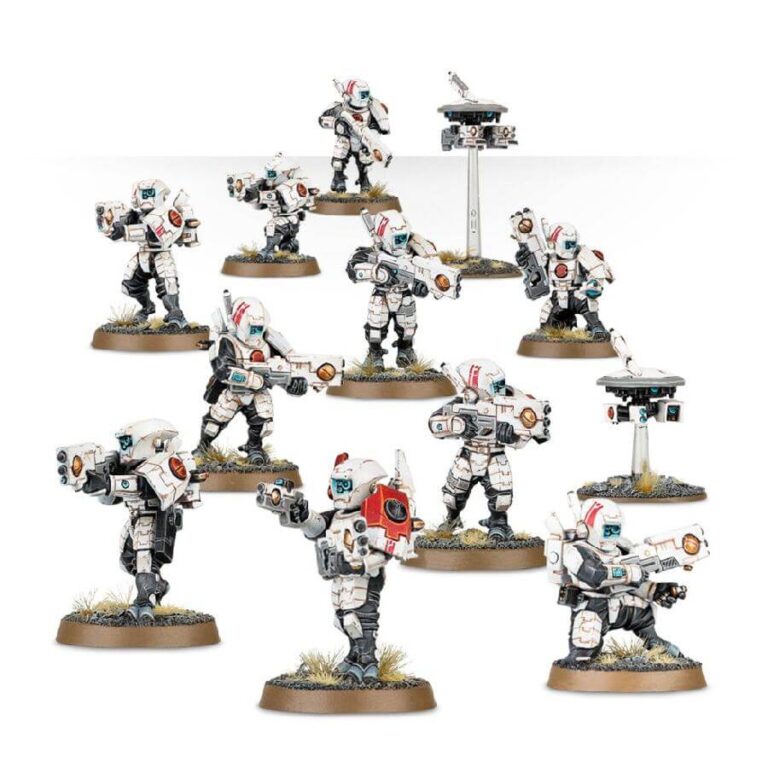
The Fire Warriors Breacher Team, specialists in executing ruthlessly efficient close-range assaults. Operating in tight, tactical formations, they boldly clear structures of threats, leaving behind a wake of incendiary power. Swift and impactful, these warriors transform the battlefield with their sudden bursts of raw energy, reducing enemy forces to mere remnants. Armed with pulse blasters and equipped with photon grenades, they methodically forge paths, ensuring no corner remains untouched by their resolute resolve.
Dive into this multi-part plastic kit, a gateway to assembling ten T’au Empire Fire Warriors in their Breacher Team configuration. Among them, one model stands ready to ascend as a Shas’ui, symbolizing leadership.
Elevating the versatility of the kit, two drones and a DS8 tactical support turret await assembly, while an array of distinct shoulder pads, back packs, and weapon options add personalization. Pulse pistols, pulse shotguns, EMP grenades, and photon grenades provide a spectrum of choices, amplifying tactical flexibility.
What’s in the Fire Warriors Breacher Team box
- x230 plastic components in total that make 10 Fire Warriors and 2 drones. This kit can also be assembled as a Fire Warriors Strike Team.
- x10 Citadel 25mm Round bases.
- x1 Citadel 40mm Round base.
- x2 Citadel 32mm flying bases.
How to paint the Fire Warriors Breacher Team set
- Step 1: Prime Your Models
To lay the foundation for your painting, begin by applying a thorough coat of Chaos Black primer to your Fire Warriors Breacher Team. This initial step ensures optimal paint adherence and sets the stage for a polished finish. - Step 2: Armor Base Coat
With your models primed, move on to painting the armor using White Scar. Apply this color evenly across the armor plates, ensuring complete coverage and a smooth, clean canvas for subsequent layers. - Step 3: Details
Pay attention to intricate details by utilizing Mephiston Red. Use a fine brush to meticulously accent glyphs and symbols on the models. This step adds character and a splash of color to their appearance. For the faces, if they do not have an exposed head, you can paint the cameras using Caledor Sky. This will add to the tactical look, specific of T’au troops. - Step 4: Metallic Details
For a touch of metallic brilliance, focus on weapons and equipment using Retributor Armour. With precision, apply this paint to highlight the metallic parts, giving them a realistic and eye-catching sheen. - Step 5: Helmet and Accessories
Address any exposed heads or flesh areas with The Fang. This creates a natural and authentic T’au complexion, lending an element of realism to your models’ faces. - Step 6: Shading
To introduce depth and dimension, it’s time for shading. Use Nuln Oil to accentuate the recesses and crevices of metallic parts. Apply Reikland Fleshshade to any exposed flesh, producing subtle gradients and contours. - Step 7: Weathering (Optional)
For an added layer of realism and battle-worn character, consider weathering effects. Craft a mixture of Nuln Oil and water to simulate streaks on the armor, lending an authentic touch of wear and tear. You can also use Typhus Corrosion or Ryza Rust for this. - Step 8: Varnish
Preserve your meticulously painted models by applying varnish. Opt for Ardcoat to impart a glossy sheen that enhances vibrancy or Munitorum Varnish for a more subdued, matte finish. This final touch safeguards your effort and adds a professional quality.

