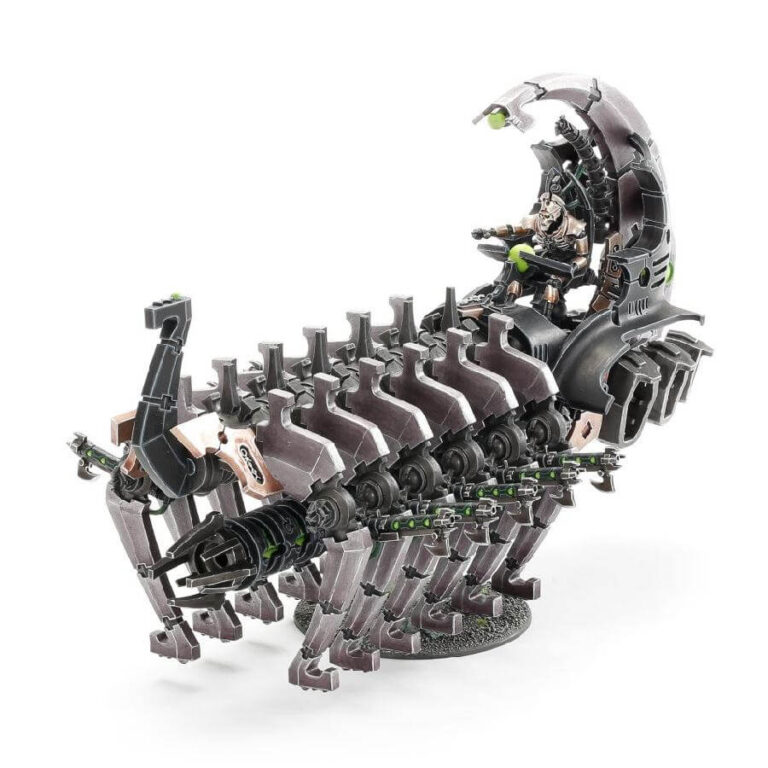
The Doomsday Ark stands as a colossal centerpiece within any Necron collection, boasting an awe-inspiring presence. Embellished with massive engines positioned at the rear, it showcases intricate detailing, orbs, and iconic dynastic glyphs. Atop this technological wonder, a Necron Lord assumes a commanding stance, overseeing an array of rib-like structures. Beneath, the ominous Doomsday Cannon looms, embodying a menace that strikes fear into the hearts of adversaries.
What’s in the Doomsday Ark box
- x168 plastic components with which to build one Necron Doomsday Ark or Necron Ghost Ark.
- x2 small flying stems.
- x1 large flying base.
- x2 Necron transfer sheets.
How to paint the Doomsday Ark set
- Step 1: Metallic Base
Begin by painting the Doomsday Ark’s main body with Leadbelcher, a metallic color that provides a sturdy and technological appearance. - Step 2: Black Accentuation
Use Abaddon Black, a deep black shade, to accentuate the intricate details and recesses of the model. Applying this to the edges and crevices will create a stark contrast against the metallic backdrop. - Step 3: Energy Sources and Eyes
For the glowing energy sources or the eyes of the Necron Lord, select a vibrant green like Moot Green or Warpstone Glow. Apply this color carefully to these areas to achieve a luminous and captivating effect. - Step 4: Interior Mechanics
Paint interior sections with metallic hues such as Retributor Armour or Runefang Steel. These colors can represent exposed machinery and components, enhancing the Ark’s intricate design. - Step 5: Accent Orbs and Glyphs
Using Runelord Brass, apply it to orbs, glyphs, and other details. This metallic shade will set them apart and showcase the technological complexity of the Doomsday Ark. - Step 7: Black Details
Use Abaddon Black to paint smaller details like gun barrels, vents, and other mechanical elements. This adds depth and contrast to the overall appearance. - Step 8: Additional Metallic Highlights
Apply a lighter metallic shade, such as Ironbreaker, to highlight edges and raised surfaces. This step creates a three-dimensional effect and adds visual interest. - Step 9: Final Review and Touch-Ups
Take a moment to review your work and make any necessary touch-ups. This includes refining lines, fixing mistakes, and ensuring consistent coverage. - Step 10: Protect Your Artistry
After you’re satisfied with your painting, apply a protective varnish like Ardcoat to safeguard your masterpiece from potential wear and tear, preserving its brilliance over time.

