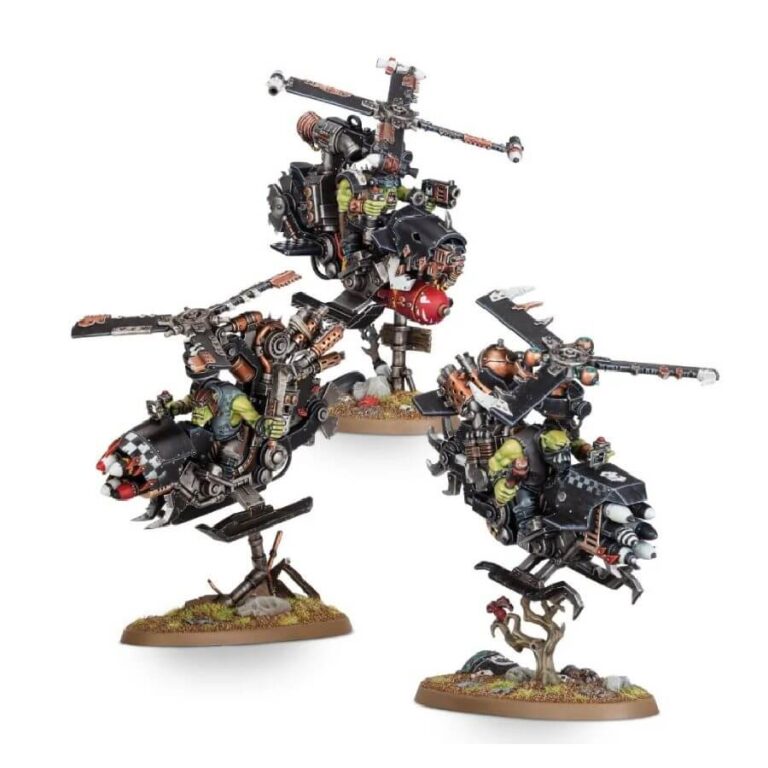
Venturing into the sky against the typical Ork preference for ground combat, Deffkopta pilots stand as rare exceptions, embracing the thrill of aerial warfare. These intrepid pilots soar above the battlefield, scouting enemy forces for their warband while raining down devastating attacks from above.
This kit allows you to assemble three Deffkoptas, unique and fast vehicles adorned with a ramshackle assortment of crude yet effective Ork weaponry. These airborne brutes unleash relentless salvos of shells and high-powered explosions upon their enemies, creating chaos and destruction. When the opportunity arises, they swoop in, slashing at foes with hand weapons and deadly rotor blades. Two of the Deffkoptas are armed with kopta rokkits, spinning blades, a slugga, and stikkbombs, while the third trades its kopta rokkits for a kustom mega-blasta and a big bomb. Prepare for an exhilarating aerial assault like no other with these daring Deffkoptas.
Also available in this box:
What’s in the Deffkoptas box
- x37 plastic components that make 3 Deffkoptas.
- x3 Citadel 75mm Oval Bases.
How to paint the Deffkoptas set
- Step 1: Basecoat
Begin by applying a basecoat of a bright color, such as Evil Sunz Scarlet or a similar shade, to the main body of the Deffkoptas. Use a medium-sized brush to ensure smooth and even coverage. - Step 2: Metallic Components
Paint the metallic components, such as weapons and engine parts, with a basecoat of a dark metallic color like Leadbelcher. Use a small brush to ensure precision when painting these smaller details. - Step 3: Metallic Highlights
Add highlights to the metallic components by dry brushing with a lighter metallic color like Ironbreaker. This will bring out the details and create a worn, weathered appearance. - Step 4: Ork Details
Paint the details on the Deffkoptas, such as the Ork pilot, with suitable colors of your choice. For example, you can use colors like Waaagh! Flesh for the skin, Abaddon Black for clothing, and various shades for other accessories. Apply these colors with care to ensure neat and clean lines. - Step 5: Weathering
To add a touch of realism, consider weathering the Deffkoptas. Use a sponge or a dry brush technique with a dark color, like Rhinox Hide or a similar shade, to lightly apply patches of grime or wear on the surfaces. - Step 6: Rotor Blades
Paint the rotor blades with a basecoat of a dark color, such as Abaddon Black. Then, add highlights by dry brushing with a lighter color like Mechanicus Standard Grey to create a worn metal effect. - Step 7: Ork Glyphs and Symbols
Add Ork glyphs and symbols to the Deffkoptas using contrasting colors, such as white or bone colors like Ushabti Bone. Paint these markings carefully, focusing on creating legible and visually striking designs. - Step 8: Details and Fine-tuning
Add additional details to the models, such as teeth, eyes, and tattoos, using suitable colors. Take your time and use a small brush for precision. Fine-tune any mistakes or areas that need touch-ups. - Step 9: Basing
Paint the base of each model to match your desired theme or battlefield environment. Apply texture using sand or small rocks and paint it accordingly. Enhance the base further by adding grass tufts or other scenic elements for a finished look. - Step 10: Varnish
Once you are satisfied with your paint job, protect it by applying a layer of varnish. This will ensure the longevity of your work and protect it from wear and tear. Choose a matte, gloss, or satin varnish based on your preferred finish.

