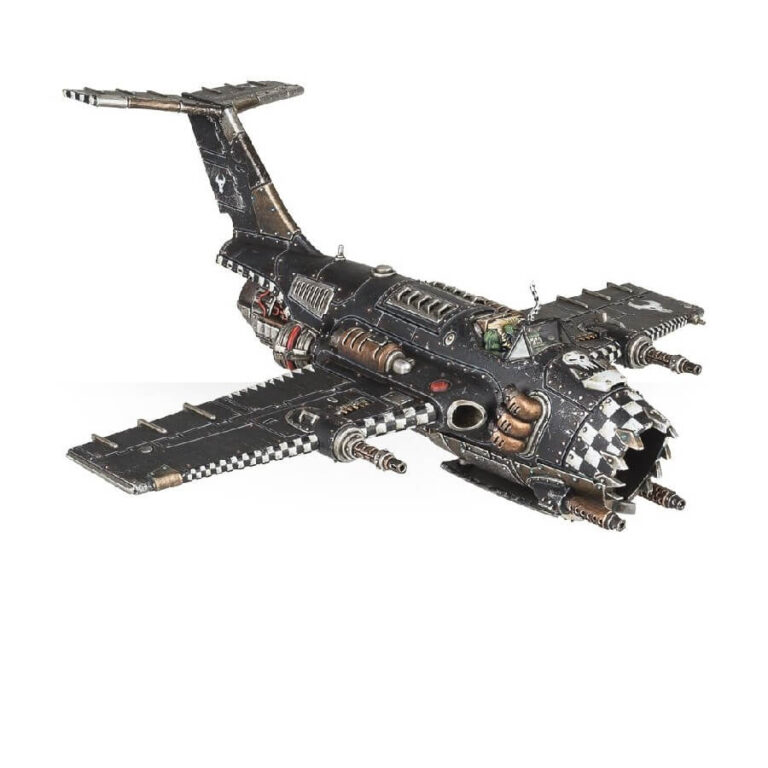
The Dakkajet is a high-speed aerial Ork menace powered by a massive jet engine, soaring through the skies with a thunderous roar. Its relentless firepower spews forth a constant hail of bullets, wreaking havoc on fleeing infantry and challenging enemy aircraft. Embracing the philosophy of quantity over quality, Dakkajet pilots attach numerous big shootas to their aircraft, ensuring a barrage of bullets that are bound to find their mark.
What’s in the Dakkajet box
- x172 plastic components you can use to build one Dakkajet. As well as a Grot Gunner, it includes a range of weapons options: a big shoota, boom bombs, burna bombs, skorcha rokkits and supa shootast.
This plastic kit can also be assembled as a Burna-Bommer, a Blitza-Bommer, or a Wazbom Blastajet. - x1 Ork transfer sheet.
- x1 flying stem
- x1 Citadel 120x92mm Oval base
How to paint the Dakkajet set
- Step 1: Basecoat the Hull
Using a medium-sized brush, apply a smooth basecoat of Abaddon Black to the hull of the Dakkajet. Ensure that you cover all areas evenly, including the cockpit, wings, and other prominent surfaces. This basecoat will provide a solid foundation for the subsequent layers of paint. - Step 2: Highlight the Edges
With a smaller brush, carefully highlight the edges of the hull using a dark gray color like Dawnstone. Focus on the raised areas, edges, and corners to create depth and add visual interest. This technique is known as edge highlighting and helps to make the details of the model stand out. - Step 3: Paint the Details
Use a fine detail brush to paint the various details on the Dakkajet. For the cockpit, you can use colors like Mephiston Red for the interior and Leadbelcher for the frame. Pay attention to smaller elements like the engine vents, weapon barrels, and any other distinct features. Use a steady hand and take your time to ensure clean and precise painting. - Step 4: Add Weathering Effects
To give the Dakkajet a weathered and battle-worn appearance, you can apply weathering effects such as chipping and rust. Using a small sponge or a stippling brush, dab on spots of a light gray color like Administratum Grey to create chipped paint effects. Then, with a brown color like Rhinox Hide, carefully add rust effects to areas that are prone to corrosion, such as the exhaust pipes and metal surfaces. - Step 5: Paint the Ork Glyphs and Symbols
Using a fine detail brush, meticulously paint the Ork glyphs and symbols on the Dakkajet. These markings can add character and personality to the model. Consider using colors like Waaagh! Flesh for the glyphs and Evil Sunz Scarlet for the symbols. Take your time and refer to reference images or other Ork models for inspiration and accuracy. - Step 6: Highlight the Edges
Go back to the hull and, using a lighter gray color such as Administratum Grey, highlight the edges once again. This time, focus on the most raised areas to create a more pronounced effect. This additional layer of highlighting will further enhance the definition of the model and create a sense of depth. - Step 7: Varnish the Model
To protect the paintwork and give the Dakkajet a finished look, apply a matte varnish to the entire model. This protective layer will help to seal the paint and prevent it from chipping or wearing off during gameplay. Apply the varnish evenly and follow the instructions on the varnish product for the best results. - Step 8: Base the Model (Optional)
If desired, you can also base the Dakkajet to match your gaming table or army theme. This can be done by applying texture paint or flocking material to the base, creating a realistic ground texture. Additionally, you can add further details like rocks, grass tufts, or other scenic elements to enhance the overall presentation of the model.

