Cypher, the elusive figure pursued relentlessly by the Masters of the Dark Angels, remains shrouded in mystery. Wrapped in shadow and known by a name that hints at secrecy, his motives and methods perplex even the most astute observers. Within the ranks of the Dark Angels, Cypher is regarded as their most detested adversary, a figure whose true intentions remain enigmatic.
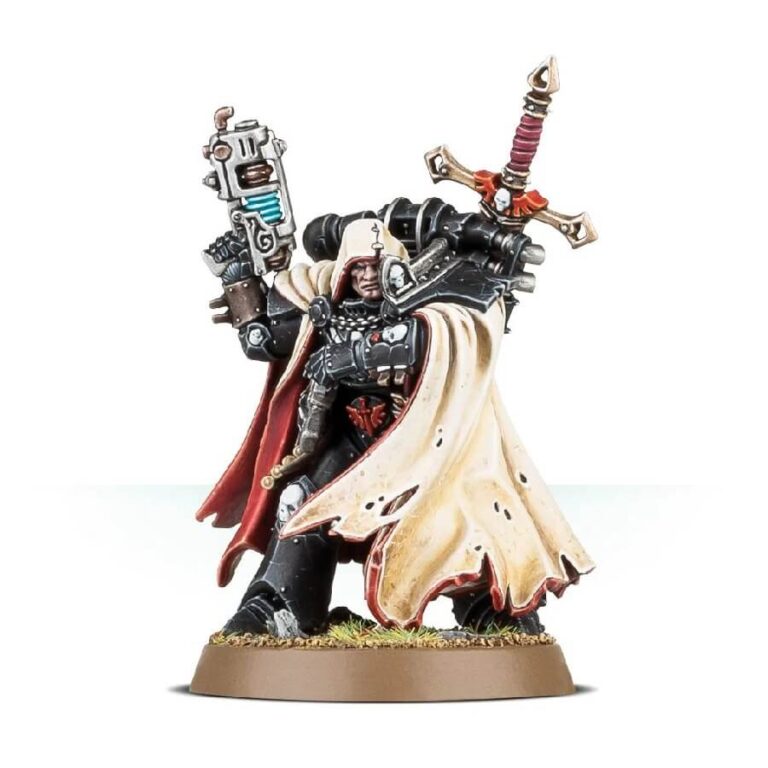
This multi-part plastic kit offers everything needed to construct Cypher, Lord of the Fallen. Adorned in a hodgepodge of archaic and makeshift gear, Cypher, being a renegade without a Chapter to call his own, relies on whatever equipment he can gather. His backpack, modified countless times throughout the centuries, features a mix of components, while his armor showcases a combination of different patterns. Armed with a bolt pistol and a plasma pistol equipped with an external heat dissipator, Cypher exudes a sense of resourcefulness. His weathered cowl and torn cloak bear witness to his tumultuous journeys. However, it is the massive sword strapped to his back that stands out the most, potentially being the fabled Lion Sword. The uncertainty surrounding its true nature only deepens the intrigue surrounding Cypher’s enigmatic intentions.
What’s in the Cypher box
- x8 plastic components that make this Hq choice for your Chaos Space Marines.
- x1 Citadel 32mm Round base
How to paint the Cypher set
- Step 1: Prime the Model
Apply a base coat of black primer to the entire model using spray or brush-on primer. This will provide a good foundation for the paint to adhere to. - Step 2: Paint the Armor
Using a black paint, carefully paint the armor of Cypher, ensuring even coverage and smooth application. For example, you can use Abaddon Black for this step. - Step 3: Paint the Cape
Paint the cape with a pale yellowish-white color. A suitable choice could be Pallid Wych Flesh or another pale off-white shade. Apply multiple thin layers to achieve a smooth and even color. - Step 4: Paint the Inside of the Cape
Next, paint the inside of the cape with a vibrant red color. For example, you can use Mephiston Red or another deep red shade. Take your time to paint this area neatly, ensuring the color does not bleed onto the other parts of the model. - Step 5: Washes and Shading
Apply a black wash, such as Nuln Oil, to the armor to add depth and shading. Use a thin brush to carefully apply the wash in the recesses and around the edges of the armor. Additionally, you can apply a red wash, like Carroburg Crimson, to the inside of the cape to enhance the shadows. - Step 6: Highlights
Using a lighter black or dark gray color, carefully highlight the edges and raised areas of the armor to create definition. For example, you can use Eshin Grey or Mechanicus Standard Grey for this step. Be precise and focus on the edges to make them stand out. - Step 7: Final Details
Paint the smaller details on the model, such as the belt buckles, pouches, and buttons, using appropriate colors. For example, you can use a metallic color like Leadbelcher for the buckles and a dark brown like Rhinox Hide for the pouches. - Step 8: Base
Finish the model by painting the base. Since the model has a black armor, you can use a dark earth tone like Dryad Bark for the base. Additionally, you can add some patches of static grass or other scenic elements to enhance the look. - Step 9: Varnish
Apply a layer of varnish to protect the paintwork and give the model a finished look. Use a matte varnish for a more realistic appearance or a gloss varnish for a shiny finish.

