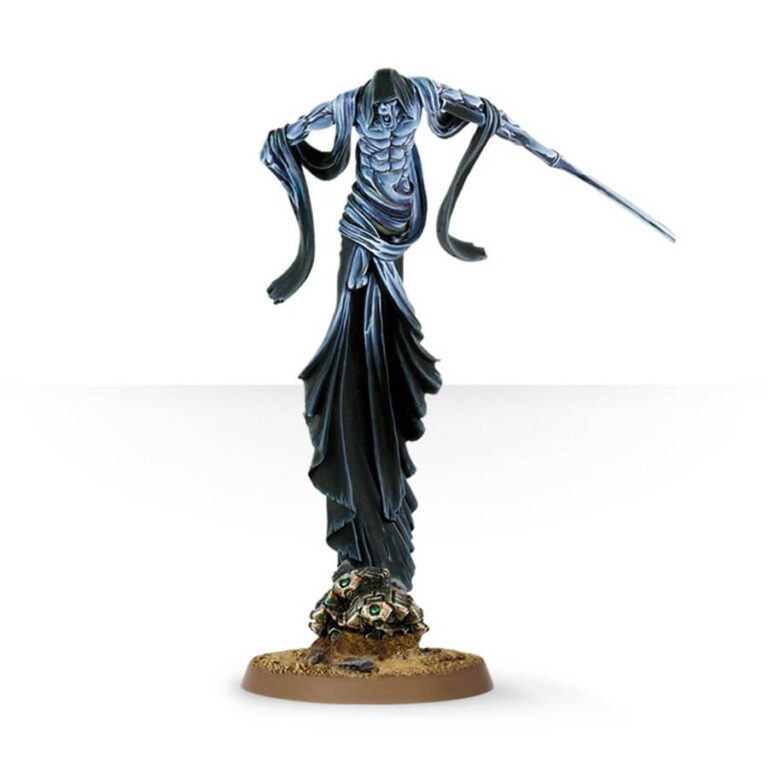
The Nightbringer, a formidable elites choice for your Necron Armies! These enigmatic beings wield astonishing abilities, from conjuring energy blasts to influencing lesser minds and even manipulating the very fabric of time. The breadth of their capabilities knows no bounds, save for the vast landscape of their own imagination and the lingering fragments of memories from their distant origins. Although no C’tan Shard can fully recollect the omnipotent entity it once was, each carries within it the essence and audacity of that grander, mightier being. Thus, these eccentric and capricious Shards frequently dismantle their adversaries in unexpected yet astoundingly effective ways. Whether it’s launching a transdimensional thunderbolt, bombarding foes with stone and earth, distorting gravity by transforming into a singularity, or propelling their opponent backwards through time to their ultimate demise, each encounter with a C’tan Shard showcases their unfathomable might and intricate intricacy.
What’s in the C’tan Shard of The Nightbringer box
- x6 resin components that make 1 C’tan Shard of The Nightbringer miniature.
- x1 Citadel 40mm Round Base.
How to paint the C’tan Shard of The Nightbringer set
- Step 1: Prime Your Miniature
Begin by applying a thin, even coat of primer to your C’tan Shard of The Nightbringer miniature. This will create a solid base for your paints. - Step 2: Basecoat the Body
Using a medium-sized brush, paint the body of the C’tan Shard with a base color like The Fang. Apply several thin coats to achieve a smooth and even coverage. - Step 3: Basecoat the Clothing
With the same brush, apply Abaddon Black to the clothing or any other fabric-like areas. Ensure even coverage to create a strong foundation. - Step 4: Shade the Body and Clothing
Using a wash like Nuln Oil, apply it to both the body and clothing sections. This shading step adds depth by emphasizing recesses and details. - Step 5: Layer the Body
With a lighter shade like Fenrisian Grey, carefully layer the body to highlight edges and raised areas. This technique adds dimension to the miniature. - Step 6: Highlight the Clothing
Using a fine brush, highlight the edges and folds of the clothing with Sotek Green. This step enhances contrast and brings out the fabric’s texture. - Step 7: Finishing Touches
Take a moment to review your work and touch up any areas as needed. This attention to detail ensures a polished result. - Step 8: Seal Your Work
To protect your paint job, apply a varnish to your miniature. This preserves the paint and gives a consistent finish.

