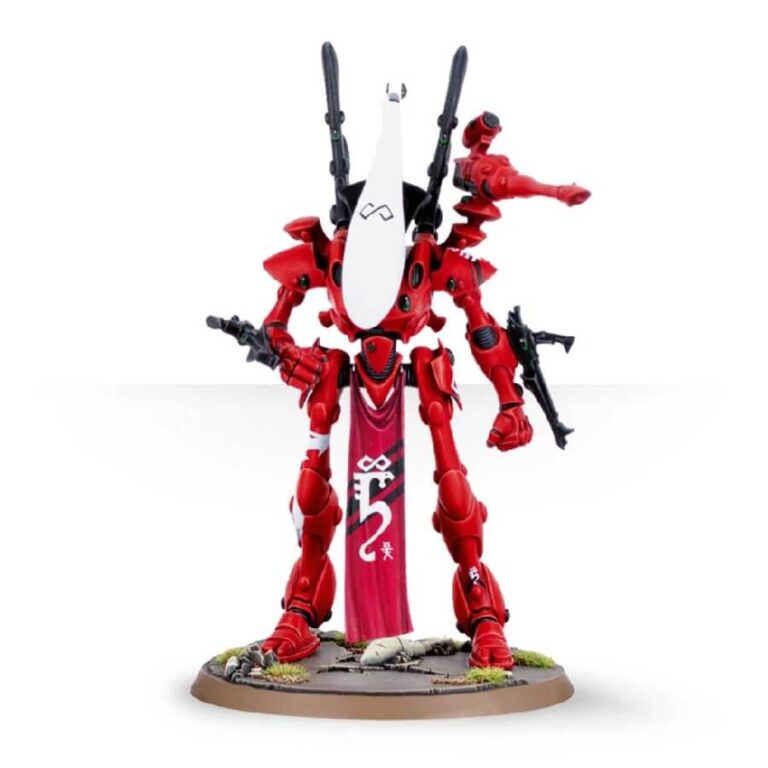
Looming above the battlefield like an indomitable guardian, the Wraithlord epitomizes the enduring might and ancient wisdom of the Aeldari. Controlled by the essence of a mighty warrior (They’re also known as Ghost Warriors because they don’t contain a living pilot) , is a towering construct that combines elegance with raw power, bearing the weight of an arsenal that can unleash devastating salvos of heavy weapons, engage enemies in close combat with a formidable blade, or rain destruction with assault weapons. The Wraithlord’s versatility and imposing presence make it an indispensable centerpiece of any Aeldari battle plan, instilling awe and trepidation in all who face its might.
This kit allows you to build one Wraithlord which you can construct in various poses and has a variety of extra weapons and upgrades you can add to your model.
Also available in this box:
What’s in the Craftworlds Wraithlord box
- x48 plastic components that make 1 mighty Aeldari Wraithlord.
- x1 Citadel 60mm Round Base.
How to paint the Craftworlds Wraithlord set
- Step 1: Basecoat
Begin by applying a basecoat to the Wraithlord’s body using a suitable color like Ulthuan Grey or another light gray shade. Use a medium-sized brush to ensure even coverage on the larger surfaces. - Step 2: Armor Panels
Paint the intricate armor panels with colors of your choice. You can use contrasting colors like Mephiston Red, Caliban Green, or Averland Sunset to create striking patterns and designs on the Wraithlord’s armor. - Step 3: Metallic Details
Paint the metallic details, such as the weapon components and joints, with a metallic paint like Leadbelcher or Ironbreaker. Apply the metallic paint carefully to ensure neat and precise coverage. - Step 4: Gems and Spirit Stones
Highlight the gems and spirit stones on the Wraithlord’s body using vibrant colors. For example, you can use colors like Lothern Blue, Baharroth Blue, or Gauss Blaster Green to bring these details to life. Apply thin layers of paint to build up the colors gradually. - Step 5: Weapons
Paint the Wraithlord’s weapons with colors that complement the overall color scheme. For instance, you can use Abaddon Black, Stormhost Silver, or Retributor Armour for the weapon casings, handles, and other intricate details. Apply the colors with precision to enhance the weapon’s appearance. - Step 6: Highlighting and Shading
Add depth and dimension to the Wraithlord’s armor by applying highlights and shadows. Use lighter shades of the base colors for highlighting (in our case Wild Rider Red, Skarsnik Green or Yriel Yellow) and darker shades (like Khorne Red, Kabalite Green or Mortarion Grime) for shading (Nuln Oil is a very good option too as it works for every base color). This technique will bring out the details and add realism to the model. - Step 7: Finishing Touches
Inspect your model and make any necessary touch-ups or corrections. Add any additional details you desire, such as freehand designs or squad markings, using suitable colors. You can also add weathering effects or battle damage for a more realistic look. - Step 8: Varnish
Once you are satisfied with your paint job, protect it by applying a layer of varnish. This will ensure the longevity of your work and protect it from wear and tear. Choose a matte, gloss, or satin varnish based on your preferred finish.

