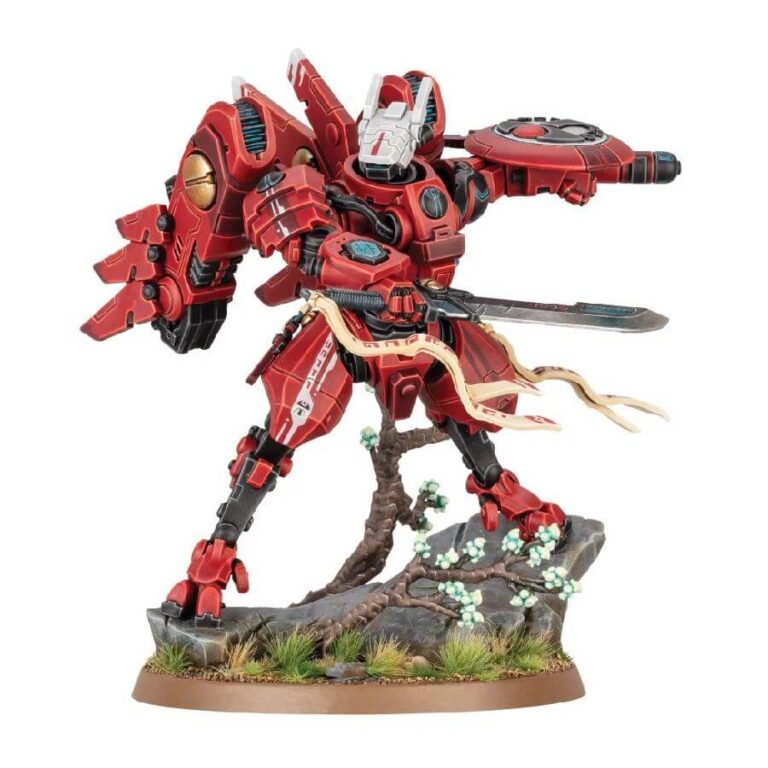
Meet the dynamic and defiant Commander O’Shovah, a true master of Mont’ka, the T’au‘s decisive killing strategy. In his crimson battlesuit, he charges into battle, leading his rebellious Fire Caste troops with unyielding resolve. Empowered by the enigmatic Dawn Blade, he unleashes unparalleled strength and precision, rendering foes powerless before him.
This multipart plastic kit expertly assembles Commander Farsight, the revered leader of the autonomous Farsight Enclaves within the T’au Empire. His custom XV-86 Supernova battlesuit boasts cutting-edge technology that enhances his agility and maneuverability, perfectly complementing his exceptional swordsmanship. Equipped with the enigmatic Dawn Blade in one hand, he sports a plasma rifle and shield generator on the other arm. Every inch of his legendary wargear, from the ritual bonding knife on his leg to the Farsight Enclaves emblem etched onto his shield, is meticulously detailed. A commanding stance atop a captivating scenic base transforms Commander Farsight into an arresting centerpiece, destined to captivate collectors and augment any collection or army.
What’s in the Commander Farsight box
- x48 plastic components that make one Commander Farsight.
- x1 Citadel 60mm Round Base.
How to paint the Commander Farsight set
- Step 1: Prime Your Model
Priming helps the paint stick better to the model. Use a spray primer in a color like grey or white. Hold the can about 6-8 inches away from the model and spray in short bursts. Let it dry completely. - Step 2: Base Coat Armor
Start with the main colors of the armor. For example, for Farsight’s armor, use a red paint like Khorne Red to paint the armor plates. Thin your paint with a little water, so it’s not too thick. Apply a smooth and even coat. Don’t worry if it looks a bit translucent – we’ll add more layers. - Step 3: Layering
Layering adds depth and dimension to your model. Use a slightly brighter red, like Evil Sunz Scarlet, and paint the raised areas of the armor. This will leave the darker red in the recesses, giving a shaded effect. - Step 4: Weapon and Accessories
Paint the weapon and any accessories next. For a futuristic gun, try Leadbelcher for the metal parts and Mephiston Red for accents. Remember to use thin coats and multiple layers for smooth coverage. - Step 5: Wash for Shadows
Washing adds shadows and definition. Use a wash like Nuln Oil and apply it over the red armor. The wash will settle in the recesses, creating contrast. - Step 6: Highlights
Highlights make your model pop. Use a light red, such as Wild Rider Red, and carefully paint the edges of the armor plates. This simulates light catching on the edges. - Step 7: Paint Helmet White
Paint Commander Farsight’s helmet using White Scar. Apply a smooth and even coat to achieve a solid white color. - Step 8: Paint Black and Gold Details
For the black details on his armor, use Abaddon Black to carefully paint areas like joints and trim. For gold details, use Retributor Armor for the base coat. Highlight the gold parts with Auric Armour Gold to create depth and shine. - Step 9: Base and Finish
Paint the base of your model. You can use Stirland Mud for a textured ground and add a little grass or rocks for extra flair. Seal your work with a varnish to protect the paint.
We’ve also left you a video guide here.

