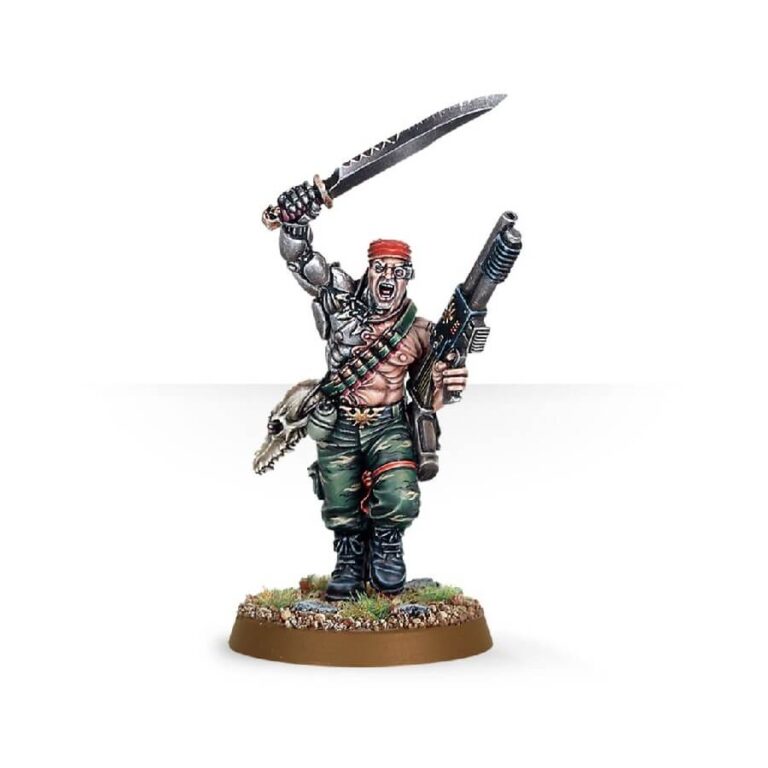
Colonel ‘Iron Hand’ Straken is a living testament to the resilience and fortitude of the Catachan Jungle Fighters. Throughout his extensive military career in the Astra Militarum, Straken has endured the harshest of battlefields and emerged victorious. It was during his time as a seasoned sergeant that he faced a harrowing encounter with an Eldar patrol, where he confronted a ferocious Miral land shark. In the brutal clash, the creature viciously tore off Straken’s arm, but against all odds, he defied death’s grasp. Through sheer determination and the unwavering spirit of a Catachan warrior, Straken not only survived but rose above his injuries, receiving a bionic replacement that would forever symbolize his unwavering resolve.
Hailing from the unforgiving planet of Catachan, Straken embodies the tenacity and resilience ingrained in those who call it home. He stands as a testament to the indomitable spirit of the Catachan people, known for their unwavering toughness and relentless fighting spirit. As one of the toughest warriors to ever serve the Imperial Guard, Straken inspires awe and admiration among his comrades, embodying the unyielding determination and unbeatable spirit that defines the Catachan breed.
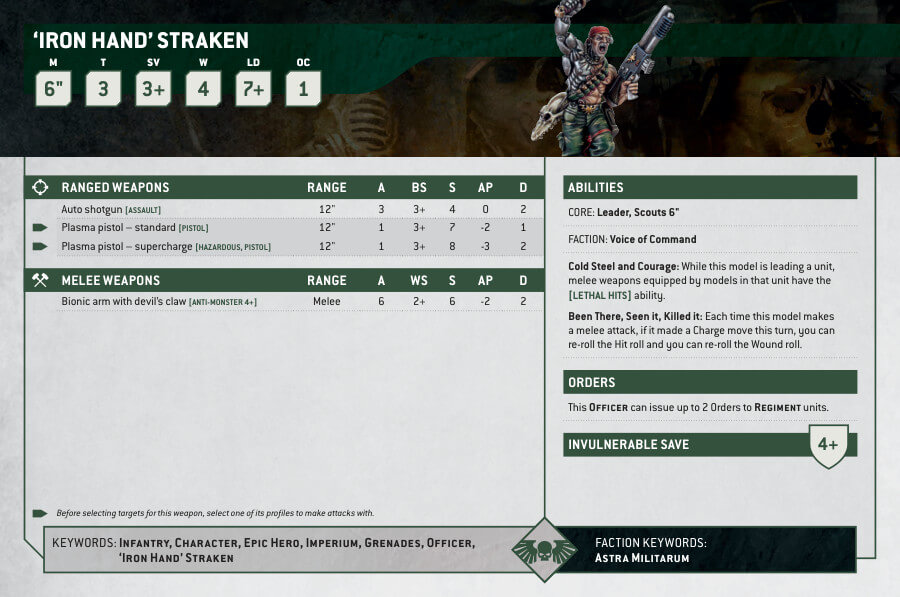
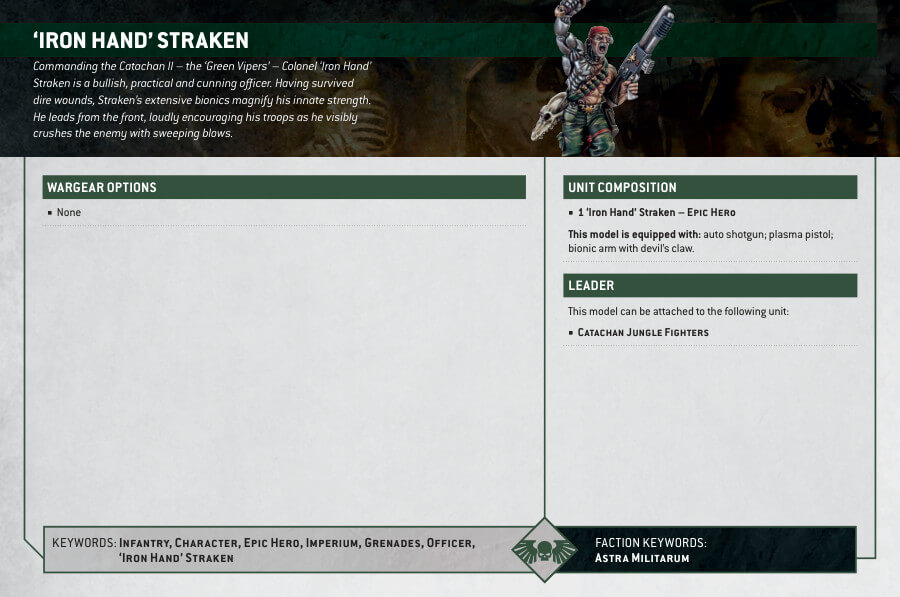
Colonel ‘Iron Hand’ Straken Datasheets
What’s in the Colonel ‘Iron Hand’ Straken box
- x2 metal components that make Colonel ‘Iron Hand’ Straken: The model captures the rugged and battle-hardened appearance of the Catachan commander. Straken’s bionic arm, earned through a fierce encounter with a Miral land shark, is prominently featured, showcasing his resilience and determination. The intricate details of the miniature bring the character to life, from his weathered face to his stoic pose, exuding authority and strength.
- x1 Citadel 25mm Round Base: The kit also includes a 25mm round base, providing a sturdy foundation for Colonel ‘Iron Hand’ Straken. The base allows for easy integration into your gaming or display setup, providing stability and enhancing the overall presentation of the model.
How to paint the Colonel ‘Iron Hand’ Straken set
- Step 1: Prime the Model
Apply a thin and even layer of primer to Colonel ‘Iron Hand’ Straken using a spray or brush-on primer. This will provide a smooth surface for the paints to adhere to and improve the overall finish of the miniature. - Step 2: Basecoat the Armor
Start by applying a basecoat of a dark green color, such as Waaagh! Flesh, to the armor plates on Colonel Straken’s body. Use thin layers and multiple coats if needed for a smooth and even coverage. - Step 3: Highlight the Armor
Using a lighter green shade, like Warboss Green, carefully apply highlights to the raised areas of the armor. Focus on edges, creases, and any areas where light would naturally hit. This will add depth and definition to the model. - Step 4: Paint the Details
Move on to painting the smaller details on Colonel Straken, such as his bionic arm, face, and accessories. Use appropriate colors to bring out the desired effects. For example, Stormhost Silver can be used for the bionic arm, while Pallid Wych Flesh can be used for the face. - Step 5: Shade the Model
Apply a wash, such as Agrax Earthshade, over the entire model. This will add shadows and enhance the overall look of the miniature. Be sure to let the wash flow into the recesses and crevices to create depth. - Step 6: Add Fine Details
Use a fine brush to add any additional details, such as belt buckles, insignias, or weapon decorations. Take your time and be precise to bring out the intricate elements of the model. - Step 7: Base the Model
Finish off by basing the model. Apply texture paint or flocking material to the base to represent the terrain or environment Colonel Straken stands on. You can also add additional details like rocks or tufts of grass for extra realism. - Step 8: Varnish the Model
Once you are satisfied with the paint job, protect it by applying a layer of varnish. This will help preserve the colors and add a protective coating to the model.

