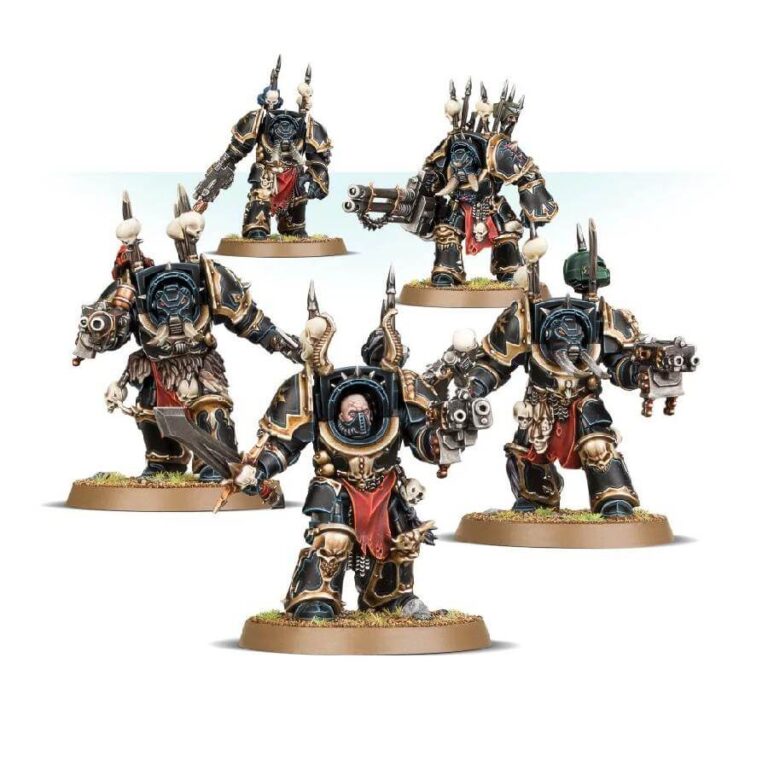
Prepare for the unstoppable force of the Chaos Terminators, the heavily-armored veterans adorned in ancient corrupted war-plate, akin to walking tanks that effortlessly dismantle their enemies. With a hand-picked arsenal of devastating heavy firepower and brutal weaponry, these murderous elites lead the charge, annihilating squads and vehicles in their path.
This versatile multipart plastic kit allows you to assemble a squad of five fearsome Chaos Terminators. Each of these formidable warriors is equipped with a combi-bolter as standard, providing a deadly mix of rapid-fire bolter shots, while two of them can be upgraded to wield combi-flamers, two to combi-meltas, and one to a combi-plasma gun for added tactical flexibility. In close combat, they unleash havoc with their melee weapons, featuring three power fists, an armor-splitting chainfist, and an array of accursed weapons including axes, blades, and a maul. Additionally, the kit includes two lightning claws that can be used individually or paired for maximum carnage. To further bolster their firepower, you can choose between a heavy flamer for close-range devastation or a long-ranged reaper autocannon for precision strikes.
But the customization options don’t end there. This expansive kit offers an abundance of interchangeable and cosmetic components. With ten distinct heads to choose from, you can add unique touches to each Terminator. Additionally, you have the opportunity to display their triumphs with separate trophy racks and adorn their armor with a variety of shoulder pads.
What’s in the Chaos Terminator Squad box
- x82 plastic components that make 5 Chaos Terminators
- x5 Citadel 40mm Round Bases
- x1 Chaos Space Marines Transfer Sheet featuring 364 Chaos symbols and Legion markings.
How to paint the Chaos Terminator Squad set
- Step 1: Assemble the Model
Follow the instructions provided to carefully assemble the Chaos Terminator Squad using plastic glue. Ensure all the parts fit securely together. - Step 2: Prime the Model
Apply a thin, even coat of primer to the model. This helps the paint adhere better and provides a smooth surface to work on. Chaos Black Spray is a great option for this step. - Step 3: Basecoat the Armor
Begin by applying a basecoat to the Terminator armor. For example, you can use a dark metallic color like Leadbelcher, a deep red like Khorne Red, or a solid black like Abaddon Black. Apply the basecoat using a brush, covering all the armor sections. - Step 4: Layer the Armor
Once the basecoat is dry, add depth and dimension to the armor by layering. Use a lighter shade of your chosen color, such as Ironbreaker for metallic armor, Evil Sunz Scarlet for red armor, or Eshin Grey for black armor, and carefully apply thin layers to the raised areas. This creates highlights and brings out the details. - Step 5: Paint the Details
Focus on painting the smaller details of the model, such as the weapons, accessories, and any additional elements you want to highlight. Use different colors to make them stand out. For example, paint the weapons with contrasting colors like Runelord Brass or Wazdakka Red. Use a smaller brush for precision. - Step 6: Wash the Model
Apply a wash to the entire model to add depth and shading. Use a wash specifically designed for your chosen color, such as a dark shade or ink. Gently brush it over the areas where shadows naturally occur, such as recesses and crevices. The wash settles into these areas, creating realistic shadows. - Step 7: Highlight the Model
To further enhance the details, highlight the edges and prominent features of the model. Use a lighter shade of your chosen color, such as Stormhost Silver for metallics or Wild Rider Red for reds, and gently brush it along the edges to create a subtle pop and add definition. - Step 8: Paint the Additional Elements
Pay attention to any additional elements like icons, accessories, or trophies. Use different colors to make them stand out. For example, use a bright color like Mephiston Red or Gehenna’s Gold for icons or decorations. Be precise and take your time. - Step 9: Paint the Base
Don’t forget to paint the base of the model. Use colors that complement the overall scheme. For example, you can use a dark brown like Dryad Bark, then drybrush it with a lighter brown like Baneblade Brown to add texture and depth. Add some grass or rocks for added realism if desired. - Step 10: Varnish the Model
Once the paint is dry, protect your work by applying a coat of varnish. This helps prevent chipping and damage during gameplay. Use a matte varnish for a natural finish or a gloss varnish for a shiny appearance. Follow the instructions on the varnish bottle for best results.

