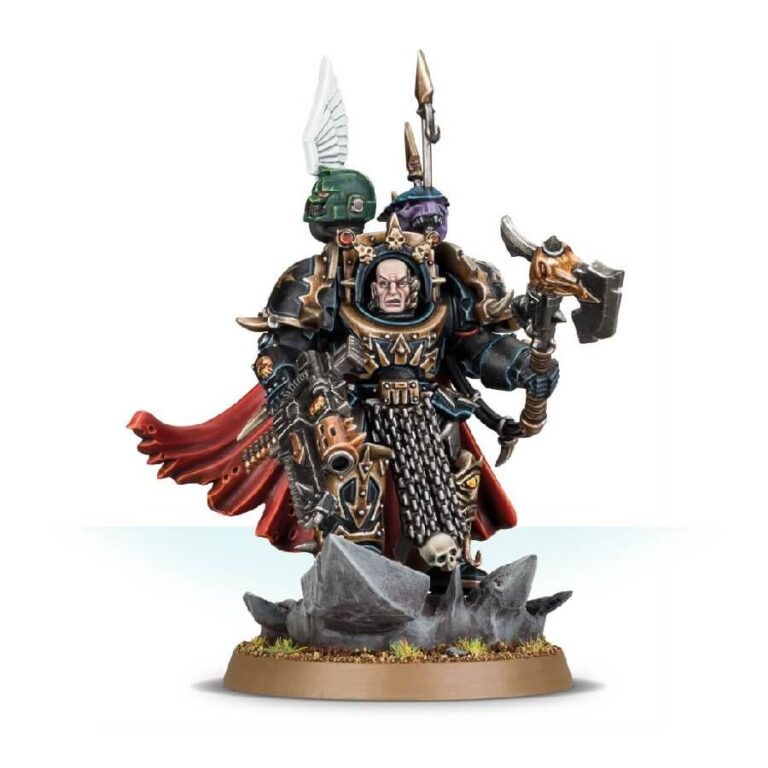
The Chaos Lords, epitomizing the pinnacle of power among Chaos Space Marines, harness both the enhanced physiology of a Space Marine and the unholy blessings bestowed upon them by the Dark Gods. With their formidable presence and deadly skills, few entities in the galaxy can match their sheer danger. This particular Chaos Lord is encased in the revered Terminator armor, allowing them to withstand devastating blows while wielding a diverse array of weapons.
Inside this boxed set, you will find a multi-part plastic Chaos Space Marines Terminator Lord, offering versatile customization options. Additionally, the kit provides the means to assemble a Sorcerer Lord in Terminator Armour, armed with potent combi-weapons, power weapons, and more. Prepare to unleash the malevolent might of the Chaos Lords upon the battlefield, as they become the embodiment of terror and destruction.
What’s in the Chaos Space Marines Terminator Lord box
- x41 plastic components that make 1 Chaos Space Marines Terminator Lord and includes options that allow you to build a Sorcerer Lord in Terminator Armour instead, as well as a selection of combi-weapons, power weapons and more, allowing you to customise the model to suit your playing style.
- x1 Citadel 40mm Round Base
How to paint the Chaos Space Marines Terminator Lord set
- Step 1: Priming the Miniature
Apply a black primer, such as Chaos Black, to provide a solid base for painting. - Step 2: Basecoat the Armor
Using a base color like Abaddon Black, cover the majority of the Terminator Lord’s body, ensuring even coverage. - Step 3: Paint the Details
Use a fine brush to carefully paint the trim, details, and embellishments on the armor using colors like Leadbelcher or Balthasar Gold to bring out the intricate features. - Step 4: Highlight the Armor
With Eshin Grey, lightly brush the edges and raised areas of the armor to create highlights, adding depth and definition. - Step 5: Color the Fabric Elements
Using a contrasting color such as Mephiston Red or Averland Sunset, paint any cloth, tabards, or fabric elements on the miniature, ensuring clean and even application. - Step 6: Apply a Wash
Apply a wash, like Nuln Oil or Agrax Earthshade, to the recessed areas and crevices of the model, allowing it to flow into the details and providing shading and depth. - Step 7: Paint the Face and Skin
Using colors like Rakarth Flesh or Bugman’s Glow, paint the Terminator Lord’s face and any exposed skin, carefully applying multiple thin layers for a smooth and realistic appearance. - Step 8: Detail the Face
Add details to the face, such as the eyes, teeth, and any facial markings, using precise applications of colors like Yriel Yellow or White Scar. - Step 9: Paint the Weapons
Using metallic colors like Ironbreaker or Runefang Steel, paint the Terminator Lord’s weaponry, paying attention to intricate details and ensuring a clean and even coat. - Step 10: Highlight and Weather the Weapons
Add additional details and highlights to the weapons, such as edge highlighting or rust effects using colors like Ryza Rust or Typhus Corrosion, adding a weathered and battle-worn look. - Step 11: Apply a Protective Varnish
Optionally, apply a protective layer of varnish to the painted model, such as Ardcoat or Lahmian Medium, to safeguard the paint job and give it a consistent finish. - Step 12: Basing
Finish the model by applying appropriate basing materials to the model’s base, such as Astrogranite Texture or Stirland Mud, and paint it to match your desired theme, adding the final touch to the overall presentation.

