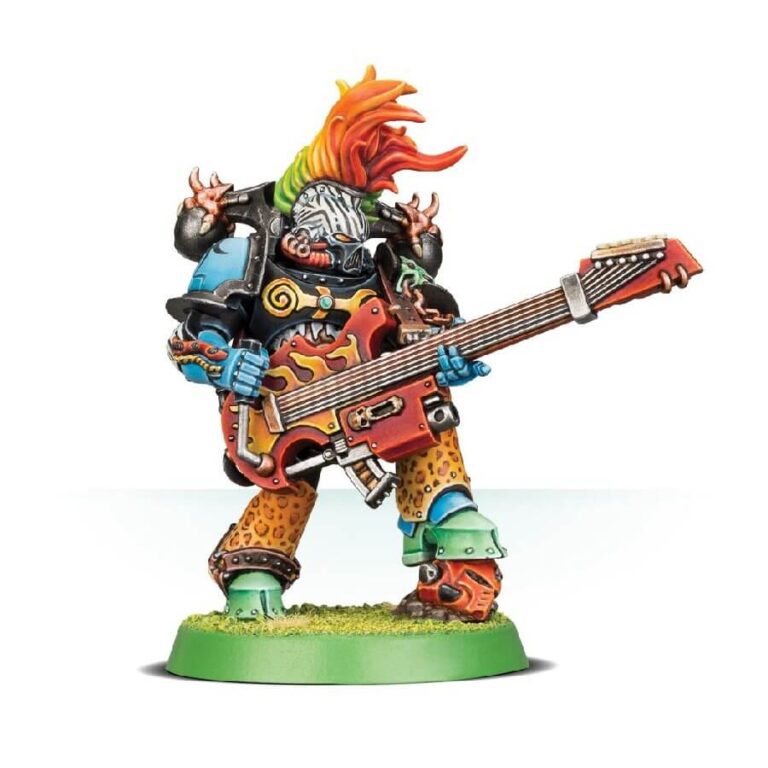
Step into a nostalgic time warp with the exclusive and revamped Noise Marine miniature! Reminiscent of the iconic 1991 Jes Goodwin design, this model captures the essence of the classic details that fans adore, from the guitar and mohawk to the distinctive hooved heels, now recreated with exceptional precision and detail.
This multi-part plastic kit enables you to assemble a single Noise Marine wielding a powerful sonic blaster. With blank shoulder pads, you have the freedom to dedicate your Noise Marine to any Chaos Legion that resonates with your vision, while an accompanying datasheet provides the necessary rules to unleash this hedonistic champion in your battles. Get ready to unleash the sonic fury of this timeless character on the battlefield!
This set can also help you make a Noise Marines army
What’s in the Chaos Space Marines Noise Marine box
- x12 plastic components make this timeless miniature that will rock your Noise Marine armies!
- x1 Citadel 32mm Round Base.
How to paint the Chaos Space Marines Noise Marine set
- Step 1: Start by painting the Zebra Design Helmet
Using White Scar as the base coat, carefully paint the entire helmet. Next, use Abaddon Black to add thin stripes and create the zebra pattern. - Step 2: Paint the Blue Shoulder Pads and Arms
Apply a base coat of Macragge Blue to the shoulder pads and arms of the Noise Marine. Ensure even coverage and let it dry before proceeding. - Step 3: Add Black Chest Armor with Yellow Details
Paint the chest armor with Abaddon Black, covering the entire area. Once dry, use Averland Sunset to add yellow details such as symbols or patterns. - Step 4: Create the Leopard-print legs
Apply a base coat of Balor Brown to the legs. Using a fine brush or Citadel Fineliner, carefully draw leopard lines and models with Nuln Oil. Once you are done, apply small dots of Abaddon Black over - Step 5: Paint the Rainbow-Colored Mohawk
Starting from the base of the mohawk, use Citadel paints to create a rainbow effect. Begin with Mephiston Red, then proceed with Troll Slayer Orange, Flash Gitz Yellow, Warboss Green, Baharroth Blue, and finally Xereus Purple. Apply thin stripes of each color and allow them to dry before moving on to the next. - Step 6: Detail the Rest of the Miniature
Use Citadel paints to add details to the remaining parts of the miniature. Paint the weapons, belt, pouches, and other accessories according to your preferred color scheme. For example, you can use Leadbelcher for metallic areas, Rhinox Hide for belts and pouches, and Screamer Pink for certain details, like the boots. - Step 7: Apply a Protective Varnish
To protect your paint job, apply Citadel’s Munitorum Varnish as a protective varnish over the entire miniature. This will help prevent chipping and ensure the longevity of your paintwork.

