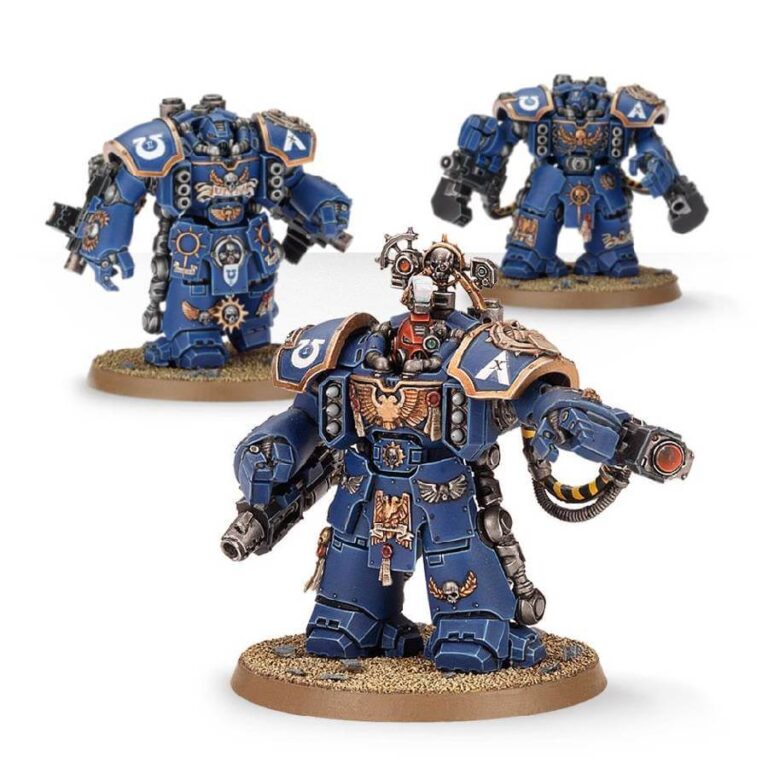
In this 3-man kit, you’ll find everything you need to assemble your Centurion Devastator Squad, including all available weapons and upgrades. But before you decide on the weapon loadout, let’s start by building the bodies. You have a choice of 3 distinct torsos, 3 sets of individual legs, 6 unique shoulder pad designs, and 7 heads to choose from (3 bare and 4 helmeted), allowing for customization and personalization.
Now, it’s time to arm your Centurion Devastators. Their arms can be equipped with a range of heavy weaponry options, such as twin-linked heavy bolters, twin-linked lascannons, or grav cannons and grav-amps. Additionally, you can choose between hurricane bolters or missile launchers for their chest plates.
For those final touches that set your squad apart, this kit includes an extra helmet plume to designate the Sergeant, an omniscope for enhanced targeting, an eagle back banner for a striking visual, purity seals for added character, and an iron halo for superior protection.
One of the great advantages of the Space Marine range is the ability to mix and match plastic parts between different kits. While the Centurion Devastator Squad offers a unique and powerful unit, you can also interchange the heads with those from other Space Marine models, allowing for greater diversity. Similarly, various extra equipment pieces found in other Space Marine kits can be added, enabling you to create a truly unique and distinctive collection of miniatures.
What’s in the Centurion Devastator Squad box
- x175 plastic components used to make either a 3 man Centurion Devastator Squad or a 3 man Centurion Assault Squad.
- x3 Citadel 50mm Round Bases
- x1 Ultramarines Infantry Transfer Sheet with which to add Chapter iconography and squad markings.
How to paint the Centurion Devastator Squad set
- Step 1: Prime the Miniatures
Apply a thin and even coat of primer to the Centurion Devastator Squad models. Use a black or grey primer to provide a solid base for the paint and improve adhesion. - Step 2: Basecoat the Armor
Start by applying a basecoat of your chosen color to the armor areas of the miniatures. For example, you can use Macragge Blue for a classic Space Marine look. Apply multiple thin coats for smooth and even coverage. - Step 3: Highlight the Armor
To create depth and bring out the details, highlight the armor with a lighter shade of the base color. Mix a small amount of Fenrisian Grey with Macragge Blue and apply it to the raised areas, such as edges and contours. - Step 4: Shade the Armor
Apply a shade like Nuln Oil or Drakenhof Nightshade to the recessed areas of the armor to add shadows and definition. Use a small brush and apply the shade carefully, focusing on the crevices and edges. - Step 5: Paint the Weapons
Focus on painting the weapons of the Centurion Devastator Squad. For example, you can use Leadbelcher for the metallic parts and Rhinox Hide for the handles. Apply thin layers and use a small brush for precision. - Step 6: Highlight the Weapons
Highlight the metallic parts of the weapons by applying a lighter metallic color, such as Ironbreaker or Liberator Gold, to the edges and raised areas. This will give the weapons a metallic shine and make them stand out. - Step 7: Paint the Details
Pay attention to painting the additional details of the miniatures, such as purity seals, eagle back banners, and helmet plumes. Use appropriate colors, like Mephiston Red for the seals or Retributor Armor for the eagle. - Step 8: Finishing touches
Finish off the Centurion Devastator Squad models by painting the bases. Use a variety of colors and textures to represent different terrain elements, such as Astrogranite for a rocky texture or Stirland Mud for an earthy look. Add additional details like grass tufts or small rocks to enhance the bases. Don’t forge - Step 9: Varnish the Miniatures (optional)
To protect your hard work and add a protective finish, apply a varnish to the painted Centurion Devastator Squad miniatures. Use a matte varnish for a non-shiny finish or a gloss varnish for a shiny appearance. Ensure that the miniatures are completely dry before applying the varnish.

