Space Marine Captains are the epitome of Adeptus Astartes leadership, commanding their forces from the forefront and embodying their Chapter’s valor. These seasoned strategists possess centuries of battle-hardened experience, often rewarded with cherished relics from their Chapter’s vaults, including the formidable relic shields capable of withstanding even the fiercest onslaughts.
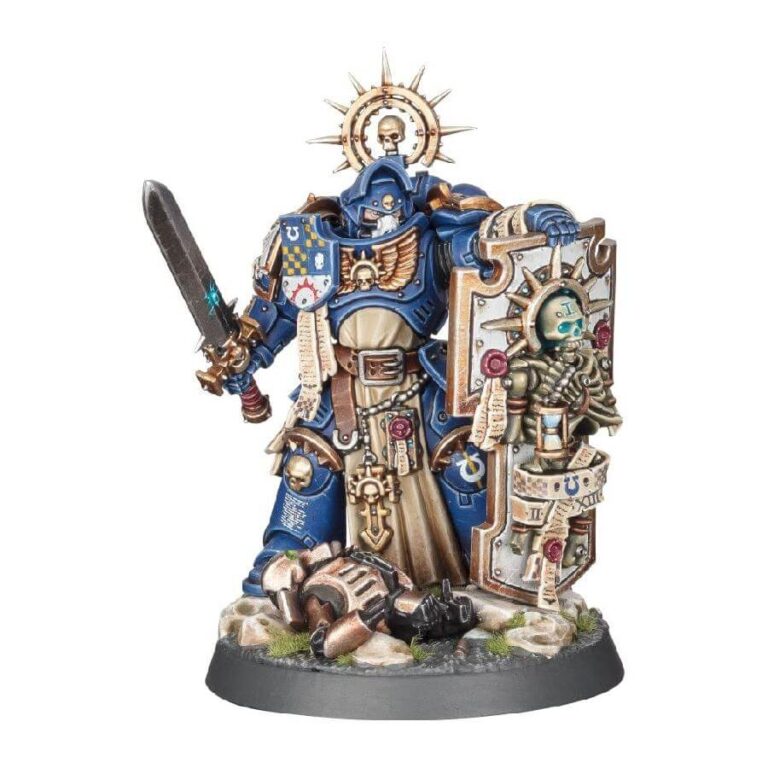
In this versatile multipart plastic kit, you have the opportunity to assemble a Space Marine Captain, a true stalwart of the Adeptus Astartes. Adorned with a relic shield, this commanding figure brandishes a lethal power sword, clad in armor bedecked with a profusion of honors and revered relics—a testament to a warrior’s countless triumphs. The kit offers a choice of three distinctive heads, allowing you to select a bare head, a fully armored visage, or a helmet with the visor raised. Additionally, the set features intricate scenic basing, where a fallen Necron Warrior lies amidst the debris, adding a captivating narrative element to your model.
Beyond being a formidable leader, this Captain also presents an enticing canvas for painters. With various textures and intricate details, it provides an ideal opportunity to showcase your artistic prowess and craft a miniature that captures the essence of this seasoned veteran of innumerable battles. Whether you’re a seasoned hobbyist or just starting your journey, this Space Marine Captain kit promises an engaging and rewarding experience.
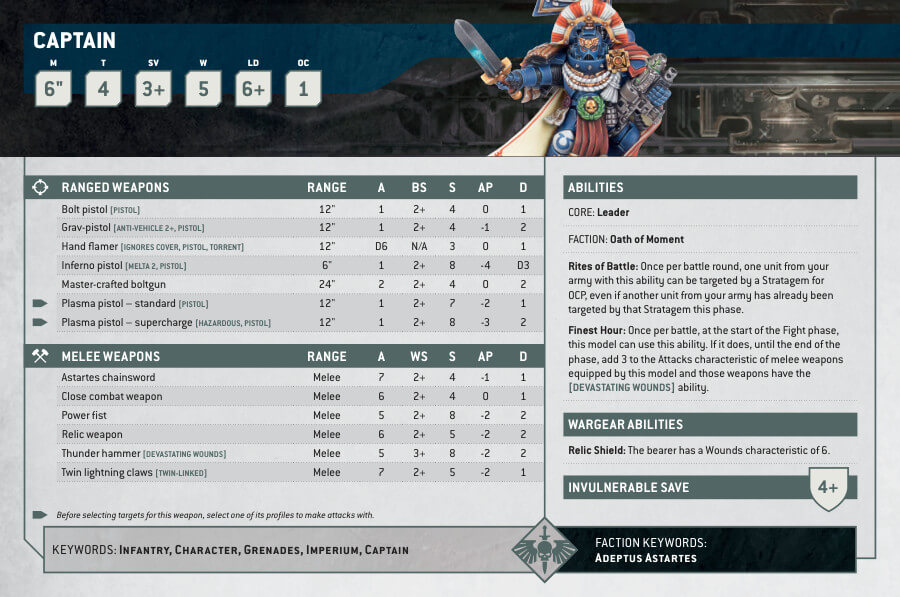
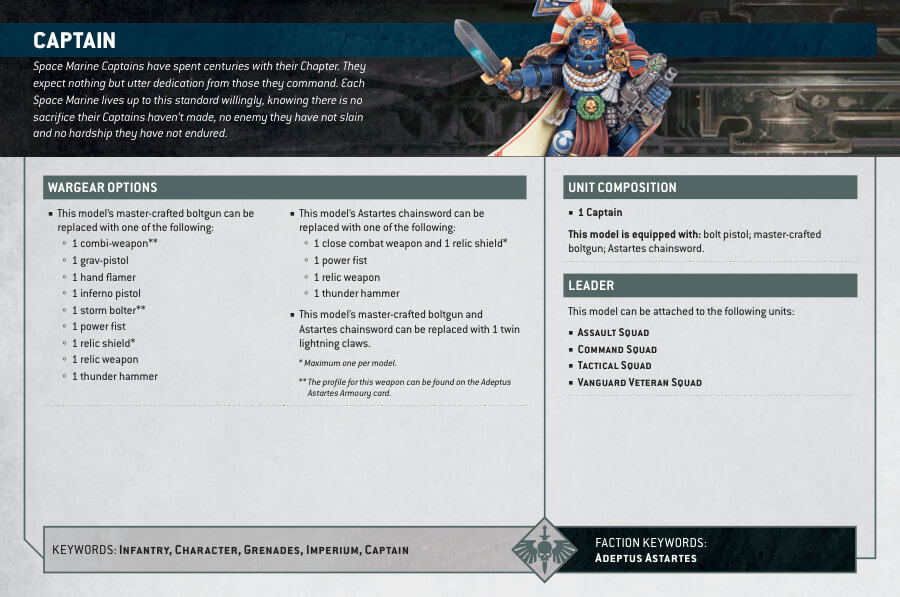
Captain with Relic Shield Datasheets
What’s in the Captain with Relic Shield box
- x15 plastic components that make 1 Space Marines Captain with Relic Sheild miniature.
- x1 Citadel 40mm Round Hex Hole Base.
How to paint the Captain with Relic Shield set
- Step 1: Prime the Miniature
Before you begin painting, it’s crucial to prime the miniature. Priming provides a consistent base for your paint to adhere to. Use Chaos Black primer for darker color schemes or White Scar for a brighter base. Ensure you apply the primer evenly and allow it to dry completely. - Step 2: Basecoat the Armor
Start by applying Macragge Blue to the Captain’s armor. To achieve a smooth and even coverage, it’s advisable to thin your paint slightly with water. Apply multiple thin coats if necessary to achieve the desired opacity. - Step 3: Add Depth with Nuln Oil Shade
To create depth and shadows on the armor, apply Nuln Oil shade. Concentrate on the recessed areas and edges of the armor. This will make the details stand out and give a realistic appearance. Ensure the shade dries thoroughly before proceeding. - Step 4: Layer the Armor
Using Calgar Blue, layer the armor while avoiding the shaded areas. This step adds dimension to the armor, enhancing the mid-tones and creating a transition from the base coat to the highlights. - Step 5: Highlight with Fenrisian Grey
Highlight the raised areas of the armor with Fenrisian Grey. This step adds contrast and makes the armor details pop. Be meticulous with your brushwork to achieve a refined look. - Step 6: Paint the Exposed Face
For the Captain’s face, use Cadian Fleshtone. Apply this paint carefully, capturing the facial features and contours. To add depth and realism, consider applying a wash like Reikland Fleshshade and blending it carefully. - Step 7: Details
Detail the Captain’s sword with Leadbelcher or Runefang Steel for a metallic appearance. Apply shades like Nuln Oil to add depth, especially in the recesses, and use Ironbreaker to highlight the sword’s edges. For the destroyed Necron, use Runelord Brass or Hashut Copper to achieve the classic Necrons armour look. - Step 8: Weathered White Shield
For the Captain’s shield, use Pallid Wych Flesh. Add bronze details, such as the rim and ornaments, using Balthasar Gold. This adds character to the shield. To make it look weathered, consider applying Typhus Corrosion or Ryza Rust to specific parts of the shield that you want to have rust on. Don’t overdo it, for a natural look. - Step 9: Clothing and Additional Details
Paint the Captain’s clothing and various other details with Zandri Dust. This color complements the blue armor and adds contrast. For gold or metallic details, you can also use Retributor Armour or just stick to the previous metallic paints you used. - Step 10: Basing
To create a thematic base, use Texture paints like Agrellan Earth or Stirland Mud. After the texture paint dries, paint the base to match your chosen theme or battlefield. Add static grass or tufts to enhance the realism of the base. - Step 11: Enhancing Intricate Details
Detailing is essential to bring your miniature to life. Consider using Citadel paints like Blood for the Blood God for creating realistic gore effects. Apply it to areas where you want a blood effect, like weapons or wounds. Afterward, add a touch of Lahmian Medium to achieve a glossy, wet appearance. - Step 12: Layering Components
Consider layering components like insignias or decorations with different colors to make them stand out. Utilize Auric Armour Gold to highlight gold accents, adding richness to the miniature’s appearance. - Step 13: Varnish and Seal
To protect your miniature, use Munitorum Varnish, a matte varnish from Citadel. Ensure your painted miniature is completely dry. In a well-ventilated area, hold the miniature at a safe distance and apply a thin, even coat. Allow it to dry thoroughly for a protective, matte finish.

